


Magazine Archive
Home -> Magazines -> Issues -> Articles in this issue -> View
Cubase MIDI Mixer (Part 2) | |
Programming ClinicArticle from Sound On Sound, November 1992 | |
Ofir Gal concludes his hands-on look at Cubase's MIDI Mixer with an explanation of how to use it to control General MIDI hardware.

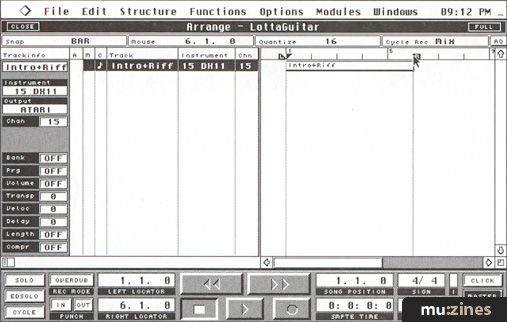
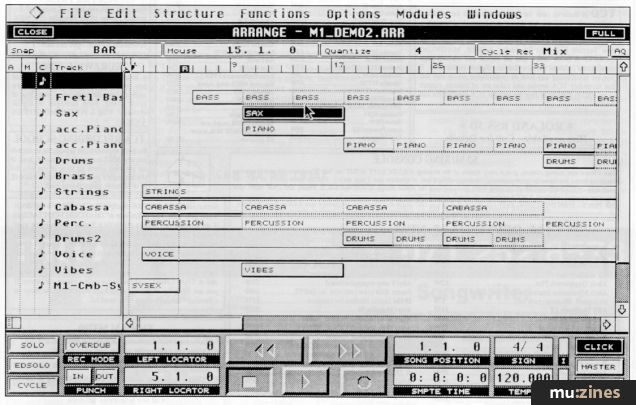
A Completed Cubase MIDI Mixer page for controlling General MIDI instruments. For each channel you can set volume, pan, bank select and program number.
Last month we took a look some of the possibilities of the Cubase MIDI Mixer, and worked through an example of how to create an editor for the Oberheim Matrix 1000. This month I'd like to finish off by showing you how to use MIDI Mixer objects to control hardware that supports General MIDI.
As you may know, the original MIDI spec allowed for, among other things, 128 controllers and 128 program change numbers. At the time, this may have seemed more than generous, but now that MIDI is over 10 years old, 128 program changes are less than sufficient. General MIDI was introduced to overcome some of the perceived shortcomings of the original MIDI spec, and there are now several synthesizers available that support General MIDI — these include the Roland Sound Canvas, Yamaha TG100 and Korg 03R/W. Although General MIDI is a recommended rather than compulsory practice, and has arisen in part out of a desire to make MIDI more popular in the non-professional and multimedia markets, many of its features are bound to be included in future professional products. The MIDI Mixer enables you to access many of these new features.
BANK CHANGE
The bank select controllers are welcome additions to the spec; these previously unused controllers will now enable bank changes from your sequencer, and this feature is directly supported in Cubase via the Inspector and playback parameters. However, using the MIDI Mixer will give you better control over bank changes because of the way different manufacturers have decided to implement these newly defined controllers.
MIDI parameters can only take 128 values, ranging from 0 to 127, so it used to be the case that you could only choose between 128 patches via MIDI. When General MIDI was under discussion, it was decided to allow for a larger number of possibilities — to support a staggering number of 16,384 possible banks, General MIDI designates two controllers for bank select, and these are controllers #0 and #32. Using a combination of two controllers it is possible two send values higher than 127. Controller #0 is referred to as the MSB (Most Significant Byte), while controller #32 is the LSB (Least Significant Byte), and each controller can take a value between 0 and 127. Setting the MSB to zero, you can change the LSB to any value between 0 and 127, thereby selecting one of the first 128 banks. If the MSB is set to 1, the LSB is then used to select one of the next 128 banks, effectively banks 128 to 255. If the MSB is set to 2... You can see now that the total number of possibilities is 128*128=16,384.
A bank select message therefore consists of two controller events which must be sent together. The format of a bank select massage is:
| B0 | — control change status byte |
| 00 | — controller #0 |
| MSB | — 1st value |
| 20 | — controller #32 (20 hex) |
| LSB | — 2nd value |
The need for more than 128 banks has not yet arisen — remember, each can contain 128 programs — let alone 16,384 banks, and so most manufacturers only use the MSB to change banks while the LSB value is either ignored or expected to be zero. In any case, both MSB and LSB must be sent, otherwise the message will be ignored. This means that when using the Inspector bank change, multiples of 128 are used. To change from bank 0 to bank 1, change the value from 0 to 1*128=128; bank 2 is 2*128, and so on. If this sounds confusing, well... it is. Using the MIDI Mixer is much easier in this case. The message line should be:
B0, 00, xx, 20, 00
The value range should be 0 to 127, and a dial is probably the best object for the purpose. The LSB is simply set to 0 and we only have the MSB as a variable. A bank change message has no effect if not followed with a 'normal' program change, so care has to be taken when actually recording bank and program change events.
BANK CHANGES AND THE TG100
Yamaha's increasingly popular TG100 expander has its own peculiar voice memory arrangement. On the TG, four voice banks are available to the user, but only bank 1 (the General MIDI bank) is accessible with standard program change messages. To remotely access the other banks you need bank select messages. To complicate matters even further only the MSB is used, and values 0 to 63 call up the standard bank, 64 to 111 for the Internal bank, MSB values 112 to 126 will enable the Disk Orchestra bank, and, finally, setting the MSB to 127 will access the C/M voices.

An example of how you could arrange four such TG100 Bank select switches with another object to select programs. G, I, C And D stand for, respectively, General MIDI, Internal, C/M, and Disk Orchestra.
You can, of course, use the object described earlier to access the four banks, but this means that you would need to scroll up and down the whole value range each time you want to change a bank. A neater arrangement would be to create four switches, one for each bank. But how can this be achieved?
The object menu in the MIDI Mixer has a switch object, but a hidden feature is the ability to choose between two different types of switches. One is the 2-way switch while the other is a 1-way switch which sends the same message each time it is pressed. The idea is simpler than it may sound, and simply involves how you choose minimum and maximum values for the switch object. If the minimum value is set to 10 and the maximum value to 20, when the switch is pressed in a value of 20 is sent, and when the switch is pressed out the minimum value, 10, is sent. If, however, minimum and maximum values are the same, the switch behaves differently — it always sends the same value. You can create four switches like that, one for each bank. The first will have its minimum and maximum values set to 0, the second set to 64, the third switch will be set to send a bank select value of 112 and the fourth set to 127. To change a bank now all you need to do is click on the appropriate switch, and then use the program change dial to select the sound. Other synthesizers may have different bank numbers, but the principle still applies.
REGISTERED AND NON-REGISTERED PARAMETERS
These have been with us for a long time but have never received the attention they deserved until the advent of General MIDI. The idea behind registered and non-registered parameters is to enable the user to edit sounds without resorting to system exclusive messages — see box on 'RPNs, NRPNs and Running Status' if you're not familiar with how they work. The registered parameter numbers (RPN) currently in use are:
| #0 | — pitch bend range |
| #1 | — fine tune |
| #2 | — coarse tune |
New registered parameter numbers are defined from time to time by the MMA, while non-registered parameter numbers (NRPN) may be used in different ways by different products.
An RPN or NRPN parameter change message defines the parameter number, and then the value. Again, to accommodate more than 128 values, the MSB+LSB system is used, which means that four discrete MIDI events are used to change a chosen parameter. The format for the message in hex is:
| B0 | — control change status byte |
| 64 | — RPN LSB (62 for NRPN) |
| LSB | — LSB part of parameter number |
| 65 | — RPN MSB (63 for NRPN) |
| MSB | — MSB part of parameter number |
| 26 | — data entry LSB |
| LSB | — LSB part of value |
| 06 | — data entry MSB |
| MSB | — MSB part of value |
The first part of the message selects the parameter; the second modifies it.

Four faders using NRPNs to edit sound parameters on a General MIDI module. The dialogue box below is the object Definition for the 'Rel' (release) Switch for the Part 1 fader.

For most parameters we only use the MSB data entry (controller #6) to edit the parameter, and so this will be the variable in the object message. To coarse tune a sound, create an object with the following message:
| B0 | — control change status byte |
| 64 | — RPN LSB |
| 02 | — LSB part of parameter number |
| 65 | — RPN MSB |
| 00 | — MSB part of parameter number |
| 26 | — data entry LSB |
| 00 | — LSB part of value |
| 06 | — data entry MSB |
| xx | — MSB part of value |
The value range is the standard 0 to 127, and because the default setting of most RPNs and NRPNs is 64 it can be useful to set them centred. Another option to create switch objects, one for each parameter, then use the data entry slider on your master keyboard to change them. The message format to change the filter resonance on the Roland Sound Canvas for example is:
| B0 | — control change status byte |
| 62 | — NRPN LSB |
| xx | — LSB part of parameter number |
| 63 | — NRPN MSB |
| 01 | — MSB part of parameter number |
| 26 | — data entry LSB |
| 00 | — LSB part of value |
The minimum and maximum values should be 33 for resonance. The last controller #6 event will be sent when you move the data entry slider on your master keyboard. If your keyboard does not have a data entry slider you can of course create one on screen. When you click on the switch, the receiving synth will be set to respond to controller #6 and change the filter resonance.
Several synthesizers support RPNs and NRPNs which are normally listed in the MIDI implementation chart at the back of the manual (see box for further information on using RPNs and NRPNs). The Roland Sound Canvas 'family' allows you to edit parameters that are not accessible from the front panel. You can use NRPNs to change LFO rate, depth and delay, filter cutoff and resonance, and more. Even the drum kits can be edited via NRPNs — you can change the pitch, level, and reverb send for each drum sound in a kit.
Having such control on your equipment in real time can really make a difference. You could, for example, open reverb on the snare drum in choruses, then turn it back down for the verse, or change the pitch bend range half way through a sax solo. Changing the attack time on strings will enable you to rapidly change from fast arpeggios to slow and mellow pads. There is no limit (well, almost no limit).
RECORDING EVENTS WITH THE MIDI MIXER
Now that you have all these wonderful MIDI Mixer objects, you are probably wondering what is the best method for recording the events generated by the objects. Well, like any other function of Cubase, there are several ways of going about recording MIDI Mixer events. Whichever method you end up using, there are some guidelines taking into consideration the way MIDI works, its event priorities and timing constraints.
To enable full event chase throughout a song, it is best to create one long part to the length of the song for each Mixer map. Event chase means that even if you start playing in the middle of a song, all banks, program changes, and any other Mixer events will be correctly set.
If you rewind or fast forward Cubase while in the MIDI Mixer you will be able to see all faders and switches updating their positions. Using one long part for Mixer events also makes editing easier, as you will see later.

The Object Definition dialogue box to create a 'single value' switch, to send a bank select message to select the Disk Orchestra bank on a Yamaha TG100. Note that only the MSB (Most Significant Byte) is used in TG100 bank select messages.
RECORDING MODES
The MIDI Mixer can be in one of three modes - Local, Write and Replace. In addition there is a snapshot facility which enables you to take a snapshot of selected objects and recall those later. In local mode the Mixer is active but events are not recorded; this is useful for trying out new objects etc. Write mode enables recording of Mixer events; when you move a fader or press a switch, a special Cubase event is recorded at the current song position, even if Cubase is not playing. To record some events, rewind Cubase to the beginning, make sure the Mixer is in write mode, then press play and start moving the objects on screen. Now rewind Cubase again and press play. This time the objects will move on their own, sending out the MIDI messages according to their position. You do not have to set Cubase playing to record Mixer events. To accurately insert events, simply advance the song position to the required place, then move the object; only the last event, or last object position will be recorded.
If you are not satisfied with a Mixer recording there are several options, the simplest one is to delete all events on the offending object. The toolbox enables you to delete all events before or after the current song position, or between the left and right locators — simply select the tool then click over the object. If you want to delete all events on all object between the locators select the Delete Range option from the Local Menu.
Alternatively, to overwrite events, click and hold down the mouse button over an object while Cubase is playing. Any old events will be erased and new ones will be recorded if you also move the object. As soon as the mouse is released, normal write mode is resumed.
Replace mode works differently — when you move an object the last recorded value on the part is replaced by the new value. If no events are found before the current song position, a new event will be recorded at the beginning of the song.
SYSTEM EXCLUSIVE EVENTS
It is important to remember that MIDI gives priority to SysEx messages, and that when SysEx events are transmitted other events are always delayed. If you are going to use SysEx objects it is best to record the events in an empty 'countdown' bar at the beginning of a song. To insure that all SysEx messages are properly received, and that they do not overflow the receiving synthesizer MIDI buffer, make sure you leave a gap between events. Most synthesizers require a time gap of 20 to 40ms, so 30 or 40 ticks between each event are recommended. It is not a good idea to record SysEx events while Cubase is playing, as this may simply 'choke' your system. Instead, use the step mode recording described earlier. In general, if you can do the same job with controllers, SysEx is best avoided.

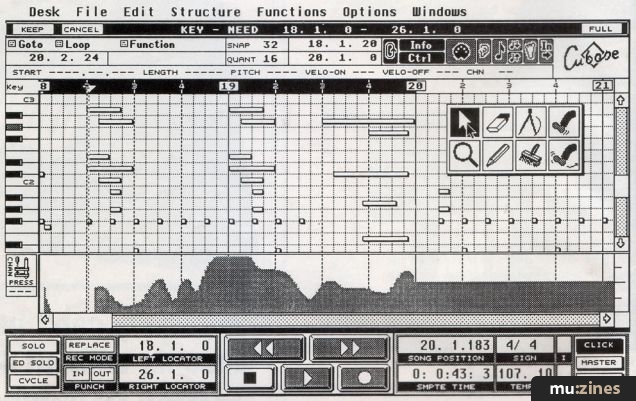
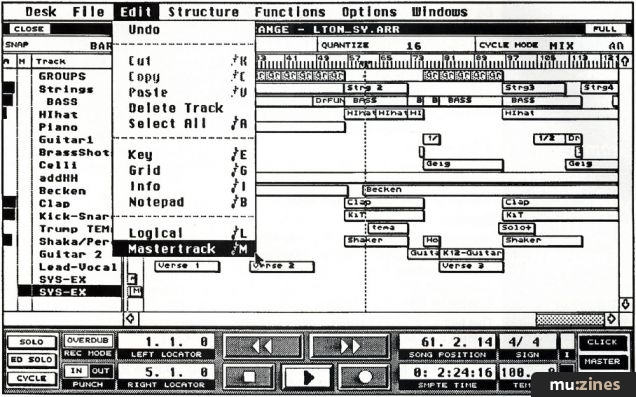
Using the List Editor in Cubase to edit MIDI Mixer Events that have been recorded into a track.
EDITING MIXER EVENTS
You can use the List Editor (formerly Grid Edit) to edit MIDI Mixer events. You cannot, however, access the List Editor directly from the Mixer page, and you must Keep your recording beforehand. You will be amazed at the amount of data the Mixer can create when you look at the event list. Cubase has some options to help you sort out the 'mess' on screen. First, drag the parting line to the right until you can see the names of all objects. Next select one event on the object you want to edit. Now click on Mask and select mask it. This will result in Cubase filtering all other objects from the display so that only the events on the selected object are visible. All functions like delete, select all etc. will only affect the one object and of course, you can move, delete, cut and paste, just as with 'normal' Cubase events. You can even use the logical editor to edit Mixer events.
CONCLUSION
I hope this 2-part article has whet your appetite and that you are now busy building up your own collection of Mixer maps. The MIDI Mixer is a powerful tool, allowing you to access the hidden features of your equipment and I am sure that once you got used to working with it you will be wondering how you managed without it. It may look very technical at first, but the results you can get can be very musical and expressive. The rest is up to you...
A disk with a collection of Mixer maps to complement this article is now available from SOS Software (Contact Details).
RPNs, NRPNs, AND RUNNING STATUS
B0, 64, LSB, B0, 65, MSB
Once the message is received, the data entry slider can be used to change the selected parameter. This is similar to the way in which parameters are selected on the synth itself. You first select a parameter, then use a slider to modify its value.
The Running Status system was introduced to minimise the amount of data passing through the MIDI chain. All modern synths are designed to use status, with the exception of some very early DX7s and drum machines. The idea is that the status byte is only sent once, before the first event, and another status byte is only required when a new type of event is sent. This reduces the amount of data significantly — a 6-note chord would normally require 6x3=18 bytes, but under running status the note on status byte is only sent with the first note. The other notes only need two bytes, because you no longer need to specify that the events are actually notes. The same chord can therefore be defined by only (1x3) + (5x2)= 13 bytes. Running status can also be used with controller events, and the RPN message does not require the second status byte. Under running status, the message is:
B0,64, LSB, 65, MSB (followed by data entry 06,xx)
Even the data entry slider that follows will only require two bytes per event instead of three. Running status can reduce the amount of data by up to 33% and therefore improve timing accuracy.
In the MIDI Mixer, running status is used when defining objects. This only becomes apparent when dealing with RPNs and NRPNs, since more than one event is assigned to the object.
Series - "Cubase MIDI Mixer Programming Clinic"
This is the last part in this series. The first article in this series is:

Cubase MIDI Mixer
(SOS Oct 92)
All parts in this series:
Part 1 | Part 2 (Viewing)
More with this topic
 MIDI Matters - Song Position Pointers (Part 1) |
 MIDI: Past, Present & Future |
 Good Enough For The Pro? - Thoughts on MIDI's Next Decade |
 MIDI - The Absolute Basics (Part 1) |
 |
 The Strange Case of the Singular Digit |
 The Performing Art (Part 1) |
 Signal Processors... Meet MIDI |
 MIDI Theory and Practice |
 The MIDI 1.0 Specification |
 Atari Notes |
 Software Support - Hints, Tips & News From The World Of Music Software |
Browse by Topic:
MIDI
Also featuring gear in this article

Clash of the Titans
(MIC Oct 89)

Cubase 2.0
(SOS Dec 90)

Cubase In-depth
(MIC Jan 90)

Dream Sequences (Part 1)
(MX Dec 94)

Dream sequences (Part 2)
(MX Jan 95)

Dream Sequences (Part 3)
(MX Feb 95)

Dream sequences (Part 4)
(MX Mar 95)

Dream sequences (Part 5)
(MX Apr 95)
Dream sequences (Part 6)
(MX May 95)
Dream sequences (Part 7)
(MX Jun 95)

Hands On: Steinberg Cubase
(SOS Jan 92)


Steinberg Cubase - Version 3.0 Software
(MT Sep 92)
Steinberg Cubase 3.0 (Part 1)
(SOS Apr 92)

Steinberg Cubase 3.0 (Part 2)
(SOS May 92)


Browse category: Software: Sequencer/DAW > Steinberg
Featuring related gear

An Old Pro - Steinberg Pro24 Amiga
(SOS Feb 91)


Macintosh or Atari?
(SOS Jan 88)
School's Out
(MIC Aug 89)


Software Tracking - Steinberg Pro24 Software
(EMM Sep 86)

Steinberg Cubase Audio
(SOS Nov 92)

Steinberg Cubase Lite - For the Atari ST
(MT May 93)

Steinberg Cubeat
(SOS Nov 90)
Steinberg Cubeat - Atari Sequencing Software
(MT May 91)

Steinberg Pro 24 - SoftwareCheck
(IM Oct 86)


Steinberg Pro24 Version III
(SOS Aug 88)

Steinberg Software Page
(SOS May 88)

Steinberg Software Page
(SOS Jun 88)


Yamaha Hello! Music! - computer music system
(MT Nov 93)
Browse category: Software: Sequencer/DAW > Steinberg
Publisher: Sound On Sound - SOS Publications Ltd.
The contents of this magazine are re-published here with the kind permission of SOS Publications Ltd.
The current copyright owner/s of this content may differ from the originally published copyright notice.
More details on copyright ownership...

Sound On Sound - Nov 1992
Topic:
MIDI
Series:
Cubase MIDI Mixer Programming Clinic
Part 1 | Part 2 (Viewing)
Gear in this article:
Software: Sequencer/DAW > Steinberg > Cubase
Gear Tags:
Feature by Ofir Gal
Ads for Gear in this article:


Help Support The Things You Love
mu:zines is the result of thousands of hours of effort, and will require many thousands more going forward to reach our goals of getting all this content online.
If you value this resource, you can support this project - it really helps!
Donations for July 2026
Issues donated this month: 0
New issues that have been donated or scanned for us this month.
Funds donated this month: £0.00
All donations and support are gratefully appreciated - thank you.
Magazines Needed - Can You Help?
Do you have any of these magazine issues?
If so, and you can donate, lend or scan them to help complete our archive, please get in touch via the Contribute page - thanks!