


Magazine Archive
Home -> Magazines -> Issues -> Articles in this issue -> View
Dave Bristow on the Yamaha DX7 | |
Yamaha DX KeyboardsArticle from Electronics & Music Maker, July 1983 | |
Dave Bristow, Yamaha’s keyboard consultant, explains how to play and programme these new FM synthesisers
E&MM takes a trip into the country and finds a new digital programmable algorithm synthesiser in the hands of consultant Dave Bristow. Mike Beecher keeps him talking.
The Basics

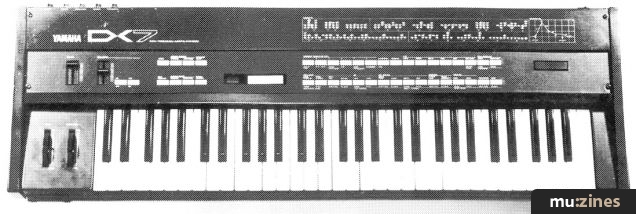
Dave Bristow with the Yamaha DX7.
Dave: Taking the instrument as it comes from the shop, you get the DX7, along with two ROM cartridges. The ROMs each contain 64 memories, giving 128 factory 'primary' voice settings. I don't like to call them 'presets' because it implies they're not programmable. They are very necessary to get you started, because the programming is not easy first time round. You're very familiar with synthesisers, but I bet if you sat and just looked at this, you would not — on a Saturday morning in a shop with a lot of noise going on — have any success.
Mike: So it's a new approach to synthesis?
Dave: Exactly. You have to take the trouble to find out how it works. Once you've grasped the system then there's no problem.
The instrument is a programmable synthesiser that's 16 notes polyphonic all the time — there's no layering of sounds, no splitting the keyboard (other than within a program). It can also be monophonic.
Mike: Does that mean in mono mode you could layer up different algorithms?
Dave: No, it's just one algorithm and I'll explain this function later.
Looking again at the instrument, there's a velocity sensitive keyboard. That's very important. And there's pressure sensitivity too.
Mike: Has the pressure control come from the old CS60/80 instruments?
Dave: The mechanics and keyboard are new for the DX, although the principle is the same — to bring in extra control on further pressure of a key once it's been played. It's quite a smooth control here, but it's not independent for each note. The DX1 does have that extra facility, like the CS80.
Keyboard range is 5 octaves. They're not sprung, they're weighted, with a little bit of inertia.

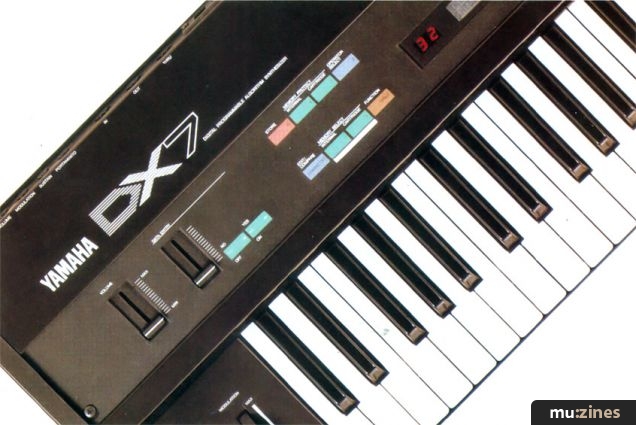
Left hand buttons and LED/LCD.
Mike: You couldn't play those fast accented notes too easily without that?
Dave: I don't think so.
Basically, the next step is to load a cartridge — actually you don't have to do this because the first 32 sounds on the first cartridge are already loaded into the machine. If I put the cartridge with 64 sounds in as well, this gives me access to 96 memories in all. The first 32 in the DX represent a general selection of the 128.
Looking at the instrument's control panel, there are buttons to the left and right of the LCD. There are 145 parameters for each voice and 23 programmable performance parameters which come after the voice programming. All these parameters are set with just 40 buttons. Therefore, the first thing to learn about programming is to find how to access the parameters.
The basic principle for setting up a parameter is to first select a function button at the left, then a parameter button at the right.
There are 2 left hand green buttons for memory selection of internal and cartridge sounds. The LCD shows which you've selected and since only 32 memories are available in one go, the other 32 on the cartridge are selected by a switch on its case.
The brown 'Function' button selects all the brown legended functions under the right hand switches. For example, button 1 is now Master Tune and you adjust it with the Data Entry controls on the left — there's a slider for continuous 'step' changes (shown on the LCD as a number) and two green buttons that give -1/+1, no/yes or on/off setting.
Functions
The Master Tune adjusts the pitch 75 cents each way. Next there's selection of Poly or Mono; two controls for Pitch Bend — one for Range from 0 to 12 semitones up or down smoothly and Step for discrete intervals over the same range (both operating from the Pitch wheel at the left of the keyboard).
There are 4 portamentos, depending on whether you're in Mono or Poly — two each. The most useful set-up requires you to connect an external Portamento switch (single contact make/break type which is an optional extra). A mono mode shows 'Fingered' on the LCD and that gives automatic portamento between two notes. This is a great playing feature and works only when the first note is held while playing another note (legato style) — it came from Yamaha's CE25 keyboard.
When you change back from Poly mode, the portamento is only effective when you press the footswitch. It's nice to have these alternatives. In addition Glissando can be dialled up instead of portamento and a Time button sets the rate of change from 0 to 99. A good portamento is around 70.
Button No. 8 is actually the MIDI. You can choose 16 channels of MIDI. In other words, if you've got 16 of the DX's (!) linked up in series, and you've got a sequence going on computer, I guess you could link a different channel to each note. The idea is that each synthesiser will only play its correct line in a polyphonic sequence. Connections are made with MIDI IN, OUT and THROUGH DIN sockets. The DX machines are the first to have the 'Through' socket for series link up. Normally I send down Channel 1, setting this on the LCD.

Wheels, volume and data entry controls.
The MIDI button also shows at a second press whether 'System Information' is available or not. When it is, I can send modulation wheel pitch as well as note key codes. Otherwise 'System Unavailable' will just send the key codes and memory number. Also, memory program data can be sent to the computer or another machine for setting up sounds from one 'base' instrument. I've used it for transferring and storing memories, and to save storing DX9 sounds on its cassette interface, I use a DX7 to store all the sounds.
When you're in System Available, the next press of the button will give you 'Save to Midi', sending the program data through the interface.
Of course, most people won't use the Midi straight away and there are other 'hidden' features built in to the machine for doing 'test runs' that go through a check procedure and display the status of the system on the LCD.
Moving on to other functions we have 'Edit Recall'. Pressing this puts the question 'Are You Sure?' on the display. This will recall the last edit you made in programming a sound (on entering 'Yes') from a separate buffer storage space — apart from the 32 memories.
That's quite important because accidents can happen with someone changing something, and this function puts you back to exactly where you were. It is possible, for instance, to make a program and store it, but make a wrong move in the process — losing the edit. In other words, if you press the Memory Select without storing, you'd go into the Memory Select mode, and the next time you press the Edit button to try and get back to your original edit, you wouldn't, because it would be the new memory. Therefore, to get your program back you just press Edit Recall.
The next function is 'Voice Initialise'. This will put the machine into a 'flat' state from which to program: Square 'organ-type' envelope, Algorithm No. 1, outputs down to zero, no key scaling or velocity sensitivity — an easy point to begin.
'Battery Check' shows current battery voltage on the LCD — the battery that holds the memories during switch-off. Anywhere between 2.6 and 3.3 volts is okay. Battery life should be about three years.
There are two cartridge operations — Save and Load. That enables transfer of all 32 memories at once to and from the RAM cartridge, although you can move individual sounds by using the pink 'Store' button left of the LCD.
Mike: How do you actually transfer one sound?
Dave: Say you wanted to put something in the cartridge at memory No. 6, then, with the cartridge buttons (for Memory Select and Protect Off) selected, you simply call up Memory 6 and press 'Store' to transfer whatever you were creating in Edit mode.

Dave going through the controls.
Incidentally, if you turn the machine off, then on again, the 'Memory protects' for both internal and cartridge turn on automatically.
Lower function controls
I'll explain the first four controls along the bottom row, because they're repeated four times. These are what I call 'After controls'. The first group is for the modulation wheel, which is directly next to the keyboard. There's Range and Pitch, Amplitude and Bias on or off. The next group is for external foot 'swell' control, then Breath control and finally After-touch. The latter is a pressure control from the keys after normal depression and is not incorporated on the DX9. Neither is the foot control.
Mike: It is really good to have all these controls together at last.
Dave: Yes it is. Range can be set from 0 to 99 maximum so that will modulate the maximum you have allowed on the program. The effect takes place 'around' the note.
Mike: That's fine for sine wave vibratos, but isn't it awkward for square wave trills?
Dave: I do reset the pitch for this by adjusting the MasterTune function. Of course, whatever the LFO is doing is built into the individual program. This section is just for changing the sensitivity of each controller. Pitch, Amplitude and Bias are all on and off selectors. If Pitch is off, then no amount of modulation wheel movement would affect the pitch. All on and off selection is done with the Data Entry controls.
There's a suggested setting for these parameters, when you buy the machine, which works for the cartridges. Basically the range of the modulation wheel is set on maximum and it's affecting the pitch only. Breath control should be set at 99 and Pitch off so that the Breath control affects only the EG Bias, which is really the 'envelope' of your sound. After pressure is useful for controlling Pitch just like the modulation wheel but to a much finer degree. When you plug in a cartridge, you need to set your performance parameters, as these are not stored on the cartridge. The DX1 does remember voice and performance memories, which is a big advantage.
The pink 'Store' button is used for keeping your edits, transferring memories from one position to another with in the machine, for taking one memory from the machine to the cartridge or one from the cartridge to the machine.
To the left, we have the two Data Entry buttons and Data Entry slider. Any change to settings has to be done via these. Finally, there is a master Volume control fader.

Right hand multifunction buttons.
On the front panel of the machine below the pitch wheel is a phono socket for headphones which gives a mono output, and a 3.5mm jack socket for the Breath control device. On the rear panel are standard jack sockets for Output, Volume, Sustain and Portamento on/off pedals. There are also the three 5-pin DIN sockets for the Midi In, Out and Through connections.
Creating sounds
Across the top of the DX7 you have diagrams of all 32 algorithms to refer to whilst creating your sound. To start with it's probably better to learn how to look at the data initially before attempting to construct a sound of your own. For example, on the preset flute sound you may decide you want more or less of the 'breath' sound, in which case you need to identify what is creating that feature.
Basically the colour of any of the sounds has to do with the frequency ratio of the sinewaves contained in the algorithm. The depth or brilliance of this 'colour' is due to the Modulation Index, which is the relative outputs of these sinewaves. The tone is the most likely thing, along with envelope, that you'd wish to edit. To do this you press the Edit/Compare button. Every single button on the main panel then has an edit function indicated by the mauve lettering. The first six on the top line of buttons turn the Operators on or off, their status being displayed on the LCD as a row of combined 1's and 0's; 1 is on, 0 is off. When in this Algorithm Select mode, the algorithm number can be changed by moving the Data Entry fader control. The easiest way of discovering what feature is creating the flute breath sound is to systematically turn all operators off except one, and then add them one at a time using the Operator on/off buttons on the main panel.
Operators 5 and 5 are giving that breathiness and if algorithms 5 and 6 are examined, you find that the sound always comes down through a bottom operator in the Algorithm lay out. In other words, if you turn this off, everything goes. The bottom Operators are the 'carriers' and the others modify them. So, if I now select Operator Output Level (button 27), then Operator number 5 (with the Operator button), the output level value appears in the display alongside the rest of the information.
Knowing FM synthesis, I know that it would be more satisfactory to actually increase the level of Operator number 5, even though number 6 is controlling the breathiness, as this would give a more general lift in output around the area of 5 and 6.
The loop on an algorithm diagram implies feedback, which can be used to get white noise and sawtooth-type waves as it's reproducing itself and the characteristic of that gives sawtooth waveforms. If you do it a great deal it becomes unstable and oscillates.
Each Operator has an output level from 0 to 99, and increasing number 5 Operator level, increases the breath sound on the flute.
Mike: It's a very delicate control that would take you hours of normal synthesis to reproduce — you couldn't actually do it really.
Dave: No, you couldn't even begin to. In terms of editing that's how you look at the data, so if you turn the Operators on and off, you'll find out which Operators are producing which aspects of the overall sound and then you look at their output levels and adjust them a little bit. That's one way of doing a useful edit.
If you want to change the envelope (EG Rate and Level) then you'll find that the envelope of the carrier is the overall envelope because the sound has to come through it, therefore that is like the 'commanding' envelope. Some algorithms have two carriers in which case you need to change both, as they are totally independent.

For example, algorithm 6 has three carriers — all independent. It is just 6 sinewaves. You're dealing with a Hammond organ there or a very limited additive synthesis. There are 32 algorithms and an algorithm is basically a different way of connecting the six Operators. In reality, there aren't that many ways of connecting six things usefully.
Mike: Are you already finding with the DX7 that there are restrictions in the sound creation possibilities?
Dave: No, not yet. I've come nowhere close to the edges yet.
Mike: Let's just move in a logical fashion through the other soundmaking controls.
Building up a sound
Dave: If I initialise a voice, we're looking at algorithm number 1. Operators 2,3,4,5 and 6 have zero output so you're just hearing one sinewave. There's no key scaling up and down the keyboard so what I'm going to do is look at Operator number 2. The frequency ratio, if we check, is 1:1, but you find the output level of Operator 2 is zero. You can change the ratio by altering the frequency of Operator 2, and hear FM working. Key scaling is the amount of presence of an Operator over the keyboard.
Let's have a look at it the other way around. If I take the frequency of Operator 1 up to level 3, this time the audio signal has increased because we've multiplied the original thing by 3. Then by introducing Operator 2 the tone changes dramatically.
That's just one FM pair, not touching the envelope — just looking at the frequency ratios and the output levels. That's how you start, by listening to an FM pair and see what they do. A pair refers to the vertical in-line Operators.
Then you start listening to three Operators. More than this would be too much to take in at the first attempt because the ratios become too complicated. You always start at the bottom of the algorithm diagram because that's where the sound originates from — the carriers. It's impossible for the mind to retain all the different values, but you get a feel for how things sound. In other words, if the frequency of 1 (the carrier) is higher than the modifier, then as long as the modifier's output is high, there's a lot of modification; the dominant frequency in this case would be that of the modifier creating a very hard, nasal sound. If it's the other way round the sound becomes more mellow.
The beauty of it is that the final tone is simply based on these two controls — Frequency and Output level. Even in this simple exercise we are doing now, I can adjust the output of Operator 2 by changing Key Velocity so that the tonal variation is altered considerably.
The red LED next to the LCD displays the memory number you are currently working on. When you are selecting memory this changes so that you always know which one you've selected.

The DX7 opened up.
To select an algorithm, you press the Algorithm button (7) and move the Data Entry slider until you reach the number you require. Having created a voice with the Operators, if the sound is not quite right, you can step through the different algorithms and hear how each one sounds, then choose the most appropriate one for the sound you want.
Mike: Say you've prepared a whole set of 32 sounds for a concert and just want to work something else out for a while.
Dave: You can always compare of course, maybe use a RAM cartridge for your searching about.
Mike: Yes, you might want to try it with algorithm 1 and get so far, then try algorithm 4.
Dave: Probably, it's more likely that you'd use a cartridge for your concert performance and keep the machine free for changing bits and storing things, and the RAM cartridge extends the memory from 32 to 64 sounds.
Feedback and Frequencies
Mike: Feedback is the other control, what does that imply?
Dave: Feedback refers to the amount of feedback occurring on the Operator that has the 'loop' shown on the algorithm. The amount of feedback ranges from 0-7, and all it does is to stack the Operator up on itself.
For example, if I select algorithm 2, that moves the feedback to Operator 2. Now we're listening to Operators 1 and 2, and here you'll find the feedback is zero so I'll increase the output level of Operator 2, with frequency ratio of 1:1.
Now if I change feedback to maximum, which is 7, you'll hear a sawtooth wave. If I go any higher it will oscillate, creating noise. This is a good start for a brass sound.

Yamaha DX9.
The principles are very simple after a while. You need the feedback loop on maximum for a sawtooth wave. If you take one Operator alone you get a sinewave; if you take Operators 1 and 2 in an FM pair (like on algorithm 2) and make the frequency ratio 1:2 you'll get a square wave. If you take a stack of three Operators you can start getting pulse-type waveforms by going with a ratio of 1:2:1.
When you're making changes to the Frequency Fine settings, you're looking for the interesting frequencies — for harmonic chiffs on pipe organs and tympani drums, for example. This is the only machine that can create good tympani sounds without resorting to sound sampling — which gives you good tymps, but in a limited area.
Mike: So, we've now used different algorithms to get nearer to our desired sound and seen how feedback is employed. We've seen how you change the frequency of each Operator using the Frequency Coarse and Frequency Fine controls. What about Detune?
Dave: Detune is another interval between each Frequency Fine step — plus or minus 7 points in between. So it's an even finer frequency control. This can be used to detune pianos for example, depending upon whereabouts you are in the frequency range. Sometimes, one point of Detune will give you an enormous pitch change if you are a long way away.
Sync locks the operator frequencies together. Sync also has another important function — it releases the Operators. Pressing Sync (button 17) causes 'KeySync' to appear in the display. Pressing this button a second time changes the display to Oscillator Mode, and the display reads 'Fixed Frequency'. You press the No/Off button and it says 'Frequency Ratio'.
Frequency Ratio is the normal thing where the frequency changes as you play a different note on the keyboard. Fixed Frequency lets you play the same frequency all over the keyboard. Alternatively you can fix the frequency of one Operator so that playing different notes will cause a ring modulation effect to be produced. You can change each Operator to a fixed frequency, which would allow you to have more of a ring modulation effect, also you can use it as a means of gentle, slow modulation like a vibrato.
The lowest frequency available on the machine is 10 Hz and the highest is 9,550 Hz, but that's only on Fixed Frequency. Frequency Ratio goes much, much higher.
LFO
LFO wave gives triangle, sawtooth down, sawtooth up, square, sine and sample and hold. Speed ranges from 0-99, Delay from 0-99 (maximum time delay = 3 seconds), PMD is the Pulse Modulation Depth. There are three controls available which affect this depth. There's the Pulse Depth within the LFO, the overall Mod Sensitivity for the brown coloured controls (wheel, foot, breath and aftertouch), and the actual setting of each group of these controls for modulation. There are similar controls for Amplitude Modulation Depth (AMD), which changes the output level of the Operators.
LFO Sync causes the LFO to retrigger at the start of each new note rather than be free-running.
EG and other functions
This is an interesting envelope generator with Rate and Level setting; it has to be a good one, because it's changing the output of the Operator and it's their output which is giving you the waveform. It's an 8-stage EG with four Rates and Levels accessed on the LCD for ADSR portions of the envelope.

RAM and ROM cartridges.
Keyboard Rate Scaling makes all the Rate values a little more faster towards the top of the keyboard, so you can simulate acoustic instrument sounds which tend to tighten off the higher you play.
Keyboard Level Scaling has Break Point, Curve and Depth functions. Break Point is defined as a key from C8 down to A-1. The Curve can be linear, exponential, minus or plus, right or left. Depth determines the depth of the curve from 0-99 with centre at 0.
Mike: How do you set these parameters?
Dave: There are some sounds you want to scale out from the bottom because there are nice overtones that you need at the bottom of a piano, say, that you don't want at the top, and vice versa. You use this Key Scaling for every Operator.
Imagine that if you make an envelope with Keyboard Rate Scaling equal to 0, then the Rates at the bottom of the keyboard are exactly the same as those at the top. If you set Rate Scaling at the maximum of 7, then the Rates at the top of the keyboard are significantly shorter than those at the bottom.
The Operator has adjustable Output Level to give you the basic Modulation Index and amount of envelope that is happening. Key Velocity Sensitivity is the sensitivity of that Operator to keyboard touch, not pressure. The velocity sensing is simply the speed between the two contacts. The feature is great for dynamics, as you can specify exactly where you put the velocity sensing.
Once again, it's a case of this factorial 7 business, there's 7 levels for each Operator and 6 Operators.
The Pitch EG is selected from buttons 29 and 30 and has Rate and Level controls. The envelope is exactly the same as the ordinary Operator EG; with Key on or off and 4 Rates and Levels that you can set.
It's worth mentioning that each note functions independently, with 6 operators for each of the 16 notes you can play. So each note is a synthesiser in its own right, completely independent, which can give the impression that you're playing a lot of synthesisers simultaneously.
The Key Transpose on button 31 affects the overall keyboard pitch and you set this parameter by pressing Key Transpose and touching the key you want, which then becomes the equivalent of Middle C.
The final button in the edit/compare group is for Voice Name. This lets you assign your own name to any voice using numbers or letters (dotted around the various buttons of the DX!) and 'typing' them on the LCD. These front panel buttons are very sensitive, with a physical click to them.
The DX keyboards have been in the pipeline for three or so years before the GS-1 and the FM in these machines is far more sophisticated than in the GS-1 and GS-2. With the machine you get 2 ROM cartridges, but you have to by the RAM packs.
The MIDI Through connection we discussed earlier lets you link several DX keyboards in series. It sends the touch and pressure sensitivity down the MIDI also. In other words if you're going from a DX7 to a DX9, you go through the DX9 into another DX7. You only really need a foot volume pedal for the DX9. Since the DX9 can't accept pressure sensitivity information, it ignores it; but with the three keyboards linked up like this, you can use pressure sensitivity on the first DX7 and send it through the DX9 to the second DX7 to get some fantastic sounds!...
If you want even more details on the DX machines, you'll have to contact Yamaha/Kemble Ltd, Mount Avenue, Milton Keynes, Bucks MK1 1JE. Give them a call on (Contact Details) if you want an interesting catalogue on the DX.
The recommended retail prices including VAT are: DX7, £1,299. DX9, £899.
More with this topic
 The Lazy Guide To Good Synth Sounds |
 A Deeper Wave - Wavetable Synthesis |
 Fun in the Waves (Part 1) |
 'Wee Also Have Sound-Houses' |
 Making More Of The Kawai K5 |
 Guide to Electro-Music Techniques - Synth Performance Controls (Part 1) |
 Synth Computers |
 Practically FM (Part 1) |
 Technically Speaking |
 Sounds Natural - The Acoustic Guitar (Part 1) |
 Patchwork |
 Computer Music at Stanford |
Browse by Topic:
Synthesis & Sound Design
Also featuring gear in this article

BeeBMIDI (Part 3)
(EMM Aug 84)
BeeBMIDI (Part 7)
(EMM Mar 85)


Hands On: Yamaha DX7
(SOS Dec 92)

Load Baring
(12T May 85)

Load Baring
(12T Aug 85)

One For The 7 - DX7 Patch
(ES May 85)

One Off - DX7 Patch
(ES Apr 85)


Sight Reading - Yamaha DX7 Digital Synthesizer
(EMM Apr 85)

Steve Gray on the DX7
(EMM Dec 83)

The Right Connections
(ES Oct 84)

The Synths Of The Year Show - Synthcheck
(IM Dec 85)

Understanding the DX7 (Part 1)
(EMM Apr 84)

Understanding the DX7 (Part 2)
(EMM May 84)

Understanding the DX7 (Part 3)
(EMM Jun 84)

Understanding the DX7 (Part 4)
(EMM Jul 84)

Understanding the DX7 (Part 7)
(EMM Oct 84)

Yamaha DX-7 Synthesiser
(MU Aug 83)

Patchwork
(EMM Feb 84)
Patchwork
(EMM Mar 84)

Patchwork
(EMM Apr 84)

Patchwork
(EMM May 84)

Patchwork
(EMM Jul 84)

Patchwork
(EMM Aug 84)

Patchwork
(EMM Jan 85)

Patchwork
(EMM Feb 85)

Patchwork
(EMM Apr 85)

Patchwork
(EMM Jun 85)

Patchwork
(EMM Jul 85)

Patchwork
(EMM Feb 86)

Patchwork
(EMM Mar 86)

Patchwork
(EMM May 86)
Patchwork
(EMM Jun 86)

Patchwork
(EMM Aug 86)

Patchwork
(EMM Sep 86)

Patchwork
(MT Nov 86)

Patchwork
(MT Dec 86)

Patchwork
(MT Jan 87)
...and 19 more Patchwork articles... (Show these)
Browse category: Synthesizer > Yamaha
Featuring related gear

A Sound Design - Design Studio Programs
(ES Jan 85)

Delirious Xcitement - Yamaha DX7S
(SOS Mar 88)

Double Take - Yamaha DX5
(ES Apr 85)

Expand your DX
(SOS Jan 87)

Hi-Tech Xpansion
(EMM Apr 85)


Pandora's Box
(MIC Oct 89)


Russ DX7 AI Editor
(SOS Apr 88)


Temperament
(MM Apr 87)

The Fifth Dimension - Yamaha DX5
(EMM Oct 85)

The Legend Lives On - Yamaha DX7IID
(SOS Mar 87)

Tips To Tame the DX7II
(SOS Mar 88)

TX7 - To The Limit
(SOS Jun 86)


Yamaha DX5 - Synthcheck
(IM May 85)

Yamaha DX7-IID Synth
(MM Mar 87)

Patchwork
(MT Feb 88)


...and 2 more Patchwork articles... (Show these)
Browse category: Software: Editor/Librarian > Sound Design Studio
Browse category: Synthesizer > Yamaha
Browse category: Expansion Board > Grey Matter Response
Browse category: Synthesizer Module > Yamaha
Browse category: Software: Editor/Librarian > Joreth Music
Browse category: Software: Editor/Librarian > Pandora
Browse category: Software: Editor/Librarian > - (No Manufacturer)
Browse category: Software: Editor/Librarian > Steinberg
Publisher: Electronics & Music Maker - Music Maker Publications (UK), Future Publishing.
The current copyright owner/s of this content may differ from the originally published copyright notice.
More details on copyright ownership...

Electronics & Music Maker - Jul 1983
Feature by Mike Beecher
Ads for Gear in this article:


Help Support The Things You Love
mu:zines is the result of thousands of hours of effort, and will require many thousands more going forward to reach our goals of getting all this content online.
If you value this resource, you can support this project - it really helps!
Donations for April 2026
Issues donated this month: 0
New issues that have been donated or scanned for us this month.
Funds donated this month: £0.00
All donations and support are gratefully appreciated - thank you.
Magazines Needed - Can You Help?
Do you have any of these magazine issues?
If so, and you can donate, lend or scan them to help complete our archive, please get in touch via the Contribute page - thanks!