Magazine Archive
Home -> Magazines -> Issues -> Articles in this issue -> View
Article Group: | |
Dream sequences (Part 2) | |
Article from The Mix, January 1995 | |
More sequencing tips
Is there a doctor in the house? Maybe not, but there's a technician in the techno, as Roger 'James' Brown gets four on the floor in his series of sequencing tips
Sequencing is not just another way of recording data. Used intelligently, it affords many creative possibilities. Not only is multiple copying possible, but data can be manipulated, cut and pasted into whatever shape we require. The facility to alter pitch, velocity, program number, MIDI channel, volume and length of notes makes a sequencer a very powerful tool for generating new ideas out of the minimum of data.
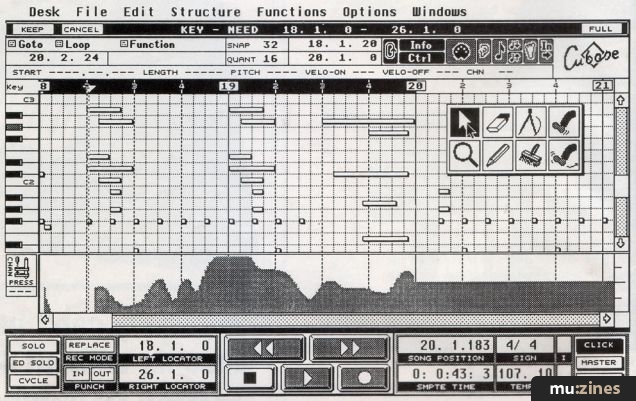
This month I'd like to take a look at a few simple means of generating the basis for a track from that bare minimum of data, the four bar drum loop. The drum loop I'm starting with isn't a sample loop but was generated by another time-honoured method. I simply looped Cubase around eight bars, set the track to send out to a drum kit (in this case an 808 kit on E-Mu's Ultra Proteus) and vigorously cleaned a section of the keyboard, with Cubase set to record.
Four good bars were found in amongst the random phrases generated by this anarchic method, and they were cut up and reassembled into the four bar loop you see before you and can hear on the audio tutorial. While this was looping I opened another track, and set that to transmit to another drum machine, (my humble DR-550) and simply experimented until the Hi-Q sound appeared to sit in the groove.
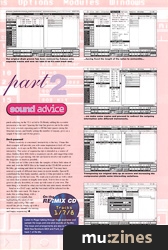
The next stage was to repeat the operation we performed last month, muting all other tracks by selecting solo from the transport bar, then selecting Remix from the Structure menu, to separate the voices on this new drum groove. This time, instead of deleting the original drum track, I opted to turn it into a normal MIDI track, by selecting MIDI from the track class column (marked with a 'c'). Then it was a simple matter to assign that track to another synth sound, by selecting from the list of instruments I defined earlier (as outlined in last month's tips).

Our original drum groove has been remixed by Cubase onto separate tracks and now we take it on it's own track and...
Cycling excursion
With the Inspector active, Cubase allows you to alter aspects of a module's sound such as Velocity, Note Length, Volume and Program Change itself, which lets you cycle through all of the patches on a machine, looking for a sound to spark that all-important creative urge.
First thing to check out here is Note Length. The note length on drum tracks is usually set to the shortest possible parameter, as drum machines do not normally require more than a simple MIDI Note On message to trigger a sound, drum samples being essentially static, fixed length tones. But other synth sounds will require longer note lengths if their timbres are to reach past the attack stage of their envelope.
Cubase allows you to alter the length of notes by 25 degree percentages up to 200%, but this is not enough for us here. The length of drum notes on my Drum Map is a miserly seven ticks, and doubling this to 14 ticks will still produce a very short note. I do, however know the pattern is quantisable to sixteenths, as drum patterns in techno and most other dance music invariably are. So we can elect to fix the length of the notes to this, to provide the basis for further experimentation.
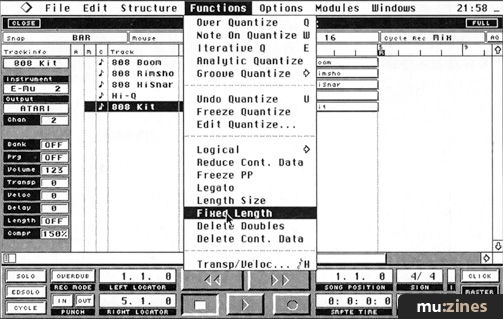
...having fixed the length of the notes to sixteenths...
With the track selected and quantisation set to sixteenths on Cubase's arrange page, simply choose the Fixed Length option from the Functions menu. Cubase then resets the note lengths to sixteenths, and we have some usable notes to experiment with. Right away, the original drum loop has generated an interesting bass groove. Holding down the Alt key and selecting the part with the mouse, we can produce multiple copies of our original part for further sound exploration.
Transposing the whole phrase up an octave from the Inspector has provided one interesting pattern, and a further octave transposition on another copied part yields yet another intriguing patch which seems to sit in there nicely. Once the sound is decided upon for a track, it is named accordingly and the part name altered to reflect its new status too.
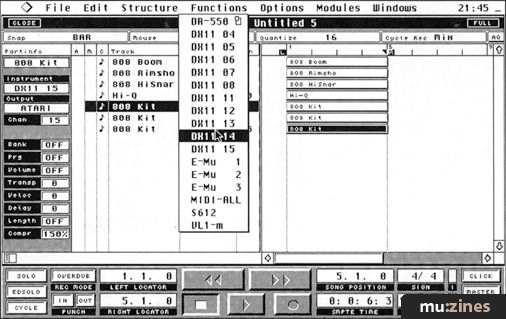
...we make some copies and proceed to redirect the outgoing information onto different instruments.
Further experimentation with the velocity allows us to fine-tune a voice's role in the mix, playing with their reception to velocity values. We can start by using the Compression function, which performs the same 25 degree percentage change on the notes' original velocity values from say, -75% to +200%. Returning that to OFF once we have a rough picture of the value we are after, we can proceed to fine-tune those values with the velocity parameter indicator, adding or subtracting up to ± 128 to the original figure.
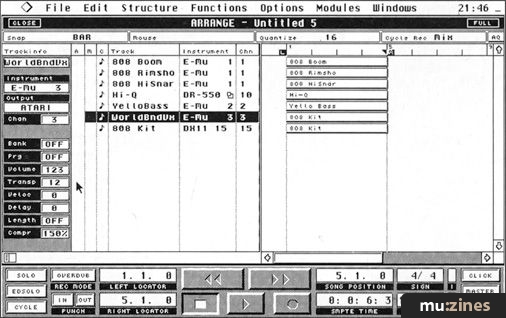
Transposing our original data up an octave and increasing the compression yields some interesting variations.
Finally, we can adjust a voice's level in the mix by use of the Volume indicator. Pressing Alt and F (or selecting Freeze PP from the Structure menu) will change the values of our selected track to those indicated by the Inspector, inserting MIDI Program Change and Volume control messages into our track at the beginning of a part to preserve those settings for posterity.
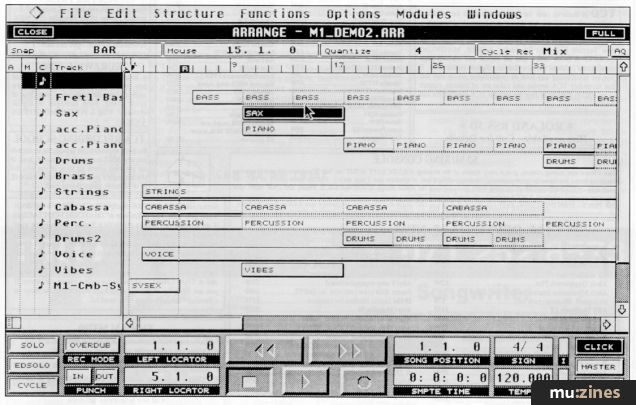
All of that activity has exposed the lack of punch in the original 808 Boom kick sample, and so a further 909 sample is selected and a simple 4/4 beat played in live while all else is looping. The flanging on the original 808's third bar adds an interesting funky feel to the whole thing. At this stage, inspiration took hold and a flurry of patch-selecting on the VL1-m led to Dr Bonky adding his eccentric percussion to the mix! Spacing the four bar grooves out in the order they were selected, repeating parts to fill the later spaces (using the Structure menu), and finally setting the number of repeats, gives us a simple 8 bar intro and 16 bar groove.
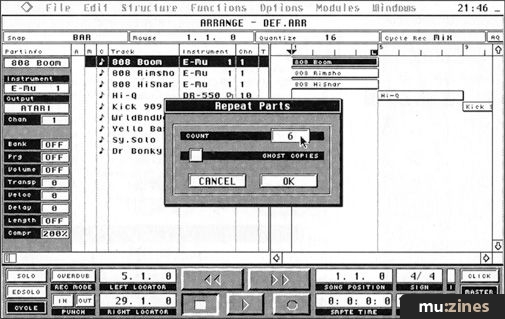
Then it's a simple matter of moving the parts about on the Arrange page and making copies to begin making an arrangement.
Do-it-yourself
Where creativity is concerned, interactivity is the key. I hope this short example will provide you with some inspiration to kick off your own tracks. As it says on Re:Mix, this is where the tutorial gets interactive. This series of sequencing tips is intended as a source of ideas, finding those little tricks a sequencer can do, and suggesting some ideas for you to get mixing, THE MIX are keen to involve our readers in the magazine as much as possible.
To this end we'd like you to take the samples of these little ideas of mine and, with the MIDI files to be found on the CD-ROM section of Re:Mix, get mixing and show us what you can do! You may have noticed a couple of different intro tunes in recent months. Special K contributed the first funky number, and In-2-One provided us with a techno groove for the last issue. We want you to provide us with a short (no more than a minute in length) intro track. You're free to use the grooves already described, or come up with some of your own. The main thing is it should be what you feel the mix intro music should be.
Send us in a DAT copy, and the best track will be selected for the next ReMix intro track. We hope to make this a rolling thing, with a new intro every month, thus highlighting the talent of our readers, and saving Chris and myself the job of coming up with a new idea every month! Get mixing and happy sequencing!
On The RE:MIX CD
Listen to Roger talking through these examples and sample the loops and one-shot sounds on Re:Mix. The loops and arrangements are also to be found as MIDI files Bonkfunk.MIDI and Funk_Law.MIDI on track 1 of Re:Mix
- Sequencing Tutorial
Series - "Dream Sequences"
Read the next part in this series:
Dream Sequences (Part 3)
(MX Feb 95)
All parts in this series:
Part 1 | Part 2 (Viewing) | Part 3 | Part 4 | Part 5 | Part 6 | Part 7
More from these topics
Browse by Topic:
Drum Programming
Sequencing
Also featuring gear in this article
Clash of the Titans
(MIC Oct 89)
Cubase 2.0
(SOS Dec 90)
Cubase In-depth
(MIC Jan 90)
Cubase MIDI Mixer - Programming Clinic (Part 1)
(SOS Oct 92)
Cubase MIDI Mixer - Programming Clinic (Part 2)
(SOS Nov 92)
Hands On: Steinberg Cubase
(SOS Jan 92)
Steinberg Cubase - Version 3.0 Software
(MT Sep 92)
Steinberg Cubase 3.0 (Part 1)
(SOS Apr 92)
Steinberg Cubase 3.0 (Part 2)
(SOS May 92)
Browse category: Software: Sequencer/DAW > Steinberg
Featuring related gear
An Old Pro - Steinberg Pro24 Amiga
(SOS Feb 91)
Macintosh or Atari?
(SOS Jan 88)
School's Out
(MIC Aug 89)
Software Tracking - Steinberg Pro24 Software
(EMM Sep 86)
Steinberg Cubase Audio
(SOS Nov 92)
Steinberg Cubase Lite - For the Atari ST
(MT May 93)
Steinberg Cubeat
(SOS Nov 90)
Steinberg Cubeat - Atari Sequencing Software
(MT May 91)
Steinberg Pro 24 - SoftwareCheck
(IM Oct 86)
Steinberg Pro24 Version III
(SOS Aug 88)

Steinberg Software Page
(SOS May 88)
Steinberg Software Page
(SOS Jun 88)
Yamaha Hello! Music! - computer music system
(MT Nov 93)
Browse category: Software: Sequencer/DAW > Steinberg
Publisher: The Mix - Music Maker Publications (UK), Future Publishing.
The current copyright owner/s of this content may differ from the originally published copyright notice.
More details on copyright ownership...
Sound Advice
Topic:
Drum Programming
Sequencing
Series:
Dream Sequences
Part 1 | Part 2 (Viewing) | Part 3 | Part 4 | Part 5 | Part 6 | Part 7
Gear in this article:
Software: Sequencer/DAW > Steinberg > Cubase
Gear Tags:
No Javascript: Audio player is disabled
Re:Mix #7 Tracklisting:
07 Sequencing Tutorial 08 Sound for the tutorial
This disk has been archived in full and disk images and further downloads are available at Archive.org - Re:Mix #7.
Feature by Roger Brown
Help Support The Things You Love
mu:zines is the result of thousands of hours of effort, and will require many thousands more going forward to reach our goals of getting all this content online.
If you value this resource, you can support this project - it really helps!
Donations for September 2025
Issues donated this month: 0
New issues that have been donated or scanned for us this month.
Funds donated this month: £0.00
All donations and support are gratefully appreciated - thank you.
Magazines Needed - Can You Help?
Do you have any of these magazine issues?
If so, and you can donate, lend or scan them to help complete our archive, please get in touch via the Contribute page - thanks!
