


Magazine Archive
Home -> Magazines -> Issues -> Articles in this issue -> View
Hands On: Cassette Multitracks | |
Article from Sound On Sound, October 1992 | |
The multitrack cassette recorder provides an excellent platform for learning the essential skills of multitrack recording. David Mellor explains how to get the best out of them.

In the list of the most brilliant inventions the human race has ever devised, third only to the bicycle and the grand piano is the cassette-based multitrack recorder, otherwise commonly known as the Portastudio. (Strictly speaking, 'Portastudio' is a Tascam trade mark. 'Multitracker' is the Fostex equivalent.) Once upon a time, if you wanted to explore the glamorous world of multitrack recording, you had to pay an arm and a leg to gain a few hours in a (probably) ropey old studio and spend an immense amount of time and money learning how to transfer your musical ideas from brain through instruments to tape. My first session in a multitrack studio was in 1977, and I paid around £150 for a day with a 16-track machine that wouldn't erase properly. Although I had spent a lot of time experimenting with tape recorders at home, I didn't realise how unforgiving the multitrack recording environment could be to a musician. That £150, by the way, would be worth something like £400 now. For the experience I gained, it was worth it (I don't dare listen to the tape now!), but for the same money these days you can obtain, in the form of a mid-range cassette-based multitrack mixer/recorder, a means of getting all the experience you want. Even in the £200-300 price bracket there are machines which will test your musical ability to the utmost and provide you with the necessary experience to progress into commercial studios, where you really will be able to compete with the big boys and girls. These days, early experience with a cassette multitrack is essential for any budding musician, not just learning how to operate the knobs, but how to perform for a recording and to gain an understanding of the degree of effort required.
Although I see the main application of cassette multitracks as tools for self education, they do have another serious use — as 'notebooks' for jotting down musical ideas and accompaniments to those ideas, or for working out parts before venturing into a commercial studio. Even top musicians with access to all manner of fancy equipment still use humble cassette multitracks to capture their thoughts. Musicians who base their work on MIDI systems with sequencers will always find tape tracks useful, and with the sequencer synchronised to cassette multitrack, you can have up to three tracks available for vocals, guitar, or whatever your imagination can devise. The quality available from some cassette multitracks, particularly if they use a high tape speed and Dolby C (or even Dolby S) noise reduction, is extraordinarily good. Between selling my 8-track a few years ago and taking delivery of a Fostex E16, I recorded a number of simple tracks on a mid-range Fostex Multitracker which are now on CD as part of a production music library and have been used by TV production companies the world over.
These are the uses, in my view, of cassette multitracks, but of course the big question is, for many people, "Can I make a hit record with one?" Well, if you're a Bruce Springsteen or a Suzanne Vega, and can hum a bit and pluck a bit, then the chances are that you can. (Brucey actually did.) If, on the other hand, your work depends on a fuller 'orchestration', the chances are that the limitations of 4-track working (or even 8-track on some of the bigger Tascam machines) will hinder your progress. Having said that, by the time you have proved me wrong you'll have achieved some brilliant multitrack recording experience that will stand you in good stead forever.
WHICH ONE?
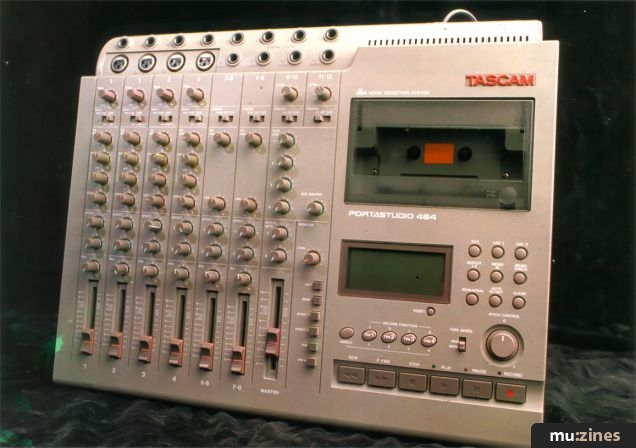
I don't want to tell you cassette multitrack you should buy if you don't have one already, but I do want to reassure you that these days it's hard to go wrong. Any of the current range of machines from Fostex, Tascam or Yamaha — the main players in the game — has sufficient facilities for you to learn multitrack recording. You may be in the position where you have can borrow or otherwise lay your hands on someone else's cassette multitrack, perhaps at school, college, or round at a friend's place, in which case you don't have a choice of model. I just want to confirm that when you have a cassette multitrack available to you, of any variety, and in good working order, then you have no excuses for not learning how to produce a good recording, given time. I have chosen to illustrate my article with the Fostex X18, which is their cheapest model, and the Tascam 464, which is their best 4-track model (discounting the 644, which has a lot of facilities for a cassette multitrack but is very complex). I could equally well have chosen a basic Tascam and top-of-the-range Fostex, so don't assume from this that Fostex are only good at cheap machines and Tascam only make good expensive ones. Both companies are very experienced in the field and produce good machines at all levels.
WHAT ELSE?
You wouldn't get far in a car without an engine, but you need a lot of other mechanical bits and pieces to get from A to B. The cassette multitrack will be at the centre of your studio, but you will need some other equipment to make a recording. Imagining a typical situation; trying to keep costs down, the list could run like this:
Cassette multitrack
Microphone and stand
Keyboard
Drum machine
Effects unit
Stereo cassette recorder
Headphones
Stereo amplifier
Speakers
Cables
This little setup will do for practice but, when you can afford it, the first improvement would be to substitute a DAT recorder for the stereo cassette — the standard cassette would be the weak link in the chain and would set a limit on your achievements. Although music recorded in a professional studio sounds more or less OK on cassette, this is because the engineers already have the skill — and the equipment — to produce a good result. You need to be able to refer back to your past mixes at CD-equivalent quality so that you can chart your progress and spot things that, in the light of experience you've gained, could stand improvement. And if you do produce a really good recording of a simply-arranged piece, which, as I said before, is quite possible, then you have a stereo master from which a CD could be made.

Figure 1. A Fully operational recording setup based around a Tascam 464.
Figure 1 shows a fully operational setup for the Tascam 464. Since the 464 has the complete set of features appropriate to its status in the recording world, it's possible to show how things should be done. With a basic machine such as the Fostex X18, you would have to adapt slightly, but I don't intend to mention anything here that you can't achieve with the X18.
STARTING OFF
Actually, we're not quite ready to start recording yet, even if all your equipment is set up and ready to go. If the equipment is fresh out of the manufacturer's packing, I'll let you off the first task, which is cleaning it — though on second thoughts perhaps you should do it for practice. Unfortunately, the materials you need for cleaning are not normally provided with the equipment, so you'll have to make a trip out to the shops. You can buy special head cleaner and rubber cleaner from the type of dealer that sells this kind of equipment (not usually from hi-fi shops or high street retailers) but most pros use cotton buds from the supermarket and isopropyl alcohol from the chemists. I buy isopropyl alcohol in 500ml quantities, which lasts for ages. To clean the heads and tape guides, just look carefully inside, without a cassette in position, and clean all the parts that the tape touches. Press the play button to clean, carefully, the pinch roller and capstan as they rotate. Another worthwhile investment is a demagnetiser since, as the machine is used, the metal parts will accumulate magnetism, which will have the effect of erasing high frequencies from the tape. Put it on your Christmas or birthday list and remember to follow the instructions very carefully when you get it.
While you're in the shopping centre buying your cotton buds and alcohol, pick up some cassettes too. Not the cheapest, not the ones in the fanciest packing, but the ones recommended in the machine's instruction manual. You'll be putting a lot of hard work into the recordings that will be going onto those cassettes, so you owe it to yourself to get the right type. (If you don't have the manual, TDK SA or SA-X will almost certainly be suitable).
Now we are almost ready to record, but not yet! I know you're keen but one of the most important tasks in cassette multitrack recording is planning. When you have 16 or 24 tracks at your disposal you can 'improvise' fairly freely onto tape, but when you are restricted to just four, you have to have a solid plan of action. This means that you need to work out how the song will be when it is finished, and it is actually a good discipline to do this because it develops the 'ear' of your imagination. Suppose you started out with just acoustic guitar and voice (a combination which suits cassette multitracks very well, since they contain a lot of sonic interest in themselves without needing much embellishment), then you need to work out the drum track on your drum machine, and also decide what other instrumental and vocal lines there will be. As a typical example, let's suppose you intend to have the following tracks:
Drums
Guitar
Bass
(Guide vocal)
Harmony vocal 1
Harmony vocal 2
Lead vocal
Keyboard
You don't have to be a mathematician to realise that this is more than than four tracks, but that's OK — we can cope. The trick is to bounce tracks together, recording several parts and then mixing them down onto one track, freeing up the remainder for more parts. (In fact, manufacturers' product literature often says you can record up to 10 parts on a 4-track cassette. This is possible, but it's a little optimistic to imagine that the result will be completely satisfactory). The list is actually in the order of recording, and you'll notice that I have included space for a guide vocal, which may make the harmony vocals easier (easier still to play the musical line of the main vocal on a keyboard so that it's exactly in tune). You may be worried that this arrangement isn't all that much like the type of music you produce, but the basic principles should still apply — hopefully you will see that I am going through a process of recording the backing parts, then the parts that fill the music out, then the main vocal line and the decoration. Your music will have components which perform the same four functions. Whatever your style, ideally you should be able to write down on paper the final arrangement of the music before you start recording.
The first instrument to be recorded will be the drum machine. It has to be this, for the simple reason that you can play your other instruments in sync with a drum track, but the drum machine can't synchronise to you. In addition to the drum track for the song, insert one bar of quarter-note hi-hats at the beginning, followed by a bar containing three quarter-note hi-hats, followed by a rest. This will be your count in. Take a lead from the mono output of the drum machine (sorry — there's usually no space for stereo drums on 4-track) and connect it into the Line Input 1 jack socket of channel 1 on the Tascam 464, or the equivalent on your machine. On most machines, there will be a switch which sets the sensitivity of the input. Powered equipment such as keyboards and drum machines will usually have a line level output, which means that, relatively speaking, the output level is high. Microphones and electric guitars have a low level output which needs more gain. (As an interesting and important aside, if you ever operate equipment which has an input level control with the control very close to zero — ie. minimum gain — then it's time to start worrying. If you can hear any distortion — unnecessary harshness in the sound — coming through, then you are overloading the input at a stage in the circuitry before the input level control. The solution is to turn down the output level of the source equipment. This often happens, so watch out for it).
Your next task will be to decide on which track you want to record the drums. Track 1 seems as good as any, so set track 1 to record ready and set the pan control of channel 1 all the way to the left. You should now be able to meter the level of the drums. Some machines have a switch to enable the meters to read the input signal; on others, pressing the record button by itself performs the same function. It's usually OK to set the level so that the top LED lights occasionally, but make a test recording to assure yourself that the recording comes out clean. Some meters are more forgiving than others. When you have set the level, press the Record and Play buttons simultaneously, wait 30 seconds, press the counter reset button and start the drum machine. Listen closely to the monitors and watch the meters until the drum track ends. Why wait 30 seconds? Because the first few turns of the tape can be a bit dodgy, so it's best not to record on them. Another question: why listen to the track as it is being recorded? Here we come to the most important aspect of multitrack recording. If you can do this you can be an engineer, if you can't you'll remain a dabbler. Read on...
MONITORING
Apart from merely mechanical tasks like pushing buttons and setting levels, which obviously have to be done correctly, being able to monitor properly is the most important part of the recording engineer's job, and modern musicians should be able to do this too. You understand the difference between 'to hear' and 'to listen'. The former means that your ear has detected a sound; the latter means that your brain is processing it. 'To monitor' is one step further advanced. It means that you are listening so intently that you will notice even the slightest fault in the recording on the first pass. To be absolutely sure, you will monitor during recording and again when you play back the take. If there is any sound that shouldn't be on the tape, such as a slight click perhaps, now is your chance to do the take again and correct it. If it doesn't seem like much now, it will when you have heard it a hundred times as you build up the song. Each time you hear that click it will appear to increase in magnitude until you are waiting, sitting in agony on the edge of your seat until it has passed. And when you play your recording to someone else it will be even worse.
When you have recorded the drum track to your satisfaction — your absolute satisfaction — then it's the turn of the guitar, or whatever main instrument your song is based around. An acoustic guitar will need to be miked up, so connect the mic to channel 1 (I'm choosing channel 1 again just to prove that you can record from any channel onto any track) and, if there is the appropriate switch, select 'mic' or 'high sensitivity'. It's usually best to monitor on headphones, using two pairs, and a splitter if necessary, if someone else is plucking the strings. Route the guitar to track 2 by record enabling that track and panning channel 2 to the right. Make sure that track 1 is not in record ready. Of course, you'll set the level before you start, and when you do start you'll hear the hi-hat count in and everything should go smoothly.
DROP IN
...or punch in, as the Americans — and the equipment manuals — call it, is where you fix a fault in a track by momentarily dropping into record from play and then out again. If there is a fault in the guitar track you should be able to get some good practice straight away. All modern cassette multitracks seem to have provision for a drop in footswitch, for lone recordists, so off you go to the shops again, because you'll never manage guitar drop ins without one. The procedure is easy: just play the track from a convenient point before the dodgy section, and hit the switch in any gap in the part, or where a slight glitch will be covered up by other instruments. It's usual to have several goes at getting the instrumental part right, but make sure you hit the switch at the right time or you'll erase something you wanted to keep. Dropping out of record is a bit more tricky because it usually creates a gap in the recording, so you'll need a longer gap in the part. Very often, you can only find places to drop in, and you have to perform from the drop in point to the end of the song each time. Listen carefully to the result when you think you're done. It's very easy to get unwanted sounds or gaps on the tape, and you might as well correct them now while you're all set up.
THE BOUNCE
The bounce is the most important part of cassette multitrack recording. Once you have finished your first three tracks, you are ready to mix them and record them onto the fourth track. You can then erase tracks 1 to 3 and record more parts.
On the Tascam 464 you can mix tracks by setting the channel switches to 'Tape'. This is common, but other recorders switch automatically according to whether jacks are inserted into the inputs. Route channels 1-3 to track 4 by setting track 4 to record ready and panning channels 1-3 all the way to the right. You'll need to have a few tries so that you can get the balance right. Unfortunately, this is an all-or-nothing stage. Get it wrong now and it's wrong forever. A useful alternative, if you are lucky enough to have a DAT machine, is to mix onto one channel of the DAT and then transfer this back to track 4 on a different section of the tape. If, at a later stage, you find that you wish you had mixed the basic tracks differently, you still have them, so you don't have to go all the way back to square one. You can try this trick with a ordinary cassette machine if you wish, but the sound quality won't be anywhere near as good. (Notice that this trick gives you the option of adding an extra instrument at this stage. The manuals often say you can add an extra instrument live while you bounce, but it really is too much to do all at one time and get right).
When you have successfully completed your bounce, take a bold step and erase the other three tracks completely. If you don't erase them now and continue with clean tracks, it's easy to get confused. Now it's the turn of the guide vocal, or keyboard playing the vocal line, if you prefer, on track 3. Next, the vocal harmonies on tracks 1 and 2, which you will bounce onto track 3, erasing the guide vocal, and then the main vocal and lastly, your keyboard embellishments. Don't expect to do all this in a couple of hours. Recording and mixing the whole song will take at least a day if you are giving it a suitable amount of care and attention (I'm a slow worker, and take between three and five days).
THE MIX
This is where you can reap the rewards of your forward planning — or curse your impetuousness, as appropriate. The vital factor when planning is to avoid bouncing instruments together unless you can make a good guess at the relative levels they will need in the final mix. You could, with the combination of instruments and vocals in my example, have ended up with this:
Track 1: Lead vocal
Track 2: Keyboard and harmony vocal 2
Track 3: Bass and harmony vocal 1
Track 4: Drums and guitar
This is obviously a worst case scenario, but it does illustrate my point. How could you assess the relative levels of the drums and guitar without the bass? How could you balance the bass and harmony vocal? And so on. You will never end up with anything as unlikely as this, but what you need is for everything to be as good as possible. Each collection of bounced parts must be perfectly balanced within itself, and capable of being balanced against the other tracks without individual instruments becoming too prominent or too quiet. Guitar, bass and drums are straightforward to balance, harmony vocals usually are too. Whatever you intend recording, start planning your final mix before you lay down a note.
If your end result is a sensible grouping of tracks, all you need do is balance them and add a little bit of reverb, as you see fit. The reverb is supplied by sending signal from the Auxiliary Output (called the Effect Out on the Tascam 464), controlled from each channel by the Auxiliary Send (Effect Send) knob; reverb signals are then brought back to the Auxiliary Inputs (called the Stereo Inputs on the 464). On simpler cassette multitracks, you will use the foldback outputs (sometimes called Cue or Monitor outputs), which otherwise have no function during mixdown. The Fostex X18 has two Auxiliary Return inputs to receive the reverb signal.
When you're mixing, you're going to have to take some important decisions about how you want the track to sound. If you have recorded everything cleanly, you might be able to get away without using equalisation to alter the frequency balance of the sounds. (The Fostex X18 doesn't have EQ, so you'll have to pay more attention to getting sounds correct in the first place, which isn't a bad thing). If you are new to multitrack recording, use EQ to correct problems. Ask yourself, 'Is there anything wrong with the sound that I could correct with EQ?'. Often there will be too much bass in instruments other than the bassline and drums. Cutting the bass in these can enhance the clarity of the mix. If the vocal isn't cutting through enough, try adding some presence at around 3kHz — but not too much or you'll make it sound 'thin'.
Moving on from EQ, I'm sure I don't have to say that it's the easiest thing in the world to cover everything in a thick layer of reverb. It covers problems as well as woodchip wallpaper covers cracks in the walls. But covering up your problems isn't going to make you a better recording engineer or musician, nor is it going to allow the song to come through to its best advantage. I like to listen to each track individually and add the smallest amount of reverb that makes the tracks sound good by themselves, and I don't often find it necessary to alter the amount of reverb once I start balancing the levels.
When you have experimented with the mix to your heart's content, you are certain you have a good balance, and you know exactly when to boost the vocal to correct any unevenness in level, you are ready to transfer the mix to stereo tape. (Mark the fader positions with chinagraph pencil so you can reset them easily if the mix goes wrong.) Since you have the count-in on tape, you can stop the multitrack just before your song starts. Start your stereo machine in record and press the play button. At the end of the song, bring down the channel faders as each track finishes, and then the master fader (if your machine has one) after the reverb dies away. It may take a few tries to get right, but in the end you'll have something which, if you have put in enough toil and trouble, will be the best recording you have made yet. It won't be the best recording you'll ever make, but that's the beauty of the cassette multitrack; you can spend as much time with it as you like in the privacy of your own room, learning your trade as a multitrack recording musician.
LISTENING TO YOUR MIX
- Loud
- Quiet
- Late at night
- With people talking in the room
- In the car
- On the motorway
- From the next room
- On your portable stereo
- On your Walkman
- At a party
- Through your television's AV input
- Through your band's PA system
- Copied onto another cassette
- With the person you like the most
- With people who will laugh at you if they don't like it
I'm not kidding — you really will learn a lot about mixing by submitting your work to this harsh series of tests. Each situation will expose weakness in your mix — and any mix, for that matter. The last one is the killer. Even if your friends don't utter a word you'll know, by sharing the listening experience, forcing you to apply new standards of self criticism, whether your recording is good.
More with this topic
 Everybody's Doin' It |
 But What Does A Producer Do Exactly...??? |
 Studio Sound Techniques (Part 1) |
Virtual or Reality |
 Live for the Record |
 Sound Bites - Production Tips & Techniques |
 State Of Independence - Dave Stewart On Going It Alone In The Music Biz |
 Adventures In Television Recording |
 Home Is The Hero - Six stars outline their home demo set-ups |
 Rhythm methods - Drum recording guide |
 Making the Most of... (Part 1) |
 Orchestral manoeuvres - Handel’s Messiah |
Browse by Topic:
Recording
Also featuring gear in this article

Fostex X18 - Cassette Multitracker
(MT May 92)


Tascam 464 Portastudio
(SOS Jun 92)
Tascam 464 Portastudio
(MT Sep 92)
Browse category: Cassette 4-Track > Fostex
Browse category: Cassette 4-Track > Tascam
Publisher: Sound On Sound - SOS Publications Ltd.
The contents of this magazine are re-published here with the kind permission of SOS Publications Ltd.
The current copyright owner/s of this content may differ from the originally published copyright notice.
More details on copyright ownership...

Sound On Sound - Oct 1992
Topic:
Recording
Gear in this article:
Cassette 4-Track > Fostex > X18
Cassette 4-Track > Tascam > 464
Gear Tags:
Feature by David Mellor
Ads for Gear in this article:


Help Support The Things You Love
mu:zines is the result of thousands of hours of effort, and will require many thousands more going forward to reach our goals of getting all this content online.
If you value this resource, you can support this project - it really helps!
Donations for June 2026
Issues donated this month: 0
New issues that have been donated or scanned for us this month.
Funds donated this month: £0.00
All donations and support are gratefully appreciated - thank you.
Magazines Needed - Can You Help?
Do you have any of these magazine issues?
If so, and you can donate, lend or scan them to help complete our archive, please get in touch via the Contribute page - thanks!