


Magazine Archive
Home -> Magazines -> Issues -> Articles in this issue -> View
Hands On: Steinberg Cubase | |
Article from Sound On Sound, January 1992 | |
This month David Mellor presents a guided tour of Steinberg's ubiquitous sequencer program.

If you are going to learn how to use a software sequencer package (assuming you don't already use one), then you had better learn either Steinberg's Cubase or C-Lab's Creator/Notator. Certainly as far as the Atari ST goes these are the two major players in the sequencing game, and since Cubase is also available on the Apple Macintosh (and shortly for IBM PC-compatibles) it has to be the sequencer to know. Of course, everyone has his or her own personal preferences and you may find Creator/Notator, or any of the other excellent sequencers around, to be the ideal tool for arranging your own music.
Cubase is an extraordinarily versatile and comprehensive system, and because there's so much to it I'm going to concentrate on the essentials of recording, and of making the most of the program's simpler editing and arranging functions. Experienced users may know short cuts to use instead of some of the things I'll describe, but I want to explain methods that are easy to understand and remember. In particular, I shall be using the menus a lot, although many menu functions have key equivalents; note also that double-clicking the mouse on the area of the screen in which you are interested may save the half a second you would otherwise spend pulling down the menu. The Cubase manual is an excellent source of information on all of this, but right now let's get started...
START UP
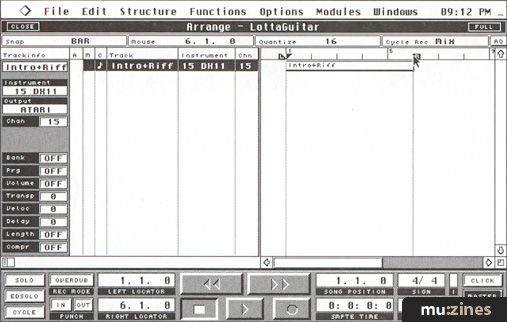
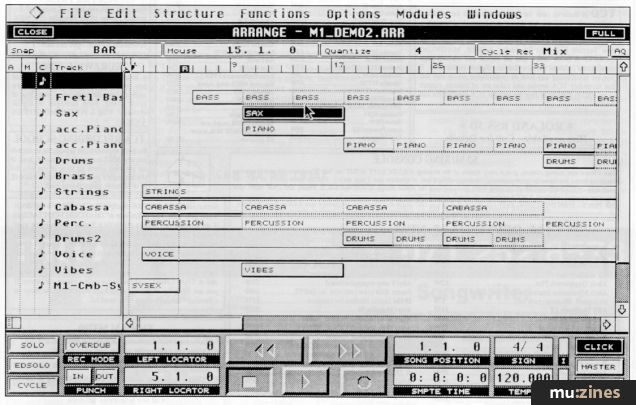
You know how to get Cubase up and running from your previous Atari experience. What you'll see in the beginning is a screen similar to the screen shown in Figure 1. Cubase users can store a file with various start up conditions, and this will be loaded automatically as the program boots. You should find that, unless the owner works in a very strange manner, the settings on the Cubase system you are using will suit your requirements.

Figure 1. You should see a screen like this on loading Cubase.
What you see now is called an 'Arrange Window'. There may be several Arrange Windows in the computer's memory at any one time, but I have never found the need to use more than one for normal recording purposes. It's worth spending some time getting familiar with the elements of this window so I'll go through them stage by stage.
Track List. Cubase can record on as many as 64 tracks. In Figure 1 there are 16 tracks, but if you need more just create them via the Structure menu.
Locators. You can see left and right locators at bars 4 and 12 in Figure 1. These are set by clicking the left or right mouse button on the appropriate bar number or division. Whereas with other sequencers locators might be more of a luxury, you need them in Cubase because of the way it works.
Parts. Looking at the screen at the top of the first page of this article, which shows a fairly busy arrangement, you will see that next to each track are a number of segments spaced out horizontally. In this example some are too short for the complete Part name to be shown. The Part is the smallest element you deal with in the Arrange window. If for example you want to record a section between bars 1 and 9, the best way of doing this is to create a blank Part between those points by setting the locators and then 'Create Part' from the Structure menu. You can then make a recording into the new Part.
Locators (again!). The locators are used for locating (obviously), creating Parts, and for recording. All recording takes place into a Part between the left and right locators. (Experts will spot this as an oversimplification, but this is probably the best way to go about one's first recordings).
Transport. Too obvious to need explanation I think.
Tempo. Likewise.
Click. Gives an audible click through the ST monitor's speaker during recording and playback.
Sync. Enables external synchronisation.
Cycle. Enables looped 'drum machine' style recording.
RECORDING
Now you are ready for your first experimental recording. It may not turn out quite as you want, but let's have a go anyway:
1) Enable Click, disable Cycle and Sync (white lettering on a black background = enabled).
2) Create a Track if necessary.
3) Set the locators to the start and end point of the recording you wish to make. (Keep it as short as possible; short Parts are easier to manipulate later).
4) Create a Part.
5) Select the Track you wish to record on (if there is more than one Track in the list) by clicking it. It should look like 'Str tune' in our busy Arrange Window.
6) Click the Record icon.
The metronome will now give a count in whose length is dependent on the standard settings that were loaded into the system (you'll be able to see from the moving cursor when you should start playing). If your recording didn't go too well then the Undo item in the Edit menu will help, but I trust your first Cubase recording was reasonably successful. Let's look at some more items in the Arrange window:
Channel. You'll see this column in Figure 1 but not in the screen we've just looked at. In Cubase you can either select the Channel for each Track directly, by left or right clicking the mouse on the number, or indirectly by naming an instrument for each Channel and then choosing that from a pop up menu that appears when you click in the Instrument column. You will see that I have dispensed with the Channel column (by dragging the dividing line to the left) to give me more viewing area in the Part display, and also that I have simply called each instrument by its channel number. To name an instrument (or anything else in the window that needs to be named) just double click on the existing name, then follow computer common sense.
Snap. When positioning the locators (or moving Parts as we shall see) they will snap to the nearest position indicated by the Snap setting. Click and hold in this box to see and select the options.
Quantise. Sets the quantise value that will be used by any of the various quantise functions.
Recording Mode. You can replace existing recordings or add new notes.
Punch. The Punch In icon handles itself pretty effectively most of the time, but you need to know about Pre-recording and Punch Out. As I said earlier, recording takes place with respect to the locators. In the Metronome item from the Options menu you can set a count in, a pre-roll and whether Pre-Record is on or off. If it's on, then anything you play during the count in will be kept. As for Punch Out, if you don't select this then recording will continue after the cursor passes the right locator. If you do select Punch Out then recording will stop.
The rest of the Arrange window either becomes obvious when you start using Cubase or remains something better left for a late night session with the manual. You know enough now to get going. I'm not going to cover Cycle recording by the way, so learning about that can be a personal experience to look forward to. Cycle playback between the locators is very useful for working out what notes to play — I use it all the time.
PART MANIPULATION
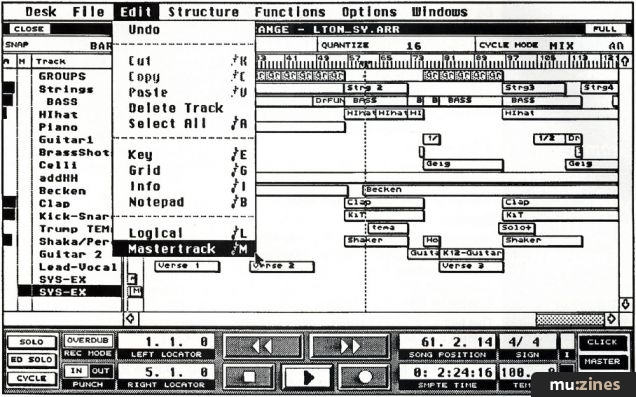
The real value of Cubase becomes apparent when you start to manipulate all those Parts that you've created, and which are so effectively displayed. Fine tuning individual parts is done under the Info item of the Edit menu. A box appears in which you can edit the Part name and various parameters such as the transposition interval, velocity, delay, note lengths and volume, among others. But to do this you have to select a Part. Selecting a Part, or Parts, is something that you'll need to do a lot. There are a number of ways of selecting, all of which are useful so let's make a list:
By clicking on a Part
By clicking on a Part, then holding the shift key and clicking more Parts By clicking and holding the left mouse button somewhere between the Parts and dragging a 'rubber band' around adjacent Parts
You can select all the Parts in a Track by holding the shift key and double clicking somewhere in the free space in the track
By choosing the 'Select All' item in the Edit menu
All Parts can be deselected by clicking in free space. Once you have selected a Part you can simply drag it to any part of the display with the mouse — you can move it to another track where it will play exactly the same notes but on a different MIDI channel, or if you move it to an area where there is no track a new one will be created. To make a copy of a Part simply hold the Alternate key as you move the Part. This time a copy of the Part will be moved. You can move or copy several Parts simultaneously if you wish.
This is perhaps Cubase's best feature, avoiding all that tedious entering bar and beat numbers that used to be required in sequencers. With Cubase you generally get things right first time, and there's always the Undo function just in case. Before I move on, I ought to mention that Parts can overlap to a greater depth than you'll probably ever need. Too many overlaps may cause confusion — to the operator rather than the computer — so a Merge function is also provided (just hold the Control and Alternate keys as you move the Part). Parts can be deleted by selecting them and pressing the Atari's Delete key.
Now you can do all this, try pressing the right mouse button somewhere in the Part display. This calls up a 'toolbox' with an eraser (which you can get by without), 'Match Quantise' (explained later) and five other handy gadgets. The scissors can cut a Part in two; the magnifying glass can be used to play individual notes in a Part; the pencil can shorten or lengthen a Part; the mute can silence a Part without losing any notes permanently; the glue tool can create one long Part out of two or more shorter ones. Select a tool with the left mouse button while holding the right then experiment at will.
By now you should be able to handle all the basic recording and Part manipulation functions. One word of advice I would give is to practise first before you put yourself in a situation that might cost you money or embarrassment. Cubase is very straightforward in its essentials, but there are quite a lot of options which might cause hiccups when you are new to the way it works.
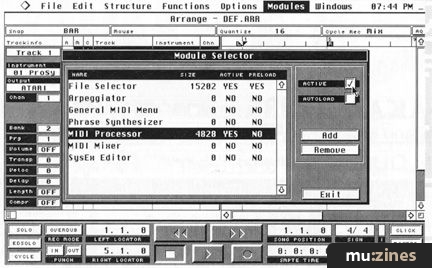
If you lock yourself in your room with a keyboard, computer, Cubase and manual you will figure out as much as you need to with few problems. Don't worry if you feel as though you will never be a master of the software — most users will find that they become fluent in the tasks they need to perform and learn not to worry about complications such as Score Editing, MIDI Manager and Interactive Phrase Synthesis. Likewise, 'Groups' are a very useful feature, but you don't need to know anything about them at all to use Cubase effectively.
QUANTISATION
As you know, quantisation often has the effect of turning a performance which was hopelessly sloppy into a performance which is hopelessly over-mechanical. With Cubase you can all turn your digital meanderings into artful keyboard playing using one of several quantisation options, all of which use the note value shown in the Arrange window (16th notes in Figure 1). All but one of the quantise options are under the Functions menu.
Over Quantise. I don't understand the name, but as Steinberg say it moves the notes to the nearest quantise value while monitoring your playing to detect if you play consistently behind or ahead of the beat and uses this fact when moving the notes even though errors are detected.
Note On Quantise. Moves the start of the note to the nearest quantise value keeping the length the same.
Analytic Quantise. Not to be confused with paralytic quantise for when your notes are really staggering! This disregards the quantisation setting and examines your playing carefully before correcting it to what it thinks you meant. Analytic quantise works when you mix triplets and glissandi with straight notes, other types of quantisation would be totally confused.
Match Quantise. When you have recorded a part with a feel that you like, you can match the quantisation of another part to it. This is done from the right mouse button toolbox mentioned earlier. Mainly for the Cubase expert.
Groove Quantise. A bit like the 'swing quantise' function found on other sequencers but much more versatile. Unfortunately this makes it harder to use so it's probably best to wait until you know the basics before attempting it.
Iterative Quantise. Ah, now we have it! My favourite quantisation tool. The idea is that you can set a quantisation 'strength' and gradually draw the notes closer and closer to their 'correct' positions. I'm afraid I don't bother about that and set the strength to 100% in the Edit Quantise dialogue box. The other part of Iterative Quantise is the 'Don't Q' function. This selects the area around the 'correct' position where the quantise function will leave the notes alone and only move notes outside of this region. I find that this keeps the feel of my playing while correcting the worst offending notes. If Cubase didn't have this feature, then despite everything else it can do I would be looking elsewhere for a sequencer — or manually editing each note!
When you have finished quantising, you'll probably be relieved to hear that the results are not permanent. The Undo Quantise function can get you back to square one at any time if you don't like what you hear. On the other hand there is a Freeze Quantise function which makes the changes permanent. Other types of note positioning techniques include Fixed Length. Combine this with Note On Quantise to give that completely even notes for that classic 'sequencer' sound.
EDITING
It sometimes amazes me how much music you can get out of MIDI with so few parameters. Doubtless future MIDI-like systems will evolve so that you can get as much expression out of a synth keyboard as you can out of a violin or guitar, and we will need more sophisticated editing software to manipulate the wealth of data generated. For now though, most editing consists of getting the notes in the right place, setting them to the right length and adjusting to the correct velocities. All of these things and more can be achieved in the Grid Edit page, which presents data in list form together with a handy graphic. First things first; you want to know how to use it, right?
OK, first select a part in the Arrange window for editing, the select Grid from the Edit menu. You can use the 'GoTo' menu or the vertical scroll bar to locate the offending note, then select it and apply the mouse in the conventional manner — left mouse decreases the values, right mouse increases. Value 1, in the case of notes, is the note name, Value 2 is the velocity. If you don't want to mess about with numbers then you'll find that the graphic has a toolbox similar to that found in the Arrange window. Learning how to use Grid Edit is a simple matter of playing around with it. All the things that you see but don't understand can be left for that quiet read of the manual that all software users promise themselves someday. One thing I haven't been able to figure out is how to set all the notes to a standard length other than the quantise value. I'll bet there's a way, but it isn't easy to find in the manual!

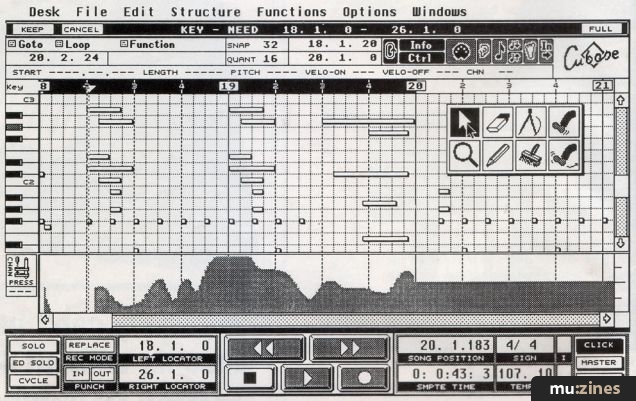
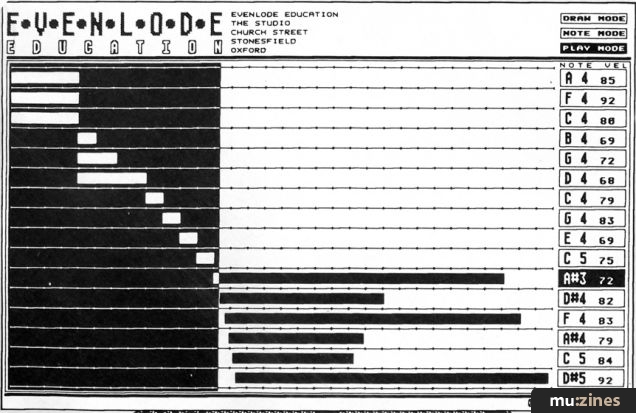
Figure 2. Key Edit Screen.
Key Edit is equally useful but with different applications. Grid Edit is for when you know which individual notes you want to adjust and can go straight to them; Key Edit is better for when you know there's something you want to change, but you are not quite sure what. Select your Part, choose 'Key' from the Edit menu so that you can see something like Figure 2, position the cursor by left clicking somewhere among the bar numbers and click play.
Key Edit is useful for seeing the patterns that the notes make, and from that you can usually decide what changes you want to make. Notes can be selected, lengthened, shortened, moved and copied quite easily. If you can see a note that shouldn't be there, select it and hit the Delete key on the Atari keyboard. By the way, if you decide that your edits were not as useful as you hoped, you can click on 'Cancel' and you will go back to the Arrange window without changing anything. If your edits were good, click 'Keep'.
HAVE FUN
So now you know all about Cubase, don't you? Well no, I haven't covered even half of it, but I reckon there's enough here to get you going, provided you are familiar with the ST/Mac/PC. As far as creating music via MIDI is concerned there are very few things Cubase cannot do. I'm not so overawed to say that it's the perfect piece of software, because there are a number of things I would change given the chance and probably a faster computer. But for me Cubase is a pointer to the future. If you learn this software now, your knowledge should see you through the next decade of sequencing and audio recording, and maybe beyond that. The thoroughly visual interface has a lot to commend it. Do your best to get yourself in front of an Atari (or Mac or PC) running Cubase soon and, as they say in all the best ads, unleash your creativity! Happy arranging.
Thanks to the City of Westminster College for the loan of the Cubase software.
FILE HANDLING
An unusual feature of Cubase is that save operations can be carried out while the sequence is playing. This helps you work faster, but occasionally notes can be cut off prematurely so it's best not to save while recording onto tape.
More with this topic


Browse by Topic:
Sequencing
Also featuring gear in this article

Clash of the Titans
(MIC Oct 89)

Cubase 2.0
(SOS Dec 90)

Cubase In-depth
(MIC Jan 90)

Cubase MIDI Mixer - Programming Clinic (Part 1)
(SOS Oct 92)

Cubase MIDI Mixer - Programming Clinic (Part 2)
(SOS Nov 92)

Dream Sequences (Part 1)
(MX Dec 94)

Dream sequences (Part 2)
(MX Jan 95)

Dream Sequences (Part 3)
(MX Feb 95)

Dream sequences (Part 4)
(MX Mar 95)

Dream sequences (Part 5)
(MX Apr 95)
Dream sequences (Part 6)
(MX May 95)
Dream sequences (Part 7)
(MX Jun 95)


Steinberg Cubase - Version 3.0 Software
(MT Sep 92)
Steinberg Cubase 3.0 (Part 1)
(SOS Apr 92)

Steinberg Cubase 3.0 (Part 2)
(SOS May 92)

Browse category: Software: Sequencer/DAW > Steinberg
Featuring related gear

An Old Pro - Steinberg Pro24 Amiga
(SOS Feb 91)


Macintosh or Atari?
(SOS Jan 88)
School's Out
(MIC Aug 89)


Software Tracking - Steinberg Pro24 Software
(EMM Sep 86)

Steinberg Cubase Audio
(SOS Nov 92)

Steinberg Cubase Lite - For the Atari ST
(MT May 93)

Steinberg Cubeat
(SOS Nov 90)
Steinberg Cubeat - Atari Sequencing Software
(MT May 91)

Steinberg Pro 24 - SoftwareCheck
(IM Oct 86)


Steinberg Pro24 Version III
(SOS Aug 88)

Steinberg Software Page
(SOS May 88)

Steinberg Software Page
(SOS Jun 88)


Yamaha Hello! Music! - computer music system
(MT Nov 93)
Browse category: Software: Sequencer/DAW > Steinberg
Publisher: Sound On Sound - SOS Publications Ltd.
The contents of this magazine are re-published here with the kind permission of SOS Publications Ltd.
The current copyright owner/s of this content may differ from the originally published copyright notice.
More details on copyright ownership...

Sound On Sound - Jan 1992
Donated & scanned by: Mike Gorman
Feature by David Mellor
Ads for Gear in this article:


Previous article in this issue:
Next article in this issue:
Help Support The Things You Love
mu:zines is the result of thousands of hours of effort, and will require many thousands more going forward to reach our goals of getting all this content online.
If you value this resource, you can support this project - it really helps!
Donations for June 2026
Issues donated this month: 0
New issues that have been donated or scanned for us this month.
Funds donated this month: £0.00
All donations and support are gratefully appreciated - thank you.
Magazines Needed - Can You Help?
Do you have any of these magazine issues?
If so, and you can donate, lend or scan them to help complete our archive, please get in touch via the Contribute page - thanks!