


Magazine Archive
Home -> Magazines -> Issues -> Articles in this issue -> View
Understanding the DX7 (Part 1) | |
Article from Electronics & Music Maker, April 1984 | |
DX7-owner Jason Chapman and the first of a new series on how to find your way round these revolutionary Yamaha synthesisers. Part 2 next month.
Although Yamaha's DX series keyboards have received nothing but praise for the quality of their factory-programmed voices, they remain something of an enigma where user-programmability is concerned. Not to put too fine a point on it, there seem to be very few users indeed who have managed to exploit their DX to the fullest. DX7-owner Jason Chapman has worked his way painstakingly through his machine's workings, and in the first of a new series, guides us through a few simple experiments that should shed a little light on how the DX keyboards go about their sound-generating business.

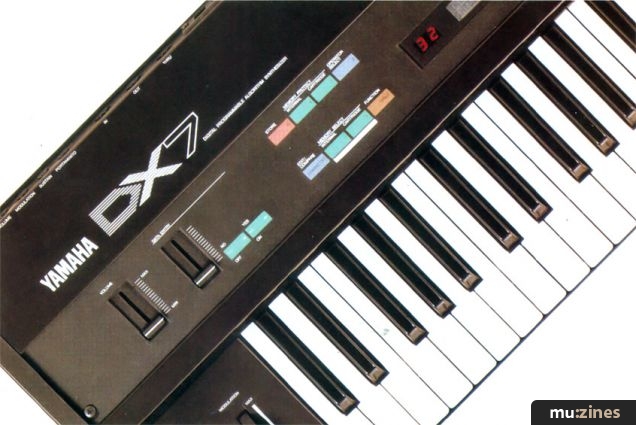
What I am going to attempt in this article is to lead you through a few practical experiments to demonstrate how the basic building blocks of the DX7 - the Operators - are used and what Frequency Modulation does. I'm going to assume you've read through (or at least glanced at) the Yamaha manual and that you can read the legends on/above/underneath all the pressure pad-type buttons. Note that some of the keypads have up to four different functions (hence all the different legends!) - I will refer to a keypad by its colour and the legend in question eg. 'the purple 'EDIT/COMPARE' keypad' actually has the '-' symbol on it and the 'EDIT/COMPARE' legend in white above.
Most of our playing about is carried out in Edit Mode where the user can not only edit or change the voice parameters to create a new voice but can also view them at his leisure. By altering parameters in a controlled and logical fashion and observing how the voice changes, you should, with luck, learn how to exploit the incredible potential of the DX7 a little more fully.
To get into Edit Mode you simply press the purple 'EDIT/COMPARE' keypad which causes the display to change from showing voice identification data to showing information about the parameters of that voice.
Frequency Modulation

To understand how the sound is built up from the Operators we first need to understand the Frequency Modulation technique used in the DX range. There is a good explanation in the DX7 manual so have a look at that and then try the experiments below to see the theory in action...
You should have gathered that sounds on the DX range are produced by connecting together Operators in various configurations called algorithms. In this demonstration we will use just two Operators (out of the six available on the DX7) and connect them in only two configurations, both of which are simple sub-parts of the Algorithms available. These two simple configurations form a complete basis for the usage of Frequency Modulation techniques.

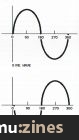
Figure 1.
The Operators
OK, let's get to work. What is an Operator? Have a look at the diagram (Figure 1).
You might think for a moment things are beginning to look a trifle complicated but, fortunately, we can look on the Operator as being a sort of simple monophonic synthesiser with one module missing. The module the Operator lacks is the equivalent of the Voltage Controlled Filter - we shall see why it is not present shortly. Another difference worth noting is that the oscillator is only capable of producing a sine wave output, so no complex waveforms overflowing with rich harmonic content - well, not from one oscillator on its own anyway.
So, the first part of the practical work is to use one Operator and in doing so understand its capabilities by relating it to the design of a very degenerate monophonic synthesiser. In fact, to show how two Operators combine in the two basic configurations in the simplest way, we ignore envelope generation completely and concentrate on pitch control and, subsequently, waveform generation.
Single Operator Demonstration
The first thing we have to do is get just about everything switched off so that we are playing with only one operator. Try the following:
- press the yellow 'FUNCTION' keypad
- press the green 'VOICE INIT' keypad
- reply to the question 'VOICE INIT?' (in the display) by pressing the green 'YES' keypad
- reply to the question 'ARE YOU SURE?' in the same way
- press the green 'OUTPUT LEVEL' keypad
- press each of the green keypads 2 through 6 once to turn all but operator 1 off - your display should look like this:

You now have the DX7 almost at its most basic, one sine-wave oscillator taking its pitch data from the keyboard. The envelope generator is effectively ignored as the sound is on simply when a key is pressed.
On an even more basic level, you can make the oscillator ignore the keyboard pitch, setting it at a fixed frequency. To do this, first press the green 'MODE/SYNC' keypad and the lower line of the display will change to 'FREQUENCY (RATIO)' which, as far as we're concerned at the moment, means that the Operator in question is taking its pitch control from the keyboard. If you now press the green '+1' button, the bottom line of the display will change to 'FIXED FREQ. (Hz)'. In fact, pressing the '+1 ' and '-1 ' keys alternately will 'toggle' between the two possibilities.
In either case, we can now set the frequency of the Operator. In the fixed example we set the frequency absolutely whereas in the 'FREQUENCY (RATIO)' case we set the ratio of the actual output frequency to the frequency specified by the key played. This should be easier to understand if we do the following two experiments:
Fixed Frequency
- get into 'FIXED FREQ. (Hz)' as described above
- press the green 'FREQUENCY COARSE' keypad
- press the green '+1' keypad until the display bottom line reads;

- press the green 'FREQUENCY FINE' keypad
- press a note on the keyboard (not for the pitch - we need the Operator's envelope generator 'on') and keep it pressed
- play with the data entry slider: you can hear (and see on the display) the pitch being set
- note that if you play a different key without moving the data entry slider, the pitch does not change
- try the different pitch ranges given by cycling through the 'FREQUENCY COARSE' settings (using the '+1' or '-1' keys to cycle)
Frequency Ratio
- get into 'FREQUENCY (RATIO)' as described above
- press the green 'FREQUENCY COARSE' keypad
- slide the data entry slider completely towards you
- press the green 'FREQUENCY FINE' keypad
- move the data entry slider until the bottom line of the display reads:

- back to 'FREQUENCY COARSE'
- press the '+1' key and you will have:

- the pitch of the Operator's oscillator now relates directly to that specified when you press keys on the keyboard, ie. if you press the A below middle C you will get 440 Hz (if the DX7 is tuned to concert pitch).
Having now reduced the DX7 to a rather expensive single drawbar organ (!) we can demonstrate the first, and perhaps the most obvious, of our two basic configuration sub-algorithms.
Configuration 1
In exactly the same way as we use two drawbars on an organ or two oscillators on a synth, we can mix the output of two oscillators (ie. Operators as we are using them at the moment), and by altering their pitch and amplitude relative to each other, we alter the overall harmonic content of the mixed output. On a normal drawbar organ we use the drawbars to alter the relative amplitudes of the harmonics but we cannot change the pitch of the individual drawbar outputs - on the DX7 we can!
The study of how the harmonics of a sound work together to create its timbre is beyond the scope of this article - I'll let another experiment explain things instead:
- do a 'VOICE INIT'
- turn Operators 2-6 off (press green keypads 2-6)
- press the green 'OUTPUT LEVEL' keypad
- you should have the basic one operator sound, ie. display reads:

- try moving the data entry slider while repeatedly pressing a key and you will find the amplitude (or volume if you prefer) alters
- press the green '2' keypad to turn on Operator 2
- press the purple 'OPERATOR SELECT' keypad and you will see the 'OP1' in the display change to 'OP2' ie. any data we change which applies to an Operator will now affect Operator 2 rather than Operator 1
- press the green 'ALGORITHM' keypad and use the data entry slider (or the '+1' and '-1' keypads) to change the display from 'ALG 1' to 'ALG32'
- press the green 'FREQUENCY COARSE' keypad
- use the '+1' and '-1' keypads (or the data entry slider) to change the 'F COARSE' value displayed to '2.00'
- press the green 'OUTPUT LEVEL' keypad - you should have:

Have a look at the diagram on the DX7 front panel for Algorithm 32 and you will see that Operators 1 and 2 both feed in parallel onto the horizontal line that represents the output bus, ie. their outputs are mixed together. Ignore the rest of the algorithm diagram as all the operators are shut off: they are not contributing to the sound.
In musical terms, we now have the 'fundamental' pitch on Operator 1 and its octave on Operator 2. Why is it the octave? Well, the 'F COARSE' value of 2.00 means that the pitch of Operator 2 will be twice that of the pitch value indicated by the key pressed, whereas Operator 1 follows the keyboard exactly (hence its 'F COARSE' value of 1.00). Twice the pitch gives the octave, of course.
If you now vary the 'OUTPUT LEVEL' of Operator 2 ('OP2') using the data slider and keep playing a note repeatedly on the keyboard, you will hear the octave changing its volume relative to the fundamental. The timbre of the sound output changes also.
If, as well as varying the output level, you also vary the pitch (ratio) of Operator 2 using the 'FREQUENCY COARSE' and 'FREQUENCY FINE' controls as described earlier, you should start to get a feel for what can be done with this type of algorithmic configuration. The lovely organ voice 'E. ORGAN 1' is constructed literally on the principle just described.
Configuration 2
This uses two Operators, the output of one Operator modulating the pitch control of the second. This method of using two oscillators is by no means unique to Yamaha FM - most really 'fat' sounds to be heard from synths such as the original Minimoogs are based on the same configuration. What years of Yamaha research has added to FM is the control that makes FM techniques of genuine practical use.
Let's get this part of the show on the road:
- do a 'VOICE UNIT' as above
- turn off Operators 3 through 6
- press the green 'OUTPUT LEVEL' key - you should have:

We've just got back to our 'one drawbar' basic single Operator sound with the pitch controlled from the keyboard. The waveform of the sound is the simple sinewave: that's all the Operator's oscillator can produce.
In most synths we create a timbre by taking a complex waveform, a sawtooth for example, and filter out some of the waveform's complexity by using a Voltage Controlled Filter. With FM, we start with the simplest possible waveform, the sinewave, and add harmonic complexity - this is why the Operator has no equivalent to a voltage controlled filter. This harmonic complexity is added either by simply summing the outputs of oscillators having harmonically related pitches - the configuration above - or complex waveform by modulating a simple waveform with a second.
Before you push any more keypads, have a look at the diagram on the front panel for Algorithm 1 to see how Operators 1 and 2 are connected. You should notice that Operator 1 feeds onto the output (horizontal line) as in configuration 1 above, whereas Operator 2 feeds into Operator 1. In this context, Operator 1 is known as a 'carrier' and Operator 2 is known as a 'modulator'. What this means is that the carrier produces the sound we hear, while the modulator modifies the timbre, or harmonic content, of the output of the Operator it is affecting.
As always, things soon become crystal clear when we actually put them into practice instead of simply talking about them:
- press the purple 'OPERATOR SELECT' keypad (to get to 'OP2')
- vary the position of the data slider while repeatedly pressing a key on the keyboard
- hear the timbre change; this is simple FM in action
As you vary the slider you should hear the timbre change from the clean sinewave (at OP2 OUTPUT LEVEL = 0) to a more 'metallic' sound as you move toward OP2 OUTPUT LEVEL = 99. The other possibility here is to change the pitch of the modulator, OP2. Try setting the OP2 output level to something like 70, and by using the green 'FREQUENCY COARSE' and 'FREQUENCY FINE' keys, you should discover a whole range of different FM effects. Try some slightly detuned oscillator effects to 'fatten up' the sound by introducing beating. An OP2 frequency of 1.99 should do the trick. The rate of beating can be varied with more detailed control by using the green 'DETUNE' keypad.
The Future
In the next few articles we'll analyse some of the Yamaha's pre-programmed voices in the hope of shedding yet more light on how to control the DX7. And we might even try setting up a voice or two of our own...
If you have any particular questions you would like me to (attempt) to answer on the wonderful world of the Yamaha DX series please write to me, care of E&MM, and I'll do my best to dig up some answers!
Series - "Understanding the DX7"
Read the next part in this series:

Understanding the DX7 (Part 2)
(EMM May 84)
All parts in this series:
Part 1 (Viewing) | Part 2 | Part 3 | Part 4 | Part 5 | Part 6 | Part 7
More with this topic
 Guide to Electro-Music Techniques - Synth Performance Controls (Part 1) |
 It's Cee Zee! (Part 1) |
 All About Additive (Part 1) |
 Hands On - Emu Emax II |
 Music Modules for NON-Keyboardists |
 The Sensuous Envelope Follower |
 Modular Synthesis - Producing String Sounds (Part 1) |
 Add Muting, Decay/Release Isolation and/or End of Cycle Triggering to Your 4740 |
 Sample + Synthesis - Programming Clinic |
 Making More Of The Kawai K5 |
 A Programmer's Guide to the Roland D110 (Part 1) |
 The Lazy Guide To Good Synth Sounds |
Browse by Topic:
Synthesis & Sound Design
Also featuring gear in this article

BeeBMIDI (Part 3)
(EMM Aug 84)
BeeBMIDI (Part 7)
(EMM Mar 85)


Hands On: Yamaha DX7
(SOS Dec 92)

Load Baring
(12T May 85)

Load Baring
(12T Aug 85)

One For The 7 - DX7 Patch
(ES May 85)

One Off - DX7 Patch
(ES Apr 85)


Sight Reading - Yamaha DX7 Digital Synthesizer
(EMM Apr 85)

Steve Gray on the DX7
(EMM Dec 83)

The Right Connections
(ES Oct 84)

The Synths Of The Year Show - Synthcheck
(IM Dec 85)

Yamaha DX-7 Synthesiser
(MU Aug 83)
Yamaha DX7
(12T Nov 83)

Yamaha DX7
(ES Nov 83)
Yamaha DX7 Voice ROMS - Accessorycheck
(IM Jun 85)

Patchwork
(EMM Feb 84)
Patchwork
(EMM Mar 84)

Patchwork
(EMM Apr 84)

Patchwork
(EMM May 84)

Patchwork
(EMM Jul 84)

Patchwork
(EMM Aug 84)

Patchwork
(EMM Jan 85)

Patchwork
(EMM Feb 85)

Patchwork
(EMM Apr 85)

Patchwork
(EMM Jun 85)

Patchwork
(EMM Jul 85)

Patchwork
(EMM Feb 86)

Patchwork
(EMM Mar 86)

Patchwork
(EMM May 86)
Patchwork
(EMM Jun 86)

Patchwork
(EMM Aug 86)

Patchwork
(EMM Sep 86)

Patchwork
(MT Nov 86)

Patchwork
(MT Dec 86)

Patchwork
(MT Jan 87)
...and 19 more Patchwork articles... (Show these)
Browse category: Synthesizer > Yamaha
Featuring related gear

A Sound Design - Design Studio Programs
(ES Jan 85)

Delirious Xcitement - Yamaha DX7S
(SOS Mar 88)

Double Take - Yamaha DX5
(ES Apr 85)

Expand your DX
(SOS Jan 87)

Hi-Tech Xpansion
(EMM Apr 85)


Pandora's Box
(MIC Oct 89)


Russ DX7 AI Editor
(SOS Apr 88)


Temperament
(MM Apr 87)

The Fifth Dimension - Yamaha DX5
(EMM Oct 85)

The Legend Lives On - Yamaha DX7IID
(SOS Mar 87)

Tips To Tame the DX7II
(SOS Mar 88)

TX7 - To The Limit
(SOS Jun 86)


Yamaha DX5 - Synthcheck
(IM May 85)

Yamaha DX7-IID Synth
(MM Mar 87)

Patchwork
(MT Feb 88)


...and 2 more Patchwork articles... (Show these)
Browse category: Software: Editor/Librarian > Sound Design Studio
Browse category: Synthesizer > Yamaha
Browse category: Expansion Board > Grey Matter Response
Browse category: Synthesizer Module > Yamaha
Browse category: Software: Editor/Librarian > Joreth Music
Browse category: Software: Editor/Librarian > Pandora
Browse category: Software: Editor/Librarian > - (No Manufacturer)
Browse category: Software: Editor/Librarian > Steinberg
Publisher: Electronics & Music Maker - Music Maker Publications (UK), Future Publishing.
The current copyright owner/s of this content may differ from the originally published copyright notice.
More details on copyright ownership...

Electronics & Music Maker - Apr 1984
Topic:
Synthesis & Sound Design
Series:
Understanding the DX7
Part 1 (Viewing) | Part 2 | Part 3 | Part 4 | Part 5 | Part 6 | Part 7
Gear in this article:
Synthesizer > Yamaha > DX7
Gear Tags:
Feature by Jay Chapman
Ads for Gear in this article:


Help Support The Things You Love
mu:zines is the result of thousands of hours of effort, and will require many thousands more going forward to reach our goals of getting all this content online.
If you value this resource, you can support this project - it really helps!
Donations for April 2024
Issues donated this month: 0
New issues that have been donated or scanned for us this month.
Funds donated this month: £7.00
All donations and support are gratefully appreciated - thank you.
Magazines Needed - Can You Help?
Do you have any of these magazine issues?
If so, and you can donate, lend or scan them to help complete our archive, please get in touch via the Contribute page - thanks!