


Magazine Archive
Home -> Magazines -> Issues -> Articles in this issue -> View
Hands On: Sound Tools | |
Article from Sound On Sound, November 1991 | |
Ever wondered what its like to use Digidesign Sound Tools? David Mellor takes the driving seat of the world's favourite hard disk recording/editing system.

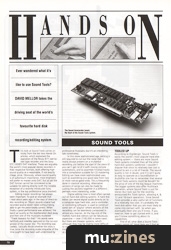
The Sound Accelerator board, the heart of the Sound Tools system.
This look at Sound Tools carries on nicely from the last two Hands On articles, which explained the operation of the Revox B77 reel-to-reel tape recorder and the Sony DTC1000ES DAT machine. These are arguably the world's most popular stereo recorders in their respective formats, both offering high sound quality at a reasonable, if not exactly cheap, price. Obviously, where sound quality is of paramount importance, most engineers will prefer to master onto DAT, but as yet the DAT format cannot be considered to be suitable for editing directly (with the notable exception of a recently introduced Sony system, in the top professional price bracket).
Editing master recordings has always been important. To give an example that I read about years ago: in the days of direct-to-disc recording on 78rpm records a band had recorded several dozen takes without being able to get the piece totally correct. When finally a good performance was achieved, the band sat quietly as the reverberation died away and then one of the musicians muttered "Thank heavens for that!" His words were faithfully and indelibly captured on the run-out groove of the master disc. The recording was useless. I actually doubt whether this story is true, since the recording studio etiquette of the time ought to have been well understood by professional musicians, but it's an interesting tale nonetheless.
In this more sophisticated age, editing is still required to cut out the noise that is nearly always present on a multitrack recording just before the start of the piece (if you can't get rid of it with mixing console automation), and to assemble finished tracks into a compilation suitable for CD mastering. Editing can have more sophisticated uses, such as assembling one good take from two or more not-so-good ones. This is frequently done in classical recording. Alternative versions of songs can also be made by cutting the sections together in a different, perhaps more interesting, order.
Digital editing now is most often carried out on hard disk editing systems. A hard disk editor can record digital audio directly on to a computer-type hard disk, and a controller, or controlling software, is used to construct some sort of 'playlist' where sections of the recording can be seamlessly juxtaposed in almost any manner. At the top end of the market, hard disk editors can be fabulously expensive — over £100,000 in some cases. But there are cheaper systems, which although they may be slightly more difficult to operate and perhaps can't perform all the tricks, can produce results which sound just as good as the more expensive systems.
TOOLED UP
According to Digidesign, Sound Tools is easily the world's most popular hard disk editing system — there are more Sound Tools systems installed than all the other hard disk systems combined. I wouldn't dispute that since its relatively low cost is bound to win it a lot of friends. The sound quality is not in doubt, and if it isn't quite as easy to operate as a SoundStation or AudioFile one has to remember that several Sound Tools systems could be bought for the price of one of the big league machines. The bigger systems also offer multitrack operation, where Sound Tools is just for stereo (but look out for the recently-announced Pro Tools option, allowing 4, 8, 12 and 16-track operation). Since Sound Tools provides a very useful set of functions at a relatively low cost, it's probably the hard disk editor that you are most likely to come into contact with. So when you eventually meet one you'll know, if you read on, how to get started with it, and you'll know something about its capabilities.
First of all, what does a Sound Tools system consist of? Most likely you'll find an Apple Macintosh computer involved (one of the Mac II family in fact), although there is a version for the Atari which is very similar. Inside the Mac will be the Sound Accelerator card which makes direct to disk recording and playback possible, and there will also be extra boxes containing analogue and digital input/output interfaces. Oh yes — there'll be a hard disk somewhere as well, probably external to the Mac if it's a large one. Let's assume that you have managed to wangle your way into a situation where some kind soul has let you loose on a system which is hooked up and ready to go. Now follow these simple instructions...
GETTING IN
Due to the former high pricing of the Macintosh range of computers, only a privileged few (comparatively) have had any experience on the Mac. This is changing because of the introduction of cheaper machines such as the Classic and LC, but in the meantime let me reassure you that they are not at all difficult to use. For total Mac novices, just remember that the Mac works much like an Atari (I'll have to assume that for the purposes of this article the reader has some experience of the Atari at least, or I'll never get onto the interesting stuff). One difference between the two computers which I ought to mention involves the use of the mouse in relation to menus. It could take a while to explain, but now you know there is a difference it'll only take you 30 seconds to figure out for yourself how to use this function of the Mac.

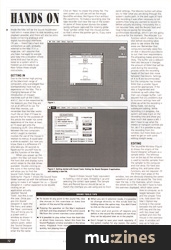
Figure 1.

Figure 2. Getting started with Sound Tools; finding the Sound Designer II application, and creating a new file.
When you power up the system the Mac will boot from the hard disk and display icons which relate to the disk drives available. Double clicking on the icons in the normal way will allow you to find the Sound Tools folder that you're looking for. Figure 1 shows the Sound Tools folder opened up with the software that is going to make it all happen for us — Sound Designer II. I rather expected to be double clicking on an application actually labelled 'Sound Tools', but this is not the case. Once you are into Sound Designer II, open the File menu and select the 'New' command. This will bring you to a screen with a window as shown in Figure 2. From the options given, select the 'Sound Designer II Stereo' format and enter the file name. Click on 'New' to create the empty file. The next screen you will see will be the empty Soundfile window, like Figure 4 but without the waveforms. To make a recording click the tape recorder icon near the top of the screen. (In some of these screen dumps the screen saving software captured the rotating globe 'busy' symbol rather than the mouse pointer, so that's where the pointer got to, if you were wondering.)

Figure 3. Preparing to record.
Figure 3 shows Sound Tools' equivalent to loading a reel of tape, threading it up and selecting the correct tape speed. The Sample Rate and Record Source should be set to match the interface you are using and its front panel settings. The Monitor button will allow you to hear what you are doing through the system's audio path. In the dark ages of hard disk recording it was often necessary to tell systems how long you wanted to record for, before actually recording. Fortunately this is not required here, and the Record Start and Stop times are purely for timecode synchronised recordings, which I am not going to pursue for the moment. 'Pre-Allocate' is a function which checks the hard disk before recording takes place to see where the free areas are. Remember that computers normally store files on disk in discontinuous blocks to suit their own requirements. Pre-allocating makes errors less likely. The buffer size is relevant here also because it changes the amount of RAM that will be used during the recording process while the recording heads of the hard disk move between free blocks. Settings of 4 to 8 are recommended, but the computer has limited RAM then a smaller figure would be appropriate. If the disk is fragmented and cluttered up with other files then use a bigger buffer. I am assured that any problems due to incorrect settings here will show up while the recording is being made, not during subsequent editing. While recording is in progress, the system will keep track on the recording time and show you how much disk space is left. I don't have to say what the meters or transport controls are for, do I? It is possible to play the recording from this window, but more likely you'll want to get on with some editing straight away.

Figure 4. The Soundfile window.
EDITING
The Soundfile Window (Figure 4) shows the origins of the Sound Designer software as a sample editor. The leftmost icon at the top of the window is used to transfer samples from the sampler to the computer and vice versa. For hard disk editing this, and some other functions, are not required. Of the three main areas of the window, two are obviously showing the stereo waveform of part of the sound file. The third, near the top, is the Overview, which shows the whole sound file. You don't have to have the overview displayed, which takes some time to compute, so to toggle between that and the simpler Time Line, hold down the Mac's Option key (lurking in the corner between the left hand shift key and the key with the clover leaf symbol) and click the mouse in the overview area. A window will pop up to help you make your choice.
The way Sound Tools is organised means that rather than performing all your editing in the Sound File window, what you will most probably do is use this window to define a number of 'Regions' in the sound file which you will use to create a 'Playlist'. One region might be the intro of the song, another might be the verse, others might be chorus sections and various backbeats, fills and other interesting bits encountered along the way. Or you might simply wish to 'top and tail' completed tracks, which you will later use to create the playlist for an entire album, if your hard disk is big enough.
Either way, it's best first of all to understand the various icons for the functions available. From left to right, these are:
• Mac To Sampler. Not necessary for hard disk editing.
• Speaker. Clicking here plays back the selected range, or if no range is selected it plays back the whole window.
• Zoom Box. Allows you to draw a zoom box over any part of the waveform. The area selected will expand horizontally and vertically to fill the viewing area.
• Pencil. This switches the display into draw mode. Very useful for declicking.
• Selection. Selection mode is the mode you'll be using most of the time.
• Display Scale Arrows. Changes the scale of the display in both horizontal and vertical directions.
• Numbered Marker, Text Marker and Loop Points. Explained later.
• Tape Deck. You have already used this to record the sound file.
• Playlist. Used for assembling regions.
• Hard Disk Play/Scrub. Used for finding edit points.
Now we know what tools are at our disposal we are ready to start. First, you'll want to audition the sound file. You can start at any point by clicking at the appropriate position on the overview or timeline, then hit the space bar to play. Hit the spacebar again to stop when you come the the start of a likely region. Now click on the Selection icon so that you can define the region. There are two ways of doing this. One is to click and hold the mouse and sweep it from left to right. When you click, the start of the region will be entered and when you release the button this will mark the end. Alternatively, you can click and release to set the start, and shift-click (hold the shift key while you click) to set the end.
To select both channels, simply incorporate a vertical motion into your sweep of the mouse so that it starts on one channel and ends on the other. Both channels will be selected. Finding the correct start and end points is made easier by clicking the Hard Disk Scrub/Play icon. A scrub bar will appear and by dragging the cursor to the left or right the sound will play forward or backwards while a line cursor will move across the screen. I found it best to use the cursor as an aid to spotting the edit point in the waveform display rather than trying to locate playback to the point, as you would with an analogue tape recorder.
Once you can see where the edit is meant to go it's easy to drop out of scrub mode back into selection mode and click to mark the beginning of the region. Marking the end of the region is done in the same way except you have to shift-click. Entering scrub mode is best done by simply holding down the option key while in selection mode; you don't have to click on the Hard Disk Play/Scrub icon. When you have defined a region, you still need to capture it. This is done via the Capture Region command in the Playlist menu, which will consolidate what you have just done so that you can go off and define another region.
There are of course more tricks and subtleties available, but the idea here is to get you started. If you want to explore further, I would advise looking up in the manual the use of markers, which help enormously in finding your way around a large sound file.
PLAYLIST
When you have one or more regions captured; you can go over to the playlist by clicking the appropriate icon. At the top of the window is a list of the regions you have captured and named. To create a playlist, click on the name of a region and drag it down into the playlist area. At this stage you will be invited to title the playlist as you have now actually created something worth giving a name to. After naming the playlist, continue to drag down regions in the order you want them to play. If you wish you can insert a region between two regions already in the list. When you have dragged a few down (don't forget that a region can appear more than once), select the first region in the playlist and hit the space bar to play back your work.
The quality of editing you now hear will depend on how well you defined your regions. If you have had experience in editing already, doubtless the result will be pretty close to perfection, even if it's not 100% yet. If the steady pulse of the rhythm of the track doesn't quite make it intact across the boundaries between regions then you need to do a bit of fine tuning. This happens in the Edit Regions window, which you reach by double clicking on the name of a region in the playlist. This shows the joins between three adjacent regions in the playlist. Clicking the left speaker icon will play across the first splice point, clicking the centre speaker icon plays the selected region, clicking the right speaker icon obviously plays across the second splice point. (You will need to set pre- and post-roll times appropriately).
To shift your edit point, you need to select a start or end point, or start and end point (as shown here between the first and centre regions). Using the nudge buttons you can shift the edit point by small amounts of time. Notice that you can adjust a single region, or by selecting two adjacent regions you can slide the edit point without altering the overall timing. This is a powerful feature, especially when combined with immediate auditioning. It's not quite as easy as with AudioFile or SoundStation, as I said earlier, but the important thing is that you can do it. Crossfades are available with selectable fade time, so it should be possible to join anything to pretty well anything, almost invisibly. Going back to the playlist itself, you can see that different types of crossfade are also available here, where they are more convenient to use.
Once you have tweaked the playlist to perfection, remember to save your work (which you probably did as you were going along anyway). As with all hard disk systems, the original audio data remains intact on the disk until you erase it to make way for another project, so the process should be been one of continual improvement. To keep the result for posterity, copy it to DAT and you'll have your edited piece of work with sound quality every bit as good as the original.
Sound Tools has many more features and can be operated in more ways than I have space to go into here. But now you should know how to approach the system and get some good use out of it. I wouldn't be surprised if I came to look at some other hard disk editors later on in the series. Disk based recording is going to become more and more important in the years to come and it's a good idea to get involved now. Take any opportunity you can to get your hands on a system such as Sound Tools.
Thanks to Sound Technology for the use of their demonstration facilities.
FURTHER INFORMATION
Sound Technology plc, (Contact Details).
SOUND TOOLS TIPS
• Pressing the spacebar on the Mac's keyboard will start and stop playback of the active sound file from the current overview cursor position.
• It is possible to play either from the hard disk or direct from memory. Select this from the Sound Playback window available in the Setup menu. Playback from memory starts more quickly, but playing time is obviously limited.
• When you are in selection mode, it is possible to change directly to the scrub tool by holding down the option key. You don't have to click on the scrub tool icon.
• The start and end points of regions you define in the sound file window are not final; they can be adjusted later on in the playlist.
• Don't forget to save your work regularly. If the system crashes for any reason, the audio will be safe on the hard disk but your edit points will be lost if you haven't saved them.
More from these topics
 Sound FX with the Uher CR240 |
 Adventures In Television Recording |
 Taping Tips |
 Is Analogue Multitrack Recording Dead? |
Home Recording: Frequency Balancing |
 Studio Magic (Part 1) |
 Bits 'n' Pieces - An Introduction to Digital Audio (Part 1) |
 Willow - The Recording of a Film Soundtrack Music |
 The Compleat Sound Effects Recordist |
 Rhythm methods - Drum recording guide |
Sound Bites - Production Tips & Techniques |
Problems - our answers to the common cassetting problems |
Browse by Topic:
Digital Audio Workstations
Recording
Also featuring gear in this article

Publisher: Sound On Sound - SOS Publications Ltd.
The contents of this magazine are re-published here with the kind permission of SOS Publications Ltd.
The current copyright owner/s of this content may differ from the originally published copyright notice.
More details on copyright ownership...

Sound On Sound - Nov 1991
Topic:
Digital Audio Workstations
Recording
Gear in this article:
Software: Hard Disk Recorder > Digidesign > Sound Tools
Gear Tags:
Feature by David Mellor
Ads for Gear in this article:


Previous article in this issue:
Next article in this issue:
Help Support The Things You Love
mu:zines is the result of thousands of hours of effort, and will require many thousands more going forward to reach our goals of getting all this content online.
If you value this resource, you can support this project - it really helps!
Donations for July 2026
Issues donated this month: 0
New issues that have been donated or scanned for us this month.
Funds donated this month: £0.00
All donations and support are gratefully appreciated - thank you.
Magazines Needed - Can You Help?
Do you have any of these magazine issues?
If so, and you can donate, lend or scan them to help complete our archive, please get in touch via the Contribute page - thanks!