


Magazine Archive
Home -> Magazines -> Issues -> Articles in this issue -> View
The Syndrom (Part 2) | |
Getting it togetherArticle from Electronics & Music Maker, June 1984 | |
PCB overlay and pricing details, plus apologies for the gremlins that crept into part one of David Ellis' description of this digital percussion sampling device.
David Ellis continues our percussion-sampling project. This month, full constructional details, pricing and availability, and details of a cassette that demonstrates the Syndrom's sonic capabilities.
The first thing to do this month is to correct a few errors that crept into Part 1. First, in the paragraph at the bottom of page 91 that relates to using the switch to play just half of the contents of a 2732, the line should go: 'only as far as the first 2K... Silly us. Next, on the circuit diagram front, the only real blunder is the value of the +/- supply going to IC7, but this is probably self-evident, ie. for '-7V' and '+7V', it should read '-9V' and '+9V'. Not our fault, m'lord. Honest.
The other point of errata is that a couple of blobs got lost in the circuit diagram wash, and these should be at the junction of C3, C4, -9V, and pin 3 of IC7, at the junction of C5, +7V, and pin 13, and at the junction of the common connection of IC9 with ground. Obvious, but worth pointing out all the same. On the subject of components, life is easier pitching-wise if a linear rather than log 25K pot (R2) is used. The ideal is the anti-log variety, but that's about as common as life on Mars. The same's almost as true for the 330uF (C6) electrolytic capacitor used for smoothing the 5V output from C9, but a 470uF (either tantalum or normal type) won't mind being substituted instead. Lastly, we've replaced the original 100m 78L05 regulator (IC9) with a 1A 7805, for the simple reason that it's better to be safe than sorry.

Syndrom PCB component overlay.
(Click image for higher resolution version)
Construction

The PCB is quite straightforward to put together, but it helps to have a narrow-tipped soldering iron wherever closely-packed tracks are concerned. The best plan of action is to start by inserting the resistors, then the capacitors, and next, D1 (the positive end is indicated by the black circle at the end of the body), the sockets for IC1-8, and IC9. SW1 can be fitted quite happily on the board, as shown in the photo, ready to do the master of ceremonies bit and switch between the acts of the two sorts of EPROMs. If you've plans to use Syndroms en masse in something like a rack-mount unit, then both the trigger and output jack sockets should be mounted on the board together with R2, so that all three can merrily poke out of a front panel and secure the PCB at the same time.
Having connected up a couple of 9V batteries via some appropriate connectors, and made sure that the 'out' side of IC9 is indeed delivering +5V, it's now time to disconnect the batteries and insert the ICs. Because the TTL and ROM are fairly profligate consumers of electrons, the battery on the positive side of the business has a habit of doing a disappearing trick that'd put Mr Marvel to shame. For the record, the +9V rail takes about 125ma, and the -9V around 15ma. So, for starters, see how you get on with a big butch PP9 on the positive side and a PP3 on the negative. And remember to disconnect them when not using the thing! However, if you're going to use the Syndrom seriously and/or intensively, a power supply is an absolute must, and we'll be putting forward some sensible recommendations (including a design of our own, the RackPack) in next month's E&MM.
To actually make the Syndrom speak to you, you'll need some sort of trigger to set the sound regurgitation into motion. We'll be covering the possibility of making drum pad transducers next month, but for initial experiments, there are two ways of going about making Herr Schmitt do his thing.
(1) Using the +5V trigger from any preexisting drum machine or sequencer - the simple option.
(2) Wiring in any push-to-make switch between the trigger input and the +5V power rail - the more complicated option.
In the latter case, don't be surprised if anything other than a quick jab at the button produces a sound more reminiscent of a roll than a single sound. Remember that as long as the trigger input remains high (the situation when your finger's on the button), the counters will cycle till kingdom come, and you're therefore repeatedly yanking the sound out of the EPROM - hence the roll effect.
The Sounds
Now, sampling a sound is easier said than done. To be perfectly frank, there's a pretty complex equation at work that's doing its best to make a pig's ear of a mess if you don't use the right sound source with the right sampling rate. The thing you have to keep utmost in mind is that there's no earthly point in sampling a sound with masses of high harmonics into just 2 or 4K of sample space. The technique we developed in putting together the initial set of samples was to perform a constant juggling act between sampling rate, input level, and input low-pass filtering until we felt that the situation had been optimised. The 21 sounds break down into 2716 (2K) and 2732 (4K) types as follows:
2716: Kick drum, Snare, Hi-hat (closed), High tom, Low tom, High Bongo, Low bongo, Cabasa, Guiro, Handclap (multiple), Explosive finger click, Dog bark, David's aaah, Door slam, David's burp.
2732: Hi-hat (open), Crash cymbal, Orchestral thump, Brassy, Squawk 1, Squawk 2.
Now, a few of these sounds proved problematic because of the difficulty in obtaining a really clean sound source. We considered C-ducing the dog, but thought better of that in view of the RSPCA's stance on the abuse of animals. That left boring old microphone techniques, but old Fido proved implacable when it came to performing on cue: so what we're left with is a rather noisy bark taken from one of Auntie's sound effects discs. It's hardly like howling at the moon, but we're getting there, and it'll be updated as and when we get our hands on a Great Dane that doesn't suffer from stage-fright. In the meantime, take a listen to the 'Explosive finger click' and 'David's burp' for a more objective view of what a sample of life and the Syndrom can do together.
The Demo Cassette
Of course, the inevitable problem with buying a sound EPROM is that until you try them out you've no idea of what they sound like. You might hit lucky and get a sampled bass drum that has a kick like a mule, but, on the other hand, you might get something that's more reminiscent of a thwack around the ear with Lady Bracknell's handbag. So, to add a bit of sonic assistance we've produced a 15-minute demo cassette that includes examples of all 21 sound EPROMs, played both individually over a four-octave range and together in rhythmic patterns. Note however that the latter effect was achieved by simply switching a solitary DAC input from one sound to another in quick succession. In reality, you'd use multiple Syndrom boards to get overlaid percussion tracks, but that's a story for the future... By the way, there's a free EPROM of your choice for anyone who can guess the source of 'Orchestral thump'!
The sounds on the cassette are arranged in three groups, with sounds appearing in the order shown, and these are followed by rhythmic patterns using combinations of the sounds in those groups.
Group 1: Kick drum, Door slam, Explosive finger click, David's burp, Handclap, Dog bark
Group 2: High tom, Low tom, High Bongo, Low bongo, David's aaah, Snare, Hi-hat (closed), Cabasa, Guiro
Group 3: Hi-hat (open), Crash cymbal, Orchestral thump, Brassy, Squawk 1, Squawk 2.
The Syndrom demo cassette is available for £1.00 (inclusive of VAT and postage) from E&MM's editorial address, payable to Glidecastle Publishing Ltd. Once you've decided on the sound that you'd like to try out on your Syndrom board, the appropriate EPROM can be ordered (£6.75 for a 3K 2716 or £7.75 for a 4K 2732) from Silicon Sound, (Contact Details), and cheques should be made payable to the same. If at any time you want to change the sound in an EPROM, we're also offering a 'burn it again, Sam' option, whereby an EPROM returned with £2.50 will be burned in with a new sound of your choice.
Syndrom Parts List
| Resistors (all ¼W, 5%) | |
| R1 | 470R |
| R2 | 25K linear pot (or anti-log) |
| R3 | 2K2 |
| R4 | 47K |
| R5 | 10K |
| R6,7,8 | 4K7 |
Capacitors (all disk ceramic except for C6) | |
| C1,4 | 0.01uF (10n) |
| C2 | 0.02uF (20n) |
| C3,5,7 | 0.1uF (100n) |
| C6 | 330uF (or 470uF) 25V |
Semiconductors | |
| D1 | IN4148 |
| IC1 | 555 |
| IC2 | 4093 |
| IC3,4,5 | 74LS163 |
| IC6 | 2716 or 2732 (supplied separately) |
| IC7 | DAC0800 (or DAC0801) |
| IC8 | LF351 (or TL071) |
| IC9 | 7805 |
Miscellaneous | |
| PCB | |
| IC sockets: 2x8-pin, 1x14-pin, 4x16-pin, and 1x24-pin | |
| 2-pole, 2-way sub-miniature toggle switch | |
| 2 PCB mounting jack sockets | |
| PP3 and PP9 battery connectors | |
All parts are available from Maplin or Technomatics, except for the sound EPROM (IC6), which is burned to order and available from the address given in the text.
PCBs are available from E&MM at the editorial address, price £4.95, payable to Glidecastle Publishing Ltd. A kit of parts is also available from E&MM for £24.95, exclusive of the sound EPROM, but inclusive of the PCB, all electronic components, and the miscellaneous items. Alternatively, you can buy your Syndrom ready-built for £29.95.
Series - "The Syndrom"
More with this topic
 How It Works - Drum Machine |
 Workbench - Sounding Out |
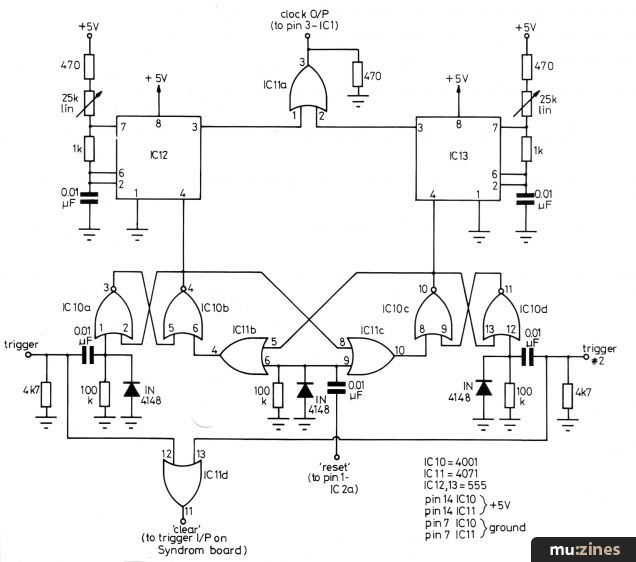
 Constructing A Trigger Delay |
 How to Calm Hysterics in Op-amps |
 Powertran MCS1 - Playing with Time (Part 1) |
 ICs for Electro-Music (Part 1) |
 Bionic Trumpet |
 Hexadrum |
 PA Signal Processor (Part 1) |
 Workbench - Signal Processors — the saga continues |
 Speaker Drive Units - Control Room (Part 1) |
 Workbench - STAGE LIGHTING INTERFACE BOARDS |
Browse by Topic:
Electronics / Build
Publisher: Electronics & Music Maker - Music Maker Publications (UK), Future Publishing.
The current copyright owner/s of this content may differ from the originally published copyright notice.
More details on copyright ownership...

Electronics & Music Maker - Jun 1984
Feature by David Ellis
Help Support The Things You Love
mu:zines is the result of thousands of hours of effort, and will require many thousands more going forward to reach our goals of getting all this content online.
If you value this resource, you can support this project - it really helps!
Donations for May 2026
Issues donated this month: 0
New issues that have been donated or scanned for us this month.
Funds donated this month: £0.00
All donations and support are gratefully appreciated - thank you.
Magazines Needed - Can You Help?
Do you have any of these magazine issues?
If so, and you can donate, lend or scan them to help complete our archive, please get in touch via the Contribute page - thanks!