


Magazine Archive
Home -> Magazines -> Issues -> Articles in this issue -> View
Article Group: | |
Hard Bargain | |
SamplitudeArticle from The Mix, March 1995 | |
Budget direct-to-disk recording for PC
Samplitude Pro represents a powerful yet cost-effective way into direct-to-disk recording for PC users, and also throws in a few surprises. Danny McAleer finds true love...
Ever since it got its first taste of hard disk recording, my PC has been pining for a more powerful system like Logic or Cubase audio. But as they discovered in the Italian government, power comes at a price, and short of actually joining some gruesome organisation and partaking in some racketeering, there's little chance of me ever getting the cash together.
Fortunately, there are a number of inexpensive options, and Samplitude Pro is one to take a peek at. The requires a 386 PC or faster to run, with Windows 3.1 and at least four megabytes of RAM installed. The actual hard disk requirements are dependent on the length and quality of recording, but as a rule of thumb, one minute equals 10 Mb of space at 44.1 KHz. The program itself, and all of its accompanying demo files take up an additional 2.5 Mb.
Installation is a simple process, involving nothing more than typing a:\setup from the Program Manager, and then following on screen prompts. Samplitude creates a folder for itself, and three others for the different types of files it creates; RAM, virtual, and hard disk projects, each of which can be put where ever you want them.
Starting out
To start a project, or indeed any work, Samplitude first needs a sample to work with. One can either be imported (in WAV format), a project loaded from disk, or you can opt to start afresh with a new sample.

A montage of sampling options are available in the record window, but just mind where you're poking those VU needles
Clicking on the record option in the project menu (or pushing the record button on the menu bar), opens up the parameters window for taking a sample. A choice of fixed sampling rates (48, 44.1, 32, 22, 16 and 11 KHz), mono or stereo, eight or 16 bit samples are selected here. The option of selecting between recording to RAM or to the hard disk; the latter obviously more useful for longer samples (unless you already have a zillion megabytes of RAM). Recording to RAM is more useful for taking one-off samples for using in MIDI dumps, or to export as system sounds, or whatever.
If the PC has more than one sound card, or a card with both analogue and digital inputs, then the recording device can be altered accordingly to use the right audio connections. Switching the monitor on allows you to hear the input signal through the sound card's outputs, and also to monitor the levels with the graphic VU meters. Adjustments to levels can either be done at the signal source, or with the sound card's own mixer accessory.
Depending on which of the RAM two recording options were chosen (RAM or hard disk), the file path and file extension are altered accordingly. It is worthwhile remembering to rename the file before you initialise recording, otherwise it uses the filename last used, and thus re-writes (without warning) over a previously recorded sample. The only time this doesn't happen is when the samples are both part of the same project.
Once a sample has been taken, an icon appears in the main window, ready for editing. The sample can be viewed in one of three ways; two views offer two and three copies of the waveform, so you can zoom in on a particular section whilst still displaying the whole sample.
Three copies of the sample allow you to see both ends of a loop point for sample accuracy editing.

With the effects parameters in Samplitude Pro you can add copious amounts of delay and reverb to your sample
Listening in
There are three buttons for playing back the sample; play once, looping continuously, or playing back marked range. The space bar toggles between start and stop, and plays the sample from the first marker point in a loop, whilst the esc key aborts the whole playback when 'overloading' occurs (the sample goes completely mad, as does the PC). However, this only happened once, when I had several large samples in RAM.
Playing files back from the hard disk can sometimes cause small interruptions. This doesn't often happen in single files, or virtual projects with up to four tracks playing simultaneously, unless the hard disk is particularly fragmented. Where it did occur during this review was in playing back eight tracks in a virtual project.
There is a remedy for this in the System menu. Changing the HD buffer size from its lowest default value of 8.192, to 16,384 or even 32,768 (as I had to do for eight tracks), improves the audio playback continuity greatly. The only drawback with having such a large buffer is that it takes up more physical RAM. If any alterations are made to the HD buffer, the same must be made to the Virtual Project buffer.

Chop out those grizzly frequencies in the filter window
Editing samples
Only marked ranges are used for editing, but the whole sample can be selected by pressing 'a' on the keyboard. Ranges can be created by pulling a shaded rectangle over the desired portion of the sample with the left mouse button depressed. Once a range has been defined, fine tuning can be achieved by pulling the block in either direction, and then these can be stored into a bank of user-definable range memories (accessed by the function and function plus shift keys).
The bottom panel contains all the functions for magnification, and manipulating the ranges. One clever function is to be able to zoom in on the vertical axis, as well as the more conventional horizontal axis. This allows you to see the quieter portions of the sample in more detail, and thus have greater confidence in removing parts that look like noise.
The editing of samples is the same for both RAM and hard disk projects, although of course, hard disk files are written and re-written directly to disk. During any editing functions, a progress bar keeps you informed as to how far into the operation the computer has got.
Normalising finds the peak of the sample, and adjusts the rest of the sample accordingly, to get the best signal to noise ratio. You can also reduce or increase the levels by a percentage factor. Increasing the levels can cause a sort of distortion, which when used effectively can have excellent results, particularly on guitar samples, and raspy synth sounds.

Media linking allows you to synchronise MIDI or AVI files to virtual projects
Reducing the levels (to around 70 or 80%) is useful for when adding reverb and delay to the sample, as these processes often cause an increase in volume.
The reverb is quite subtle, and unlike some other digital effects I've tried on sample editors, tends not to sound like a drainpipe with a rusty spring in it. Three sliders corresponding to the amount of reverb, the 'size' of the room, and early reflections. The room size parameters fall between 0 and 300, where 100 is roughly average.
Other editing functions in Samplitude include a definable high, low, and band pass filter, reverse, and a comprehensive set of resampling/time-stretching tools. By typing in the desired length of the sample, Samplitude re-creates the sound to the new size. This operation does require a lot of RAM, so unless you have more than four megabytes, the buffers will need altering again (lowering the HD and virtual values). Closing any other samples is an idea too.
Echo offers two definable parameters: The delay in milliseconds which can be set from anywhere between 1ms (great for creating phasing and other weird harmonic effects), to 2 seconds, and a decay level. Setting this to anything above 100% produces a sort of feedback, where the decay actually gets louder.

It's dull locking; it's functional; it's the MIDI sample dump window
In the undo definitions, you can select to enable or disable undo for RAM and HD projects, and also how many levels of undo (up to a hundred) available. Unless you're prone to stupid mistakes, or fickle about your editing, no more than three or so levels are needed. Opting to have the undo function on for HD projects is quite sensible, although it does require a bit of temporary disk space to create an 'undone' copy of the sample.
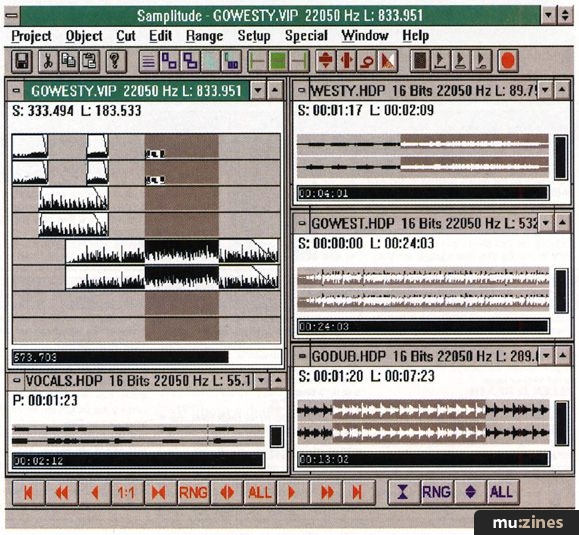
Virtual projects
A virtual project is the name given by Samplitude to the one, two, four, or eight track arrangements of samples. An infinite number of samples can be used, duplicated, and edited in a virtual project, dependent only on the amount of hard disk space available. Any editing performed (volume, cut and paste, fades and positioning) is performed non-destructively, which allows you to make several different edits from the same material. Once a sample has been used once in a virtual project it becomes part of that file, and is recalled each time the VP is loaded. Having all the sample windows and the VP open at the same time can make the screen rather cluttered, but pressing return tiles all the open files into a sensible order so that all can be fully viewed.
The range part of a sample can be dropped anywhere on the track bars, and then moved around using the right mouse button. You can make as many copies of the portion as you need once it is in. This way, you only need record one or two bars of a percussion loop, saving a huge amount of disk space for other samples. Copying a part is done by holding down the control key as you move the desired part along with the right mouse button. Using the raster function ensures that the parts don't overlap.
Each part can be assigned its own name, plus a new background and foreground colour, allowing you to colour-code certain instruments, or sections of a song. Cutting and pasting works in much the same way as the RAM project, except here there is no discrimination between what is, or rather was, a separate sample to begin with. Sections of all of the tracks are cut and pasted together.

View your sample in many different ways. How Freudian
Clicking on a single sample portion with the right mouse button selects it for editing. Each box has around its edges objects called 'handlers' which can be pulled around to create fade-ins, volume changes (with the middle handlers), and fade outs. The fades can be as long, or as short as you like, but always fade to zero volume. Lining two mono samples up, so that one fades in as the other fades out, creates an excellent panned cross fade, which I used for a vocal part.
Mixed media
Samplitude has a function whereby you can synchronise the playback (or indeed recording) of samples with either MIDI files, or AVI video files. This way, you can have a drum pattern in the MIDI file, and have it play back as you record a guitar or vocal part to disk. Using the AVI video file option, you can inexpensively perform post-production audio to video testing.
The program also supports the MIDI sample dump standard, and so can be connected via MIDI to any compatible sampler/keyboard and swap samples. Stereo samples are sent as two individual samples for those modules that are compatible, or merged into mono. Dumping samples is reasonably fast, and certainly comparable in terms of speed to Replay 16 on the Atari. It does actually seem to work better too, particularly with the Korg T3, which can at times be quite fussy about what samples it allows.
Verdict

The results achievable with Samplitude Pro are potentially astounding. Its strength lies in the ludicrously easy way it is to get started on a project, whilst still having a professional level of functionality. Then again, it not only performs well with direct-to-disk recording and sequencing, but has the additions of MIDI sample dumping, synchronisation with MIDI and AVI video formats, and a versatile sample editor too.
Perhaps what would make this program nothing short of perfect would have been including a separate page for virtual project and sample editing, thus cluttering the screen less. But this is a minor quibble, and Samplitude is certainly a near perfect, inexpensive piece of software worthy of an 'essential' recommendation.
The essentials...
Hard disk requirements
| Sampling rate | Mono | Stereo |
|---|---|---|
| 16-bit @44.1 KHz | 5.292 Mbytes | 10.584 Mbytes |
| 16-bit @22.05KHz | 2.646 Mbytes | 5.292 Mbytes |
| 8-bit @44.1KHz | 2.646 Mbytes | 5.292 Mbytes |
| 8-bit @22.05KHz | 1.323 Mbytes | 2.646 Mbytes |
On the RE:MIX CD

On this month's Re:Mix CD there's a demo version of Samplitude Pro to try out. Read the guide in Toolbox on how to install it.
Publisher: The Mix - Music Maker Publications (UK), Future Publishing.
The current copyright owner/s of this content may differ from the originally published copyright notice.
More details on copyright ownership...

The Mix - Mar 1995
Donated by: Colin Potter
Coverdisc: Simon Dell
Control Room
Review by Danny McAleer
Ads for Gear in this article:

Help Support The Things You Love
mu:zines is the result of thousands of hours of effort, and will require many thousands more going forward to reach our goals of getting all this content online.
If you value this resource, you can support this project - it really helps!
Donations for May 2026
Issues donated this month: 0
New issues that have been donated or scanned for us this month.
Funds donated this month: £0.00
All donations and support are gratefully appreciated - thank you.
Magazines Needed - Can You Help?
Do you have any of these magazine issues?
If so, and you can donate, lend or scan them to help complete our archive, please get in touch via the Contribute page - thanks!