


Magazine Archive
Home -> Magazines -> Issues -> Articles in this issue -> View
Using Microphones | |
Article from Home & Studio Recording, February 1984 | |
Miking up small percussion.
Passing from drum miking techniques to miking hints for percussion, we enter the subject of recording acoustic instruments. Whether you're recording a violin, a pair of maracas, an acoustic guitar or a triangle, you should always attempt to capture the 'natural' sound of the instrument, and this is usually achieved by distant microphone pickup techniques - preferably with condenser microphones.
Condenser Mic Basics
Frequency Response
Of all the constructional details of a condenser mic, this one makes its acoustic properties readily understandable. The mass of its diaphragm is only in the order of 1-5 mg as compared to, perhaps, the 75 mg of a dynamic microphone's diaphragm. In order for a diaphragm to pick up sound vibrations it should be able to move 'in sync' with the corresponding air pressure changes around it. In the case of very fast changes, such as those experienced at high frequencies, the small mass diaphragm of a condenser will follow them more accurately. This is partly why a frequency response extending well up to 20kHz is quite common for condenser microphones.
Transient Response
It takes any instrument a few milliseconds to set up the vibrations and produce sound after it has been 'activated'. This is known as its attack time, and is one of the qualities that characterises the sound of an instrument. As an experiment to prove this, try recording a single note played on different instruments and then splice off the beginning of the note. You'll find that the instrument has lost its identity and will be very difficult to recognise as a result.
The attack time varies from long (strings, bass instruments) to the short transients of percussion instruments. Again, the lightweight diaphragm of a condenser follows a sudden attack more easily and thus it displays a better transient response.
Distant Recording
Condenser microphones are more sensitive to sound than dynamic types: they deliver a higher output for the same sound pressure level, generally around 15dB. This is an important consideration when recording more distant (and therefore quieter) sound sources. The condenser mic will still supply the microphone input with a sufficient level and the gain can be kept within a safe operating range. A dynamic microphone, however, would require excessive gain in this situation which results in increased amplification of hum (picked up through microphone cables etc.) and amplifier noise.
Distortion
This can be a problem with condensers. The weak point is the preamplifier that is integrated into each condenser mic to convert its impedance. Unfortunately, the maximum undistorted (below 1% THD) sound pressure level specification is not too meaningful as a rule, as it is measured at 1kHz, when the problem actually occurs at low frequencies. AKG are the exception to the rule, as their stated specifications for the C460 are 138dB for 0.5% THD measured between 30 and 20,000 Hz.
Generally speaking, when things get really loud, dynamic mics are safe to use; condensers with built-in attenuators will probably do it - but steer clear of electrets!
Power
Condenser mics need a DC power supply from the mixing desk (carried by the audio cable) with the exception of battery-supplied electrets. Most microphones accept a voltage between 9V and 48V (universal phantom power). High quality types which are least prone to distortion usually require a 48V supply. Professional mixing desks (and many semi-pro ones nowadays) offer phantom powering at their balanced microphone inputs. However, balanced inputs are not a must to provide phantom power.
DIY Phantom Powering
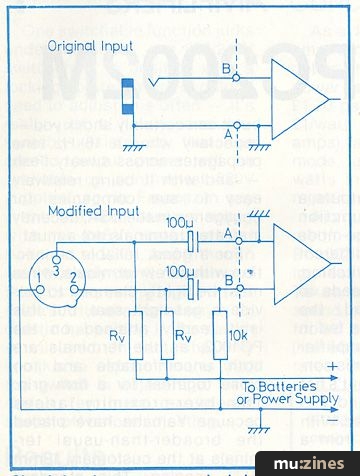
Circuit for phantom powered mic input.
If you want to build phantom powering into your unbalanced desk or tape machine, the major modification is to replace your ¼" mono jack sockets with 3 pin sockets - either stereo jacks or XLRs. XLR connectors are preferable as stereo jacks are usually used for send/returns or headphones which might lead to confusion and are less rugged.
If you don't want to modify your unit, build an external supply unit into a metal case for shielding. You can either use two 9 volt batteries or simply tap your mixer's own power supply. Find some stabilised 12V or 20V supply rail, and use this, as the 1mA current drain per microphone won't do it any harm.
Figure 1 shows a possible circuit. Resistors Rv have to be at least 0.5% tolerance types to satisfy the symmetry requirements. The following are standardised values for Rv:
| Power | Rv |
|---|---|
| 12V (+/- 2V) | 680 ohms |
| 24V (+/- 4V) | 1-2Kohms |
| 48V (+/- 4 V) | 6-8 Kohms |
Dynamic mics can still be connected to this phantom-powered input as before, but no phantom current will flow through the capsule.
Recording Percussion

Recommended mic positioning for congas.
Congas and bongos don't deliver much sound above 8kHz so cheaper mics with a dynamic response are sufficient eg. AKG D80, Shure 558, EV PL6 etc. Figure 2 shows a recommended position for miking, but for mono a single microphone may be pointed between the drums.
The same choice of mics would also be sufficient for cowbell which can be miked up pretty close with a dynamic mic.
There are various small percussion instruments easily recognisable by their sound and looks, but their names are often familiar only to the percussionist eg. guiro, vibra-slap, cabasa and so forth.
In terms of sound they are similar to the well-known tambourine and may be recorded likewise. They all deliver virtually no low frequencies and so a bass cut can be applied, either via a switch on the mic itself or from the mixer EQ, to reduce sound spillage, background noise and particularly 'pumping' effects when noise reduction systems are operative. This, generally, will help improve the instrument sound and prevent it from losing its identity in the mix.
Small percussion instruments should be miked from above at a distance of between 20 and 60 cm. This also ensures a uniform sound level reaching the microphone if the instrument is moved whilst being played (maracas, tambourine etc.).
To capture the sound of these instruments a condenser microphone is ideal, as it captures their fast transients and high frequency components perfectly. One disadvantage of such mics is that they are prone to pick up too much 'rumble' noise; in which case, an elastic suspension mount can help cure the problem.
The vibraphone and marimba are usually best recorded using two microphones, about 1 metre apart and 60 to 80 cm above the instrument, pointed at the bass and treble ends, respectively. In most cases condensers should be used, but if you think that the sound reproduced is too accurate ie. when playing with stiff, bright-sounding mallets, then go for good quality dynamic mics such as AKG D222, Sennheiser MD441 or similar.
One final word of warning - drums and percussion require very careful level setting when being recorded. Their fast transients won't show up on your VU display, so watch out. Keep the meter set between -10 and -3dB VU and you're away!
More from these topics
 Is Analogue Multitrack Recording Dead? |
 Success in the Miking |
 State Of Independence - Dave Stewart On Going It Alone In The Music Biz |
 Step by Step |
 But What Does A Producer Do Exactly...??? |
Home Recording: Frequency Balancing |
 Studio Sound Techniques (Part 1) |
 Notes on the Recording of Synergy's "Cords" |
 Using Microphones |
 Sessioneers - Sessionmen Special |
 Oddballs & Out Takes - Studio tales |
 Digital Overdubbing |
Browse by Topic:
Microphones
Recording
Publisher: Home & Studio Recording - Music Maker Publications (UK), Future Publishing.
The current copyright owner/s of this content may differ from the originally published copyright notice.
More details on copyright ownership...

Home & Studio Recording - Feb 1984
Donated & scanned by: Mike Gorman
Feature by Wolfgang Staribacher
Previous article in this issue:
Next article in this issue:
Help Support The Things You Love
mu:zines is the result of thousands of hours of effort, and will require many thousands more going forward to reach our goals of getting all this content online.
If you value this resource, you can support this project - it really helps!
Donations for June 2026
Issues donated this month: 0
New issues that have been donated or scanned for us this month.
Funds donated this month: £0.00
All donations and support are gratefully appreciated - thank you.
Magazines Needed - Can You Help?
Do you have any of these magazine issues?
If so, and you can donate, lend or scan them to help complete our archive, please get in touch via the Contribute page - thanks!