


Magazine Archive
Home -> Magazines -> Issues -> Articles in this issue -> View
Sonus MasterPiece | |
Software for the Atari STArticle from Music Technology, November 1987 | |
The software catalogue for the Atari ST continues to grow. Ian Waugh checks out a sequencer package that may give Steinberg and Hybrid Arts serious competition.
One new addition to the expanding Atari ST software library is a sequencer/composer package from American company Sonus; the competition is tough, does it match up?

THERE CAN NOW be no doubt at all as to which computer is the music computer. At least, which computer has the most MIDI software available for it. Of course, it's the Atari ST. There is now more music software for the ST than for all the other computers put together. In spite of that we still have to see some "intelligent" software (such as M and Upbeat for the Mac) but there is certainly no shortage of sequencing and voice editing programs.
It was barely 18 months ago that the Commodore 64 held the Most MIDI Software Available For title, but even now some software producers have dropped their C64 products in favour of those for the ST. Ah, the fickle hand of the software developer.
To be fair, the STs half or 1Meg RAM and 16-bit processing speed - to say nothing of its built-in MIDI interface - make it an obvious choice for music and now that the 520 has been reduced to under £300, it well and truly put the C64 on the spectator's bench. I wonder what will be ruling the roost 18 months from now.
Let's take a quick look at the company responsible for MasterPiece and who hope to make an impact on the ST MIDI program market: Sonus.
They have a good track record in the States and have won awards for their software over there. They've recently set up a distribution centre in the UK - just too late to qualify for a stand at this year's BMF - but they have an enormous range of Mac, C64 and ST software. When you're used to seeing software companies slowly develop and increase their product range it gives you a touch of future shock to see someone suddenly appear with over 30 software titles on offer.
Layout
RIGHT, INTRODUCTIONS OVER. MasterPiece is Sonus' latest, and was adapted from a version for the Mac. It runs in medium resolution mode on the ST and uses a dongle to prevent naughty people making copies for their friends. Without a dongle the program runs in demo mode, which could be a neat form of advertising: if you like the bootlegged demo, go buy the complete program.
MasterPiece is a Song-based sequencer which allows you to chain together up to 24 Sequences. Each Sequence can contain up to 32 tracks which play back simultaneously. There is one main screen which is divided into five windows. Selections can be made with the mouse or from the keyboard, although some options (stopping recording and playback, for example) are only available from the keyboard.
The 24 Sequences are shown in banks of six in the upper left window. Below that are the Transport Controls containing Play, Record, Fast Forward and Rewind controls. Movement through the recording is à la tape recorder, a tried and tested method of operation. You can fast forward or rewind in pulse or beat increments.
The Transport control section also has icons to take you to the next and last Cue Points. Up to 25 Cue Points can be defined - and named - and are shown in the top right window.
Here, too, you see a counter which ticks off the music in measures, beats and pulses. MasterPiece has an internal resolution of 192ppqn (pulses per quarter note) even when being driven by a MIDI clock running at 24ppqn.
Below the Counter is the End indicator which tells you how long a Sequence is and below that are In and Out counters which are used to define a range for editing or autopunching.
The lower right window contains the Tracorder, basically a 25th Sequencer which can be used as a scratchpad or a temporary store for a Sequence (before you try out a potentially fatal editing procedure). Here, too, you'll find a Refuse Can (it is American) icon and Full Range and All Events flags. These are useful during editing if you want to override a preset range or set of event filters.
The lower left window has icons for all the 32 tracks in a Sequence. All Tracks and Sequences can be named, a feature you will appreciate after laying down half a dozen or more lines.
So let's get down to recording. The first thing to do is click on the Clock menu. Here you can select Internal or External clock and Real or Step-time input (we'll stick with Real-time).
Next, select the Clock Hold option. This is used to set up the way you want to record the first track. You can start recording as soon as you play the first note, start the clock when the first note is played but don't record it (so you can start a sequence with a silence, for example), start recording with any MIDI controller, wait for a start byte from a MIDI drum machine or start immediately you click on the Record icon. You can also specify an intro count in measures for the recording of subsequent tracks. If you can't find a setting to suit you here you just ain't tryin'.
The Clock Hold and various other assignable settings you may wish to use regularly as "default" values can be saved in a Configuration file. If you give it the name DEFAULT, the program will automatically look for it and load it upon booting.
"You'll normally want to quantise both the beginning and the end of notes, but the other options may be useful for special effects."
Metre and Tempo are set from the Edit menu and apply to all tracks in a Sequence.
Recording
CLICK ON A Sequence and a Track, dick on Record and off you go. The first Track is used to determine the length of a Sequence and the end of it appears in the End Counter. This pointer can, however, be altered. It is used purely as a marker and data beyond the End is retained.
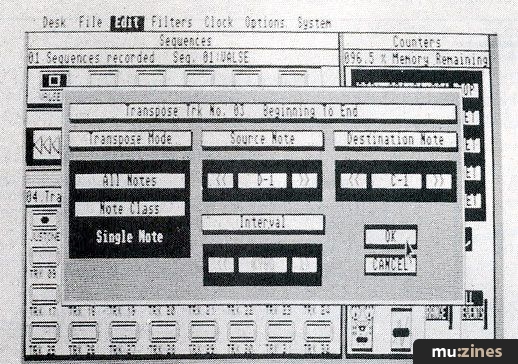
A Track can be copied to another by dragging with the mouse. From the Edit menu a Track can be Appended to another, copied to itself, Quantised and Transposed.

Transpose can be made effective on all notes, a range of notes or only single notes. Quantise offers values from a whole beat to a 1/128th including triplets. It also lets you set a tolerance range so any notes within that range will not be quantised. This allows you to retain a "human" feel while ensuring that grossly inaccurate timing errors are corrected. In practice you may find you have to do a little event editing, too, to get a piece just right.
There's also an Alignment control here which introduces a positive or negative offset value to the track. This could be useful if a synth sound has a slow attack and doesn't gel with the rest of the sequence, for example.
Finally, you can elect to quantise the beginning of the notes, the end of the notes or both. You'll normally quantise both to keep the note lengths the same but the other options may be useful for special effects or, for example, to maintain the release portion of an envelope.
Two other editing features can be found here: Scale Velocity and Shift Track. Scale Velocity lets you program a crescendo or diminuendo using velocity levels 1-127. Using the In and Out counters to set the edit range you can easily add dynamics to any part of your music. But of course, you need a velocity-sensitive keyboard to appreciate this. Shift Track lets you shift a complete track backwards or forwards in time.
A Track can be sent to up to four MIDI channels at once. It can also be directed through two MIDI outputs if you have Sonus' MIDI Interface, the MIDI Port B, which plugs into the Modem port. You can also select a Velocity Scaling factor to increase or decrease a Track's volume in a Sequence. All these are playback functions only and don't affect the original data although they can be made permanent by clicking the Harden icon.
Other editing features operate on a complete Sequence. You can Append, Shift and Transpose a Sequence much as you do a Track and you can additionally push the beginning of a Sequence forward to remove unwanted bits from the start of it.
Filtering
THE FILTERS MENU gives you flexible and versatile control over all that MIDI data which you may or may not want to preserve during editing. First on the list is Input Filters which determines what MIDI data will be ignored during recording. Options are Pitch-bend, Controller, Aftertouch, Program Change, Velocity Level and System Exclusive.
Edit Filters is used to determine the types of MIDI data which will be affected by Bouncing, Editing and Erase functions when the All Events flag is off. It can be a quick way of switching a set of filters in and out.
Other Filters include Note Pitch, Note Velocity, Channel, Aftertouch, Controllers, Pitch Wheel and Program Change. Most have All, Some or None options where appropriate and you can set the parameter range which you don't want filtered. For example, the Channel Filter lets you specify a range of channels which would survive any editing processes.
In addition to the functions mentioned previously, the Clock menu holds several other options. Normally, the Counter resets itself to zero after playback, but clicking on Auto Zero will prevent a reset. You can also make the playback loop.
"The Editor comes on a separate disk - files must be saved, the Editor booted and the files loaded into it which is really rather a nuisance."
On the MIDI front you can turn MIDI Clock output on and off and you can choose to send a clock timing byte with the MIDI start byte at the beginning of playback. Some drum machines interpret the MIDI start byte as the first timing byte while others (Yamaha's RX11 and RX21 for example) interpret it only as a start command and require a separate timing byte.
You can define reset information for various controllers which will be sent at the end of the sequence: Centre Pitch Wheel, Zero Mod Wheel, Max MIDI Volume and Sustain Pedal Off.
Finally, there's the Seam Manager. This is used to determine how much bookkeeping time you allow the system at the end of a Sequence. For example, if 20 notes were playing right to the end of a Sequence it would take 20 milliseconds to send all the Note Off commands and the next downbeat would arrive 20 milliseconds late.
To avoid this you can specify a value in pulses (0-192) which will be devoted to bookkeeping and the program will pinch these from the very end of the Sequence. It follows that no data can be processed in the Seam Manager's time. This is rather an exotic feature which most of us (without a myriad of synths) will be able to ignore 99% of the time.
The Options menu can be used to Mute and Solo Tracks although you can do this directly from the STs keyboard. It will also display information on all the Tracks in a Sequence. If you lay down a lot of tracks this is very helpful.
You can send an Omni Off/Poly (Mode 3) command to all channels - in case your synths start up in Mode 1 - but you can't return them to Mode 1 as easily. You can send a Note Off command to all keys over every channel (this takes about 12 seconds) in case something goes drastically wrong and you get the dreaded MIDI drone. You can also send the end of Sequence data as defined in the Clock menu.
There's a View MIDI data option here too, which translates incoming data into a stream of bytes which scrolls across the screen. This is useful to check that you're inputting what you're supposed to be inputting, but the data is in hex and events aren't separated. A translation into English wouldn't be too difficult and would be far more helpful to non-computerate musicians.
You can send a set of initial start-up commands consisting of Channel Assignment, Patch Number and Velocity Level. These are set in the Systems menu under the heading of Set Ups.
Cue the Systems menu where we also find an Auto Punch command which automatically drops you into a Track and out again at points determined by the In and Out counters. The Play Through command lets you play other synths or expanders from your master keyboard as you record. This lets you play the actual sound during recording that will be heard on playback. The Captive Play Through command lets you play any other synth from your master keyboard without recording.
Mapping
CONTROLLER MAPPING IS another item of Masterpiece exotica. It lets you map the values of one MIDI Controller into another as they are input into the ST. You could use this, for example, to turn Breath Control data into Pan Control or Sustain information. It also lets you map Pitch-bend, Aftertouch and Velocity which are not, strictly speaking, controllers. You can have lots of fun with this as well as producing some rather weird effects.
You can designate any MIDI channels as Drum Channels. These will not be transposed during editing operations and are called Drum Channels, naturally enough, as you wouldn't want MIDI drum data to be transposed.
Finally, there is a Safety option which tells the program to ask for confirmation before performing an irreversible operation.
Using Step Time input, the Counter can be made to advance automatically by a specified amount after each entry (made from the synth) or you can advance the clock manually. You can select 1/4, 1/8, 1/16 and 1/32 notes plus triplets. These are measured in Pulses and you can manually select any Pulse length (1-192).
"When you're used to seeing software companies slowly develop it gives you a shock to see someone suddenly appear with over 30 software titles."
Having selected Step Time for recording, playback takes place in step time, too. You must reselect Real Time to play back normally. A niggle.
I must confess I have yet to find an ideal method of steptime note entry. Most sequencers seem to concentrate on real-time input. MasterPiece does a fair job - better than some, worse than others - but you can easily tie yourself in knots if you have a lot of different note lengths or irregular note values. You can't step back during entry and you can't delete notes. However, for fairly straightforward pieces it works okay.
Composing
WHEN YOU'VE RECORDED your Sequences you enter Song Mode to string them together. The Song Mode screen is similar to the Sequence Mode and in it you can chain together up to 32 Elements. An Element is basically one of your Sequences but it can have its own transposition, number of repeats and you can mute any of the 32 tracks.
Many of the Clock, Option and System facilities are available in Song Mode too. Additional features can make the program output Song Position Pointer data. You can adjust the overall tempo of the Song by a percentage and transpose the whole song.
If you're wondering why I haven't mentioned event editing yet it's because the Editor comes on a separate disk. Files must be saved, the Editor booted and the files loaded into it. This is really rather a nuisance although for 520 owners I suppose the 74066 bytes the Editor contains could be used for music storage but personally I'd rather have everything available at once.
The Editor has Transport controls to move around the data along with Markers and Search controls which let you search for specific events. The data appears in a large window which shows the type of data, its position, the channel, the note name (if it's a note), velocity level and length.
You can play the piece, play the section which is shown in the window and mute any of the 32 tracks. You can also filter various data from the Options menu.
Editing consists of deleting or inserting events and, of course, you can alter any of the parameters shown in the window by clicking on them.
A slightly annoying feature of the whole program is the way all the screen updates after most operations rather than just the window or icon which has been altered. It may only take a second or two but it miffed me.
Finally, if you're wondering about sync facilities, Sonus are about to release a SMPTE box.
Verdict
CONCLUSION TIME. IT seems to have taken so long to detail the features of MasterPiece that I haven't said much about its performance in use. Okay, Real Time input works very well and once you've run through the manual and acquainted yourself with the options, it's really easy to use. It has enough sophisticated features to make friends with most kinds of MIDI equipment.
Step Time input is par for the course, even a little better perhaps, but not ideal.
During playback the mouse is locked out and I would have liked the ability to mute tracks and generally fiddle around with other things on the fly (you can alter the tempo with the cursor keys). Other software lets you do this so it's quite feasible.
MasterPiece is a solid, workmanlike piece of software with several nice features and one or two niggles. (Does anyone know of any completely niggle-free software? Manufacturers need not reply.) As such, it's up there with the other main sequencing programs for the ST.
So, do you buy it? All the main ST sequencing programs are good pieces of software and preferences, I'm afraid, will be personal. But I can say this: if you want an easy-to-use Real Time biased song-oriented package then put MasterPiece on your shortlist. It's cheaper than its direct competitors and its files are compatible with Sonus' SuperScore, a notation printing program which is nearing completion and should be worth looking at.
Prices Masterpiece £199; MIDI Port B £50; SMPTE box £321; SuperScore £165; all including VAT
More from Sonus, (Contact Details)
Also featuring gear in this article

Publisher: Music Technology - Music Maker Publications (UK), Future Publishing.
The current copyright owner/s of this content may differ from the originally published copyright notice.
More details on copyright ownership...

Music Technology - Nov 1987
Donated & scanned by: Mike Gorman
Review by Ian Waugh
Ads for Gear in this article:

Help Support The Things You Love
mu:zines is the result of thousands of hours of effort, and will require many thousands more going forward to reach our goals of getting all this content online.
If you value this resource, you can support this project - it really helps!
Donations for May 2026
Issues donated this month: 0
New issues that have been donated or scanned for us this month.
Funds donated this month: £0.00
All donations and support are gratefully appreciated - thank you.
Magazines Needed - Can You Help?
Do you have any of these magazine issues?
If so, and you can donate, lend or scan them to help complete our archive, please get in touch via the Contribute page - thanks!