Workbench - Impedance. What is it?!
Electronics / Build, Maintenance / Repair / Modification
(IM Mar 86)


Magazine Archive
Home -> Magazines -> Issues -> Articles in this issue -> View
Using Microphones | |
Microphone BasicsArticle from Home & Studio Recording, November 1984 | |
A rundown on microphone basics.
Having concentrated over previous months on the intricacies of microphone placement and special recording hints, I think it's about time to cover some fundamental facts about microphones. Facts that, although well known to the veteran home studio owners, are of vital interest to the many newcomers. Facts, also, that are rarely discussed in recording magazines and yet which everybody seems to understand. Actually, most of this article consists of questions people keep asking me through the years.
Can I plug any mic into my Portastudio?
Yes. Cassette-type multitrack equipment is designed to accept a wide range of input levels. Plug any mic into the input and adjust the input gain for optimum level. Though dynamic, low impedance microphones won't deliver too high a voltage when used at great distances from the instrument to be recorded, it should suffice.
With regard to signal-to-noise ratios: I've had my trusty 144 Portastudio measured in a friend's laboratory and he told me that an extra 20dB of gain (required to make low impedance output equal to high impedance output) costs me a 2dB decrease in signal-to-noise, worst case! So, I wouldn't worry too much about impedances and utilise common (low impedance) microphones.
What about Mic Inputs (of tape decks etc.)?
It's okay to use these with any dynamic mic. If you have condenser mics (the ones that need powering from the mixer or batteries) you may overload the input amplifier. An alarm signal should start ringing inside your head as soon as you have to work with faders all the way down. Don't trust your VU meters in this instance, they may be well in the safe area and yet you still get only garbage on tape. There's a sad but true story behind this folks: though using top grade equipment, AKG mics and a Nakamichi tape deck, I once blew a recording this way by trusting the VU display. It's best to use condensers with attenuation pads or (worse) the 'line' input of your equipment. Line inputs of mixing desks will, of course, accept all signal levels.
What length mic cable?
As short as possible, but trust your ears. Long, unbalanced cables (the type usually employed with home recording gear) may pick up stray magnetic fields resulting in 'hum'.
High impedance?
High impedance (high Z) microphones must have short cables to ensure high frequency content won't get lost. High Z mics are rare on this side of the Atlantic. Some Shure models, the 565 for example, are dual impedance types and are usually shipped connected for low impedance operation; so, as long as nobody has changed the internal connections, there's nothing to worry about. If in doubt, check the supplied data sheet or ask a recognised dealer. Rewiring is easy - just change the plug connection for low impedance operation as this best suits recording purposes.
It doesn't work...!
No output from the microphone? Well, a mic breaks down quite seldom, so check your cables first for bad soldering joints and correct wiring (see this column in HSR July/August). Check your mic's on/off switch (it does happen!) and replace the battery if it's an electret condenser type of mic.
Having traced the fault to your mic itself, send it to a dealer for repair, but if you're pushed for time you can try a basic repair job if it's a dynamic type microphone.
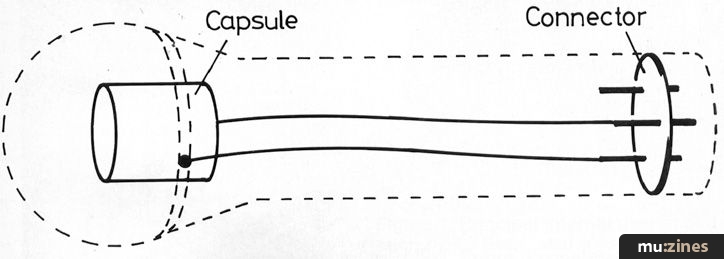
Figure 1. Principal internal design of a microphone.

Figure 2. Mic with on/off switch.
Figure 1 shows the basic design of a dynamic mic. The two leads coming from the transducer element (capsule) are directly soldered to pins 2 and 3 of the mic's XLR connector (pins 1 and 3 for a DIN connector).
Figures 2/3/4 show the principal connections if an on/off switch, bass cut switch or an output transformer is employed.

Figure 3. Mic with switchable bass cut switch.
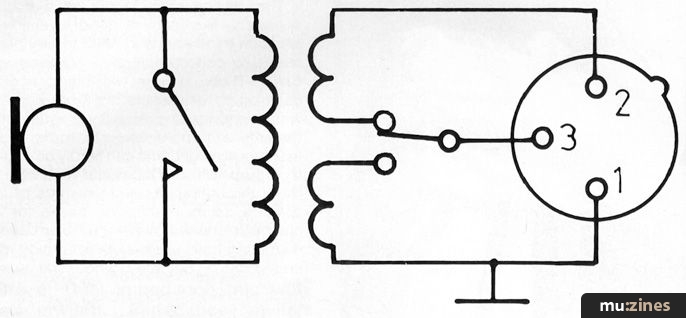
Figure 4. Dual impedance mic with on/off switch. Impedance switch shown in low Z position. Note: phase change and unbalanced wiring for high impedance (used in many models).
How do I check the mic, electrically?
For a first check, an ohmeter is of great help. By connecting it to the hot pins (2 and 3 XLR, 1 and 3 DIN) it must 'see' the capsule's resistance - very roughly corresponding with the mic's own impedance. The ground (earth) pin must not have any connection with the hot pins. Ohmeter readouts:
Pins 2/3 (XLR), Pins 1/3 (DIN) 1-100 Ohms (low Z).
Pins 1/3 (XLR), Pins 1/2 (DIN) Infinite Ohms.
Pins 2/3 (XLR), Pins 2/3 (DIN) Infinite Ohms.
Having discovered any irregularities, open up the mic (most capsules may be unscrewed counter-clockwise). The chances are that you'll find a bad soldering joint or a lead that doesn't have a connection to its soldering lug. You can also check the resistance of the capsule directly at its soldering lugs, but a visual inspection will let you find the fault quickly.
If the capsule is out of order you'll need a replacement and these are generally available as spare parts from the manufacturer/distributor.
Microphone care... what should I do?
Microphones, fortunately, don't need any servicing except for integrated windscreens which are usually made of special foam. Every now and then, these should be pulled out and washed carefully in a mild detergent solution, then leave to dry overnight. A heavily soiled pop screen does affect the sound and feedback characteristics of a microphone so pay attention to the cleaning.
More from these topics
 |
 Getting The Most From A 4-Track - Better Recording |
 Basic Microphone Technique |
 Setting Up Shots |
 Hands On: Sound Tools |
 First Guitar Faults - Your First Guitar |
 Step by Step |
 Before You Start Making That Demo Tape - Demo Tape Discipline |
 Studio Sound Techniques (Part 1) |
 When the Pressure's On |
 The Vinyl Solution |
 Of Mikes & Men - Buying & Using: microphones |
Browse by Topic:
Maintenance / Repair / Modification
Microphones
Recording
Publisher: Home & Studio Recording - Music Maker Publications (UK), Future Publishing.
The current copyright owner/s of this content may differ from the originally published copyright notice.
More details on copyright ownership...

Home & Studio Recording - Nov 1984
Donated & scanned by: Mike Gorman
Feature by Wolfgang Staribacher
Help Support The Things You Love
mu:zines is the result of thousands of hours of effort, and will require many thousands more going forward to reach our goals of getting all this content online.
If you value this resource, you can support this project - it really helps!
Donations for September 2026
Issues donated this month: 0
New issues that have been donated or scanned for us this month.
Funds donated this month: £0.00
All donations and support are gratefully appreciated - thank you.
Magazines Needed - Can You Help?
Do you have any of these magazine issues?
If so, and you can donate, lend or scan them to help complete our archive, please get in touch via the Contribute page - thanks!
Please Contribute to mu:zines by supplying magazines, scanning or donating funds. Thanks!
Monetary donations go towards site running costs, and the occasional coffee for me if there's anything left over!

 @mu_zines
 RSS Feed
 Blog
Blog