


Magazine Archive
Home -> Magazines -> Issues -> Articles in this issue -> View
Kawai K1 Editors | |
Steinberg & SoundbitsArticle from Sound On Sound, December 1988 | |
Tony Wride investigates the Steinberg and Soundbits Atari-based voice editing programs for the Kawai K1 multitimbral synthesizer.
Tony Wride investigates two of the latest Atari-based voice editing programs for Kawai's best-selling multitimbral synthesizer.
I remember the days, not so long ago, when synthesizers had lots and lots of funny looking objects with which you could instantly tweak any of the various parameters which made up the sound. Then somebody de-invented the knob, gave us a load of multi-function switches and a small LCD display, and created a whole new problem: "How the **** do I edit a sound?". To be fair, if the current generation of synths had knobs on them, they'd cost twice the price at least.
As a result of this technological progress towards the 'knobless synth', and the general increase in the number of computer-owning musicians, a whole new industry was spawned. I'm talking of course about computer editing programs for synthesizers, and what follows is a look at two such editors for the remarkable Kawai K1. Since, by all accounts, the K1 is selling like the proverbial 'hot cake', and thousands of musicians already own Atari ST computers, some of you should find this review useful.
STEINBERG SYNTHWORKS K1
In keeping with other Steinberg packages, the K1 program comes complete with a copy-protection 'key' or dongle, which must be inserted into the Atari's cartridge port before you can run the program. Along with this key comes two program disks (one for medium resolution colour monitors and one for high resolution mono) plus a fairly extensive manual to help get you up and running quickly.
Let me say at the outset that Atari 520ST owners will not be able to run the K1 Synthworks program on their 512K machine unless they have had its internal memory expanded to one megabyte (1024K), 1040ST owners will have no problems.
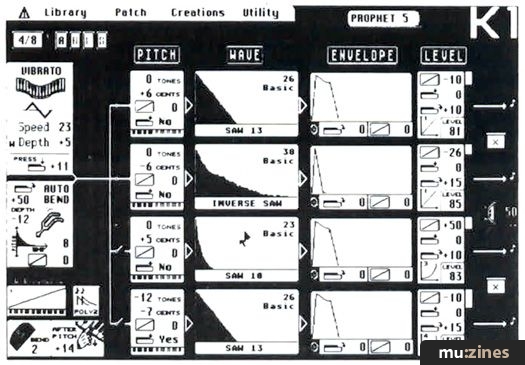
Figure 1. Synthworks K1 Single patch screen.
SINGLE EDIT PAGE
What you see after booting up the program is a screen display which looks very similar to Figure 1. This is the Single Edit page, containing lots of very impressive little icons and graphic symbols for just about all of the parameters that make up a Single patch on the K1. The screen is laid out in a very similar format to the diagrams that appear on the top panel of the K1 itself, starting with the Common variables on the left, followed by Pitch, Wave, Envelope, and Level parameters for each of the four Sources. The remaining elements at the right of the screen are for setting the overall volume and for switching the 'AM' feature.
To adjust any of the values, you simply point at the appropriate icon and click the mouse. Steinberg give you no less than five different ways of modifying a parameter using the mouse. The first two methods simply allow you to increase or decrease values by clicking the mouse buttons - left to decrease, right to increase, or vice versa. Alternatively, you can adjust a value by holding down either of the mouse buttons and moving the mouse horizontally or vertically. Finally, you can select the 'click and type' option, which involves just that.
Although the Common block does not have a title, careful inspection of the screen reveals that some of the elements on the left (Vibrato and Autobend) are linked to the four Sources via what looks like a bit of circuit diagram. In fact, close scrutiny of Figure 1 reveals that only Sources 1 and 2 are set to be affected by Vibrato and Autobend, whilst Sources 3 and 4 appear to be switched off. To open or close the 'switches' simply involves a quick point and click.
Five other items appear to the left of the screen, which complete the Common block, namely: number of Sources used with polyphony available as a result (the 4/8 shown in the top-left corner). Keyboard Scaling curve, Poly Mode, Pitch Bend Wheel amount, and Aftertouch Pitch Bend amount.
The buttons marked 'ABCD' at the top-left are for switching between the four Single buffers. These are an extremely useful feature, since you can work within one edit buffer until you reach a point where you have a good sound, copy that sound to another buffer and make further adjustments, then copy the results of that edit into the next buffer, and so on. This gives you the welcome ability to return to previous stages in the sound constructing process.
The Pitch section lets you adjust the following five parameters (from top to bottom): Course Tune, Fine Tune, Keyboard Scaling Curve amount, Aftertouch control of Pitch Bend on/off, and finally Keyboard Track. I might just as well tell you now that if you see an icon which shows a keyboard key with a tiny downward-pointing arrow above it, it is referring to Aftertouch, and if it shows an equally small curved arrow it is representing Velocity. (They say a picture is worth a thousand words, but I wonder!)
WAVING OR DROWNING?
Obviously, many K1 owners have degrees in advanced harmonic structuring, and a graphical representation of such things is an absolute must if you intend to produce a sound - or is that just what Steinberg believe? If you are a mere mortal like me, you will no doubt look at the pretty pictures under the 'Wave' heading, ignore them, and simply refer to the waveform name printed below! Come on guys, who actually looks at the Wave List supplied by Kawai with the K1 and can instantly get an idea of the sound you are going to get just by looking at the harmonics?
In the world of Fairlights I would agree that being able to look at the harmonic structure of a waveform is useful, since you can actually do something about it, but with the K1 all you can do is select one of 256 different waveform types - there is no form of filtering available on the synth itself. Perhaps if Steinberg hadn't gone to the effort of storing 204 harmonic tables in memory, the program might have been able to run on a 520ST machine!?
To select a new Wave, you simply change the number in the top right-hand corner of the appropriate Source.
ENVELOPES AND VERY FAST GRAPHICS
On clicking one of the small envelope graphs, a large window opens displaying the chosen envelope in an enlarged format. From this window you can adjust the various envelope parameters of Delay, Attack, Decay, Sustain, and Release (but not Level), either by adjusting a series of numbers at the bottom of this window or by grabbing the appropriate point on the envelope graph and dragging it. The latter method is extremely fast, mainly due to the fact that Steinberg have utilised their own special, custom-designed graphics environment instead of sticking with the standard GEM interface found on most other Atari software.
Apart from being able to edit an existing envelope, you can call up a series of preset envelopes, copy envelopes (and place any of the other Source's envelopes in the background as a comparison), or use a Link function which basically adjusts all four envelopes when you adjust any one.
If you have read the manual that came with your Kawai K1 and understood the section about the envelope, you may notice something quite interesting about Figure 1. Although the diagrams of the envelopes do show the relative values of Delay, Attack, Decay, Sustain, and Release for each Source, it should be remembered that the Envelope Level parameter acts as a volume control and adjusts the peak level that the envelope attains. So, in real terms, what you should see is a compression of the overall envelope as the Envelope Level parameter is reduced.
On the Steinberg editor there is a separate Level section and it does not change the overall height of the graphic envelope displayed within the Envelope section. For instance, if you had selected a very low (Envelope) Level setting of 40, so that it just brought in a hint of the breath sound within your patch, you would still see the envelope rising to the full height of the envelope graph and not to a point just under half-way down. This can be seen quite clearly in Figure 1, where Source 4 has a Level setting of 74. This should, in theory, show the peak of the envelope appearing around the three-quarters mark, but it doesn't. Instead, you have to glance over at the separate vertical bar within the Level section to see the relative value.
To be fair, this must be due to the fact that it would have caused a lot of problems to achieve the ideal, since within whatever Level setting you have you need to divide that figure by 100 to give the true step size of each increment of Sustain! It would have required some very clever programming and an ultra high resolution monitor to achieve it. As long as you remember that you must refer to the Level section to complete what effect the envelope is having, then no problems. Personally, I would have preferred it if Steinberg had let you set up the Envelope parameters within the separate large window, without any reference to Level, and then produced a suitably compressed and representative envelope diagram when you switched back to the main screen.
The final elements of the Level section complete the remaining parts of the envelope adjustment in terms of Velocity, Aftertouch, and Keyboard Scaling.
That's not all there is to the Single Edit page, you can also copy Sources, and change the Patch name either by typing in a new name or by using Steinberg's Automatic Naming facility. To quote the manual: 'A computer analysis of the English language has given us basic rules for creating pronounceable names. Do not expect to find words you already know, it is not a dictionary!' I'll agree with that statement, especially when my best edit of the famous 'Ahh' sound ended up being called 'ferdwang'!!!
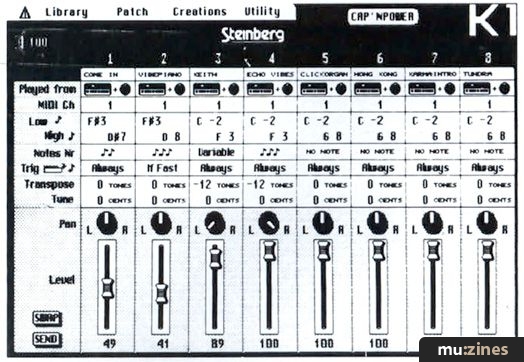
Figure 2. Synthworks K1 Multi patch screen.
MULTI EDIT PAGE
This is where you combine up to eight K1 Single patches to form one overall multitimbral Multi patch. You can switch instantly to the Multi Edit page either by selecting it from the Patch menu at the top of the screen or by pressing the number '2' key on the Atari. Figure 2 shows a typical display. As you can see, the screen layout adopted is more akin to that of a mixing desk, having familiar Pan knobs and Level faders, which makes a lot of sense when you think about it.
This page is very straightforward to use provided you remember that the K1's MIDI specification does not allow you to edit the Multi parameters in real time. I didn't like the fact that the only reference you have to the Single patches being used within the Multi patch is a name rather than a bank and program number. In order to hear the results of your work, you have to click on the Send button in the bottom left-hand corner of the screen. Just above this is a button marked 'Swap', which lets you compare two versions of your Multi patch.
Don't forget the golden rule when working with Multi patches - you must have the appropriate Single banks loaded into memory and must always transfer the Multi bank and Single banks together, otherwise you will not get what you originally wanted. I forgot the rule and ended up wasting an hour's work.

Figure 3. Synthworks K1 Librarian screen.
STORING PATCHES IN THE LIBRARIAN
The Librarian facility on the K1 Synthworks program is very well thought out, and has several useful little features not readily apparent at first glance. (See Figure 3.) You can see the names of all 96 patches (64 Single and 32 Multi) that make up a Bank, which is the way the K1 works in terms of using its Internal or Card memory. Remember that you cannot use an external Single patch as part of an internal Multi patch, and vice versa. The computer can hold three Banks within its memory at once, and you can scroll through them by clicking on the arrows at the top right of the screen.
As well as the four Single buffers mentioned earlier, Bank X provides a group of nine all-purpose buffers. You can store eight Single patches and one Multi patch in these locations for copying to another Bank.
When you select a Single patch on the Librarian page by pointing and clicking the left mouse button, apart from that patch being sent to the appropriate memory location in the K1, any Multi patches that contain that Single patch are highlighted. Conversely, if you click on a Multi patch, the Single patches it uses are highlighted. I found this little feature extremely useful. It avoids ruining a favourite Multi patch simply because you elect to edit one of the Singles.
To move a patch from one location to another you use the right mouse button. If you click on another patch then the two patches are swapped. Initially, I thought doing this was going to totally screw up the Multi patches, since all they look for is a Single patch memory number not a name. However, the clever boys at Steinberg have thought of this and if you do swap two Single patches, the Synthworks software will automatically update all the Multi patches of the Bank linked to these Singles. Bloody clever if you ask me!! If that's not enough, there are numerous other examples where Steinberg have thought carefully about the 'Singles linked to a Multi' problem and have taken steps to avoid disaster, including maintaining the links when you reorganise the Singles and Multis alphabetically using the 'Alphabetise' function.
AUTOMATIC PATCH CREATION
If you are into creating some really weird sounds, the Automatic Patch Creation facility will have you jumping for joy. You can define what parts of a Single patch are going to be affected using a 'Redefine Mask' option, which lets you select whether the Pitch, Wave, Envelope, or Level parameters are free to be adjusted. The facility can be set to create one Single or 32 Single patches, complete with new names, following a so-called logical progression. There is also a function known as 'Blind Random", which doesn't appear to follow any form of logical progression and as a result gives even more useless sounds!
Opening the Utility menu, you suddenly discover that Synthworks provides a simple but accurate sequencer which can record up to 3000 notes, is tempo adjustable, can be looped on playback, is compatible with Pro24, and is 'transparent', ie. you can edit, load or save K1 files, create sounds, etc, and the sequencer will continue to play.
It was while using this sequencer that I stumbled across another little feature that really made me stop and think, as it caused me to lose a collection of edits! To start and stop the sequencer you press the letter 'P' key on the Atari. Close inspection of the various menu options reveals that other functions can also be selected using a single key on the Atari. Unfortunately, yours truly just happened to press the 'R' key (which selects the Blind Random function) at the wrong time and watched 32 quite usable edits disappear into oblivion, never to be heard again!! The moral of the story is to save your work regularly as you progress, and be sure you know what keys do what or pay the price!
Suffice it to say that the Steinberg Synthworks K1 program offers just about everything you need to edit, create, or store new sounds, and I found very little missing from its comprehensive capabilities. Unfortunately, due to the lack of a suitable monitor, I was unable to test the colour version of the program but suspect that several things may be quite difficult to see on-screen, since there are a lot of very tiny icons used all over the place.
SOUNDBITS K1 VOICEMASTER ST
Having looked at the Steinberg program that seems to do everything but open the can of beer at suitable intervals, we now move to the world of much easier to use software but with far less facilities.
One instant advantage of the Soundbits program is that it will run on a 520ST using an ordinary TV as a monitor, which will no doubt please those people who use such a set-up. It is all well and good the likes of Steinberg saying that the minimum requirement is for a 1040ST, but some of us do have a limited budget and may not be able to afford the additional cost of buying the larger capacity computer and a high resolution monitor to run an all-singing, all-dancing program.
To get the Soundbits program up and running simply involves inserting the disk (no key is required), 'booting up', and answering a few simple questions (Is the K1 connected? Is a RAM/ROM card fitted? What MIDI Channel?).
The program then loads the contents of the K1's internal memory into the computer and you are presented with the Library screen (Figure 4).

Figure 4. Soundbits K1 Library screen.
IN THE LIBRARY
Close inspection of the Soundbits Library screen reveals that you are initially presented with Banks A and B, which each hold a set of 32 Single patches. If you click on the Goto option within the menu bar, you can change from the Single Library to the Multi Library where, again, you have two banks of 32 patches. Unfortunately, you cannot view all the 64 Single and 32 Multi patches that make up a K1 Bank at the same time, as is possible with the Steinberg program.
You select a Single patch for editing either by double-clicking on the desired patch name or clicking once and dragging the patch to the Transfer window (edit buffer). Interestingly, no matter what patch location you select the sound is always sent to the Internal A1 memory slot in the K1, which I thought a bit of a limitation - until I thought about it. With the Steinberg program, when you select a patch it is instantly placed in the appropriate slot in the K1, overwriting whatever was there before.
Consider the following scenario: You want to change just a couple of sounds within your internal Bank by loading in some new sounds from a Bank that exists on disk. To ensure that you don't overwrite valuable sounds within the K1 when using the Steinberg program, you would need to go through a fairly lengthy routine of placing the internal memory in one Bank while loading the additional set of sounds into another. Then you would have to place the sounds that you wanted into, say, the Bank X buffer and then move them into your original Bank. With the Soundbits program, I found things so much easier. Having taken the precaution of saving the original internal memory contents of the K1 on disk, something you should do with either program before commencing any editing, you simply load a new set of sounds into the computer and can then listen to each of them in turn, only disturbing one of the original sounds in the K1. Once you know what sounds you want and have decided where to put them, the process is very straightforward.
Other things that appear on the Library screen include a Copy facility for moving elements of one patch to another (eg. the Frequency from Source 4 of one patch to Source 3 of another), and a Rename facility, where you simply type in a new name. You can switch to the Editor screen at any time by clicking the icon at the bottom of the Library screen.
Something else that is not readily apparent, unless you look carefully at the Desk option in the menu bar, is that Soundbits have included a very useful Desk Accessory that may be used on its own or within other manufacturer's programs. It allows you to load K1 voices into the Atari and send them to the K1. The file included on the disk is not copy protected, which means that you are free to send your voices to a friend who can boot up this Accessory and then load your K1 voices. This little 'extra' is extremely handy for use with, for instance, any GEM-based Atari sequencers (but not Dr.T programs).

Figure 5. Soundbits K1 Single patch Common screen.
SINGLE PATCH EDITOR
The parameters that make up a Single patch are split across two screens (Figures 5 and 6). The initial screen lets you adjust the Common parameters of a patch, values being adjusted by clicking/holding the left mouse button to decrease and the right button to increase. At the top right of the screen is a Goto box, within which you can select to return to the Library (hence the bookshelf icon) or switch to the Source screen. The small loudspeaker icons are used to represent the Sources.
The Source screen is dominated by the graphical representation of the Envelope parameters, and these values can be adjusted either by clicking to increment the number or by dragging a point on the envelope. The astute amongst you who followed my criticism of the Envelope section in the Steinberg program will notice something even more strange about the Soundbits program.
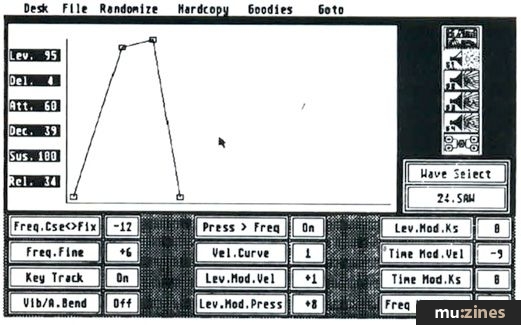
Figure 6. Soundbits K1 Single patch Source screen.
Look carefully at Figure 6 and note that you have a very short Delay setting of 4, with an Attack rate of 60 (a bit of a slope) rising to the Level point at 95, followed by a Decay of 39 rising (??) to the Sustain level of 100!! Remembering what happens in real terms, this representation is incorrect since the Sustain level, even if set to 100, should never exceed the overall Level value. For instance, if you had a Level value of 60, then a Sustain value of 50 should appear at about half the height of the Level.
Following numerous telephone conversations with Soundbits, where yours truly pointed out this fact, a minor change has been made to the program in that what you now get is more like the ideal. The initial envelope graph can be used to set up the values but will not truly represent what is really happening. By then clicking the right mouse button, the graph is redrawn to show the envelope a bit more like its true form (ie. compressed if the Level value is reduced).
Unlike the Steinberg program, there is no facility to superimpose the envelopes from other Sources for comparison purposes but you can instantly call up what another Source envelope looks like simply by using the Goto box.
Having made an adjustment, you can hear what the edit sounds like either by playing the K1 keyboard or by activating the Soundtest facility. This will sound a Middle C note if you click on any point outside the editable boxes, chords if you press Function keys 1 to 4, or a short sequence if you press Function key 5.

Figure 7. Soundbits K1 Multi patch screen.
MULTI PATCH EDITING
It seems that everybody is going in for letting the computer create a new patch. The Randomise feature on the Soundbits program seemed to create far more usable sounds than the Steinberg equivalent. You have far better control over what items are randomised and can choose between an option that will randomise the patch according to a set algorithm, or one where you can define the parameters you want randomised. This second option uses a 'Mask', much like the Steinberg program, but you have even better control of what gets affected.
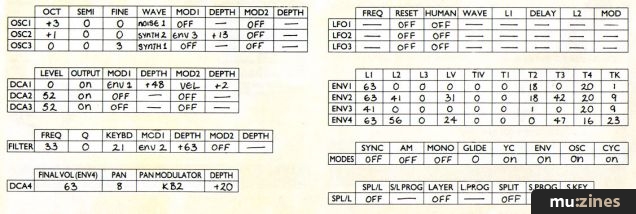
Moving from the Single patch editor to the Multi patch editor produces another uncluttered screen which displays the parameters for one Section only of the chosen Multi patch. (See Figure 7.) To select one of the eight available Sections for editing, you just click on the appropriate numbered keyboard icon, which now also has the Single patch name printed above it (not shown in Figure 7). Although fairly easy to use, I did prefer having all eight Sections on screen at once (a la Steinberg) but liked the fact that the Soundbits program specified which Bank the sound came from.
DECISION TIME!
Comparing these two programs is a bit like comparing a Rolls Royce with a Ford Escort! There is no doubt that Steinberg's Synthworks K1 has far more facilities, gadgets, pretty icons, etc, and at £99 (inc VAT) represents good value for money. However, I personally prefer a program which has uncluttered screens and which doesn't require a set of 'high resolution spectacles' so that I can see the right little icon.
If I had spent more time with the Synthworks program and got used to all of its facilities, including the keyboard commands on the Atari, I might possibly be less reserved about recommending it. If you have the time to learn how to use the program properly, the right Atari and monitor, and have the spare £99, then buy the Steinberg editor.
At £75, the Soundbits program represents a slight saving and it could be argued that it is a little overpriced when compared with the Steinberg. However, despite this, I personally preferred using the Soundbits K1 editor.
FURTHER INFORMATION
Synthworks K1 £99 inc VAT.
Evenlode Soundworks, (Contact Details).
Voicemaster K1 £75 inc VAT.
Soundbits Software UK, (Contact Details).
K1 EDITOR COMPARISON TABLE
| Feature | Steinberg | Soundbits |
|---|---|---|
| 520 ST compatible | No | Yes |
| Used with normal TV | ??? | Yes |
| GEM based? | Own System | Yes |
| New Sounds | 128 | 128 + 32 Multi |
| No. of Banks (64 Single + 32 Multi) | 3 | 1 |
| Sound Test | Yes | Yes |
| Sequencer | Yes | No |
| Random Voice Creation | Yes | Yes |
| Automatic Voice Naming | Yes | No |
| Alphabetic Sort | Yes | No |
| Multi/Single Tie | Yes | No |
| On-screen Help | Yes | No |
| Patch & Library Printout | Yes | Yes |
| Copy part Voices? | Yes | Yes |
| Free Upgrade | Yes | Yes |
| Cartridge port Key | Yes | No |
| Price (inc VAT) | £99 | £75 |
Also featuring gear in this article

Browse category: Software: Editor/Librarian > Steinberg
Browse category: Software: Editor/Librarian > Soundbits
Featuring related gear

K-1r
(MIC Aug 89)

Kawai K1
(MT Jun 88)

Kawai K1 Synthesizer
(SOS Jun 88)

Kawai K1/K1M
(MT Mar 88)

Kawai K1R Synth Expander
(PH May 89)

Making The Most Of Your Kawai K1
(SOS Feb 90)
Patchwork
(MT Jan 89)
Browse category: Synthesizer Module > Kawai
Browse category: Synthesizer > Kawai
Publisher: Sound On Sound - SOS Publications Ltd.
The contents of this magazine are re-published here with the kind permission of SOS Publications Ltd.
The current copyright owner/s of this content may differ from the originally published copyright notice.
More details on copyright ownership...

Sound On Sound - Dec 1988
Donated & scanned by: Mike Gorman
Gear in this article:
Software: Editor/Librarian > Steinberg > Synthworks K1
Software: Editor/Librarian > Soundbits > K1 Voice Master
Gear Tags:
Review by Tony Wride
Help Support The Things You Love
mu:zines is the result of thousands of hours of effort, and will require many thousands more going forward to reach our goals of getting all this content online.
If you value this resource, you can support this project - it really helps!
Donations for April 2026
Issues donated this month: 0
New issues that have been donated or scanned for us this month.
Funds donated this month: £0.00
All donations and support are gratefully appreciated - thank you.
Magazines Needed - Can You Help?
Do you have any of these magazine issues?
If so, and you can donate, lend or scan them to help complete our archive, please get in touch via the Contribute page - thanks!