


Magazine Archive
Home -> Magazines -> Issues -> Articles in this issue -> View
Room EQ, Myth or Legend? (Part 1) | |
Article from Home & Studio Recording, November 1986 | |
If there are two sides to an argument, you can bet that Ben Duncan will be on the other one. Can the graphic equaliser survive after this?
There's more to room equalisation than just equalising a room. As always, Ben Duncan injects a little controversy into the proceedings.
If your monitoring doesn't sound even, despite having paid lavish slims for good speakers, you may reasonably conclude that the room itself is responsible for colouring the sound. One way of combatting this is to analyse the room's response curve, using a spectrum analyser. We can then apply some compensation, using a graphic EQ to even out the stray frequencies. Simple in theory, but practice is another matter.
The Abandonment of Graphics
As you probably know, graphic equalisers are multi-band tone controls, not simple bass and treble knobs. The audio spectrum is divided and thus controlled in eight or more smaller segments (or bands). But why graphic? Well, instead of being rotary, the controls are sliders, giving a graph-like display of the dB's boost or cut against ascending frequency.
But it may be that the days of the graphic are numbered...
There's no doubt that, used in moderation, they are valid and worthwhile studio tools, and yet there's one job where they're likely to be a big hinderance, unless they're particularly good. That's equalising the combined room/speaker response to be 'flat' at the mixing/listening position. In part, the setback relates to facets of the speaker/room combination that graphics cannot reach, such as anomalies in the time domain. But even if we concentrate on the EQ's home territory, there are some snags. To begin with, the spectrum analyser you've hired will most likely have an exact ⅓ octave response, meaning that the 9 octaves that encompass music are broken down into 27 bands. If the graphic EQ you're using is a 1— or ½-octave model (with eight or 16 bands), the outcome is subtraction: you'll find yourself tweaking adjacent faders in an attempt to tidy up the response at one point, without losing the nice flat line at an adjacent frequency. In effect, we end up trying to 'equalise the equaliser', a thankless task. This establishes rule no. 1; before equalising with an analyser, make sure that the octave rating matches the analyser set. Usually, this means using a 1/3-octave graphic. Anything with less than 27 bands just won't do.

Figure 1.
Toys or Tools
The majority of budget graphic equalisers don't exhibit constant bandwidth. This is to say that an individual slider only covers about 1/3 of an octave at a particular setting. At all other settings, either boost or cut, the bandwidth is either broader or narrower. Figure 1 shows how bandwidth is universally defined for ⅓ octave response. Here, we're concentrating on the EQ response curve for just one of the sliders, which is set to a boost position, while the remaining 26 are set flat. For ⅓ octave EQ with constant bandwidth, the response falls off -3dB either side of the centre frequency, fc (this is the one printed under the knob, in this instance 1 kHz) at upper (fh) and lower (fl) frequencies, which are always respectively 112% and 89% of the centre frequency. Needless to say, a ½ octave EQ has its own different set of ratios for fl and fh.
If a graphic EQ truly has constant bandwidth, fl and fh are always 3dB below the peak boost or cut, always provided it's ±3dB, or greater. So for +3dB boost, for example, the response of a 1kHz filter flattens out to 0dB at 890Hz and below, and at 1.12kHz and above, with the obvious proviso that all the other sliders are set flat.

Figure 2A.
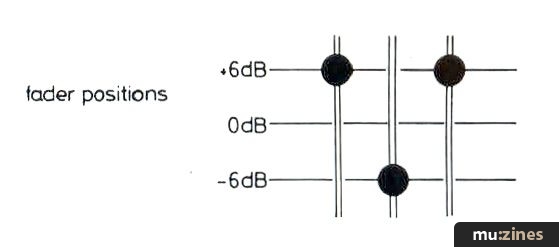
Figure 2B.
So what happens in practice, when a triad of adjacent faders are set to boost, cut and boost respectively? When a graphic lacks constant bandwidth, we soon discover that it's impossible to achieve any cut when the faders on either side are set to boost, or vice versa. What happens next is portrayed in Figure 2a — it's also very rude. The adjacent faders overrule any attempt to cut. Instead they conspire to create a curve of dubious proportions. Typically, this is double the boost you applied to each. So with the two outer knobs set at +6dB (as in Figure 2), you can expect a +12dB peak.
And unless your monitoring system has over ten times the normal drive power in reserve (as headroom), you can also expect to drive it into 100% overload at this frequency. Meanwhile, the overlaid 'V' curve shows the response we'd anticipate if the fader positions were truly 'graphic'. But this can only be realised with a constant bandwidth equaliser.

Figure 3.
A fictitious setback with constant bandwidth graphic EQs is their 'ripple'. Figure 3 shows how the response dips up and down ±2dB, like a comb filter, when all the knobs are set in a straight line, across the range of boost and cut settings. This looks great in colour brochures, and makes a good sales pitch in domestic mid-fi circles. But when did you last see a graphic set-up with all the knobs in a straight line? It's obvious that boosting all the frequencies equally is somewhat pointless. One option is to bypass the graphic. Another is to set all the knobs into the centre. Either way, the dreaded ripple promptly disappears. By the same token, we should avoid trying to generate a shelving response (Figure 5) with any graphic; this is strictly a job for ordinary tone controls: the bass and treble variety.

Figure 4.
The Phase Bogey
Any instrument which causes frequency response to deviate from a straight line invokes a side effect known as phase shift. As a rule of thumb, phase changes +10° per 3dB of dipping, regardless of whether the response irregularity is brought on by a speaker, mic, or any kind of equaliser. In extreme cases, a messy phase response can wreck an instrument's timbre, but there's no need to get hysterical; if a graphic is set up to exactly compensate for a speaker's response peak or dip, the nett phase shift will ideally cancel out. Any worries about phase are best directed at creative EQ, where we're not necessarily working to cancel out an opposing tonal or phase deviation, and at room EQ, where we may be tilting at windmills if we attempt to EQ the tonal aberrations of the reverberant sound field.

Figure 5.
Skills
Experienced sound engineers avoid using graphic EQs in the boost mode, wherever possible. Their preference for setting knobs in the cut position is obvious once we're aware that +6dB of boost calls for double the amplifier power, to retain headroom. If one or more knobs simply have to be boosted, they're best kept to +3dB or below. In fact, an experienced engineer won't even touch the graphic EQ until the scope for improving the raw acoustic has been exhausted. In general, this means experimenting with speaker positions, assessing reflective surfaces and applying some kind of acoustic deadening, however crude. Not only does this discipline reduce the amount of EQ required, it also helps to tackle the reverberant tonal aberrations, which strictly lie outside the province of EQ.
Well, that wraps it up for this month. Next month we'll delve deeper into the gentle art of room EQ.
Series - "Room EQ"
Read the next part in this series:

Room EQ: Myth or Legend (Part 2)
(HSR Dec 86)
All parts in this series:
More with this topic
 When Is A Room - Sound Training |
 Urban decay - Part wall |
 Bass á la mode - Bass modes |
 A Shiftin' air affair - Bass Traps |
 Analysing the Spectrum - Audiosource RTA1 Spectrum Analyser |
 Reflected glories - Studio design |
 Sound Spaces - Getting Studio Acoustics Right |
 Practical Studio Design - The Principles Of Soundproofing (Part 1) |
 Contact Miking Real Drums |
 Sound Systems For Synthesizers |
 Building a Home Recording Studio - Acoustics |
 Shut Up! - How to soundproof a rehearsal room (Part 1) |
Browse by Topic:
Acoustics
Publisher: Home & Studio Recording - Music Maker Publications (UK), Future Publishing.
The current copyright owner/s of this content may differ from the originally published copyright notice.
More details on copyright ownership...
Home & Studio Recording - Nov 1986
Donated & scanned by: Mike Gorman
Feature by Ben Duncan
Previous article in this issue:
Next article in this issue:
Help Support The Things You Love
mu:zines is the result of thousands of hours of effort, and will require many thousands more going forward to reach our goals of getting all this content online.
If you value this resource, you can support this project - it really helps!
Donations for May 2026
Issues donated this month: 0
New issues that have been donated or scanned for us this month.
Funds donated this month: £0.00
All donations and support are gratefully appreciated - thank you.
Magazines Needed - Can You Help?
Do you have any of these magazine issues?
If so, and you can donate, lend or scan them to help complete our archive, please get in touch via the Contribute page - thanks!