


Magazine Archive
Home -> Magazines -> Issues -> Articles in this issue -> View
Tape Echo Effects | |
Studio Sound TechniquesArticle from Home & Studio Recording, February 1984 | |
Tape echo techniques for reel-to-reel machines.

In this age of Digital Delay units many people may not be aware of the variety of echo effects which may be achieved using a reel-to-reel tape recorder. This article sets out to explain how to use such a tape recorder to produce different echo effects.
Two pieces of equipment are required: a mixer with at least one Echo Send (Aux Send) and a tape recorder with three heads; even more interesting effects may be achieved if the mixer has two or three Echo Sends and a second tape recorder is also available.
Before we go on to describe the echo effects, let us first of all set the scene. Having previously recorded all of the sounds onto your multitrack tape recorder you are now ready to mix down the song onto a 2-track master recorder (or cassette deck). When in a mixdown situation the line outputs of the multitrack tape recorder are normally connected to the mixer channel inputs, the 2-track machine you are mastering onto being connected to the master Left and Right mix outputs. At this point you can now link in the additional tape recorder that is going to be utilised for the echo effects. This is achieved by patching the output from the mixer Echo Send to the input of the left channel of the tape recorder, and then the output of the tape recorder is taken back into the mixer using a spare channel.
Many mixers have special inputs labelled Echo Return, but unless you have a very good (normally expensive) mixer, the echo return input only returns your sound to either the left or right channel of the master mix. This type of Return imposes serious limitations on the creative use of your mixer, so it is far better to return the echo signal to a spare input channel. The advantages of doing this will become clear later in this article.
Principles
Now that the tape recorder is patched in, we are almost ready to produce echo effects, but before we do this it would be helpful to go over the basic principles of how tape echo works.
Tape Echo makes use of the physical time delay that occurs between recording a signal onto the tape, waiting for the tape to travel from the record head to the playback head, and then hearing the signal coming back off the playback head (Figure 1). Readers may be familiar with the famous Watkins Copycat echo unit which utilised a loop of tape travelling across several playback heads thereby enabling you to select the type of echo heard, by mixing the output from the heads in various combinations.
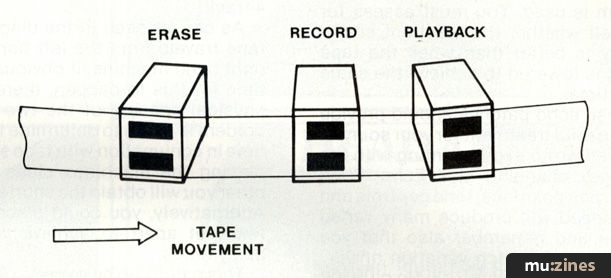
Figure 1. Standard head configuration necessary for tape echo.
There are two factors that determine the type of echo produced by this time delay: (1) Tape Speed (2) Head Spacing. The physical distance between the record and playback heads on the tape recorder partly determines the delay time, as the further apart they are, the longer it will take for the tape to travel from one head to the other. This distance varies from one tape recorder manufacturer to another, but is typically 3 centimetres. However, tape speed is standard on all machines, typical speeds being 15 inches per second, 7½ips, 3¾ips and 1⅞ips. So, by applying a simple formula we can work out the delay time between the heads by dividing the tape speed into the head distance. If we assume a head distance of 3 cm, then:
15ips (38cm/s) = 78 milliseconds
7½ (19cm/s) = 157 milliseconds
3¾ (9.5cm/s) = 315 milliseconds
1⅞ (4.76cm/s) = 630 milliseconds
These figures will give you an idea of possible delay times, however, what they do not indicate is the resultant sound quality. It is an inherent characteristic of tape recorders that the lower the tape speed, the poorer the sound quality, but this problem can be overcome somewhat by using a noise reduction system.

Figure 2. Single echo patch.
Echo Patches
The first patch (Figure 2) is fairly straightforward and produces simple echo effects.
Switch the tape recorder you are using for echo into the record mode and select the "off-tape" position to enable you to hear the sound that has been recorded on the tape. We shall now add echo to one of the sounds you have previously recorded on the multitrack tape. To do this, select the sound source, for example, a vocal track routed to channel 1 of the mixer, then increase the Echo Send amount on that channel until you have a good level showing on the echo tape recorder VU meter. Patch the output from the tape recorder into channel 2 of the mixer, slowly push up the fader on channel 2 and you should hear the same vocal sound as on channel 1, but it will be delayed. This will produce a single echo when both channel 1 and 2 faders are up.
By panning the original (source) sound on channel 1 to the left and the returned sound on channel 2 right, you will hear the sound bounce from left to right speakers. This effect is quite useful on several sound sources such as vocals, sequencers and guitars, though it is better to avoid adding echo to the rhythm-keeping sounds (drums, bass) as this causes odd rhythmic effects. Having said that, it can be rewarding when used sparingly on a snare drum; a technique often used in Reggae and Dub music.
Once this basic effect has been established you can do two things: firstly, you can change the tape speed (the slower the speed the longer the delay). Secondly, you can increase the Echo Send level on channel 2 (echo return channel), which controls the amount of signal regeneration, in order to produce multiple repeats. Be warned, however, if you turn this level up too much it will cause feedback and a constant oscillating sound will be heard.
This multi-echo sound can be very useful at high tape speeds for producing a reverb-like effect. At low speeds (3¾ips) the repeats are easily discerned, and this effect can make a synthesiser or guitar solo sound as if it is being played much faster than it really is.
If you had used the normal Echo Return input on the mixer instead of routing the echo back into another channel, you would not have been able to produce the multi-echo sound or to have panned the echo between left and right. Returning via a channel allows you to use its tone controls to further alter the echo sound. All of these advantages make this method of echo return truly creative.

Figure 3. Stereo multi-echo patch.
Once you have become familiar with this echo patch you can move on to an extension of this basic idea, as illustrated in Figure 3. The set-up is as before, but this time we shall use both the left and right tracks on the echo tape recorder and another channel on the mixer. This requires the use of two Echo Send facilities, but a Foldback Send can serve as a good substitute if your mixer only has one.
Set the echo tape recorder into the same mode as before, send the sound from channel 1 to the recorder using the Echo Send, and return the recorder output to channel 2. This time, instead of turning up the first Echo Send level control on channel 2, we are going to use the second Echo Send or Foldback level and patch its output into the Right track of the echo tape recorder. Having done this, we can return the Right track back to channel 3 on the mixer and by setting the pan control on channel 1 to its centre position, channel 2 left and channel 3 right, you will hear the sound bounce from the centre of the stereo image to the left and then to the right. At low tape speeds this effect can be quite spectacular, particularly on headphones. Again, by altering the Echo Send levels you can create various multi-echo effects that will really add depth to your music.

Figure 4. Echo patch to give increased delay time.
As mentioned earlier, low tape speeds generally result in poor sound quality. The next patch (Figure 4) shows how you can double the delay time without actually reducing the tape speed. To do this we need to use the Foldback Send on the mixer, whilst retaining the same patch as in Figure 3. When the echo is returned to channel 2, however, you keep the channel fader down and send the signal out from the Foldback level control to the Right track of the echo tape recorder and then return it to channel 3. The signal is thus recorded on to the Left track of the tape and travels to the playback head where it is not monitored, but is rerouted via the mixer back to the Right track. Here the sound is re-recorded and you finally hear it when the tape passes the playback head. The signal has travelled the same path twice and has therefore doubled the delay time.
Even with this method there is still some loss in sound quality which will vary depending on the make and condition of your tape recorder and whether or not a noise reduction system is used. You must assess for yourself whether the resultant sound quality is better than when the tape speed is lowered to achieve the same delay time.
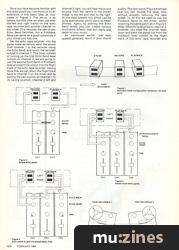
These echo patches should provide some useful treatment for your sounds. It is well worth experimenting with the patches; changing the Echo Send levels, pan positions, tone controls and tape speed will produce many varied effects and remember also that you can utilise the pitch variation control on some tape machines in addition to the normal tape speed control. All of the patches illustrated can be extended further if you have a 4-track tape recorder as signals can be routed in a greater variety of combinations between the four tracks.
Extra Long Delay
To produce very long delay times of several seconds with good sound quality, reel-to-reel tape recorders are still most studio engineer's first choice. The cost of digital delays that are capable of producing delay times of 5 seconds or more, is far too high for all but the very rich.
The final patch shows how you can usefully produce time delays of several seconds with little loss in quality and at a fraction of the cost of a digital system. Figure 5 illustrates the basic set-up. Two tape recorders are necessary, they do not have to be the same make but both must run at the same tape speed and have the same track configuration ie. 2-track or 4-track.

Figure 5. Extra long delay using two tape recorders.
As can be seen in the diagram, the tape travels from the left hand to the right hand machine. It obviously takes time for this to happen, therefore the physical spacing of the two tape recorders is going to determine the delay time in conjunction with tape speed. By placing the machines close to each other you will obtain the shortest delay. Alternatively, you could place them a few feet apart to achieve very long delay times.
This patch can be a very fruitful starting point when you want to build up several layers of sound very quickly. The effect produced is similar to that heard in music that has been composed using the Canon method. If, for example, you play a four-note phrase on a synthesiser into the tape delay, it will travel between the two machines and will be heard again several seconds later. If you continue to play a layer of multitracked sound will begin to build up. Experimentation with the Echo Send levels can produce note repeats that literally take minutes to decay and panning the Echo Return signals can produce interesting effects, like the gradual moving of note clusters from left to right over several seconds.
When trying this patch you may run into a few problems - tape tension being the main one. To overcome this thread the tape around the normal tape path on the first machine, missing out the right hand tape guide after the pinch wheel. You will probably have to keep the guide in the 'up' position with sticky tape, otherwise it will cut out the reel motors. You also need to bypass the take-up spool on the first machine for obvious reasons.
The tape is then taken across to the second machine where it is threaded in the normal way onto the take-up reel and the tape set so that is just taught. When you are ready to use this set-up, both tape recorders have to be switched on at virtually the same time. As this can be a little tricky, it's best to switch on the righthand machine a fraction of a second before the left one. The left machine should be placed in the 'record' mode and the right one in the 'playback' mode.
Finally, if you use two 4-track machines you can produce some amazing effects with this arrangement. Many people have put this long delay effect to good use, one of the most noted being Brian Eno, who recorded his Discreet Music album using a tape delay system similar to that outlined above.
More from these topics
 Home Recording: Frequency Balancing |
 Delaying Tactics |
 Compressors - Sound Workshop (Part 1) |
 Survivor: The Single |
 Sound Bites - Production Tips & Techniques |
 Doing it for effect - FX tutorial |
 Reading The Meter |
 Hands On: Tascam & Fostex 24-Tracks - Fostex G24S & Tascam MSR24S Multitracks |
 Using A Stereo Mixer - for multitrack recording |
 Choosing A Cassette Tape - Tape Talk |
 The Hard Edge - Direct-to-disk recording explained |
 Sessiontime - Radio One - DJ Mix |
Browse by Topic:
Effects Processing
Recording
Publisher: Home & Studio Recording - Music Maker Publications (UK), Future Publishing.
The current copyright owner/s of this content may differ from the originally published copyright notice.
More details on copyright ownership...

Home & Studio Recording - Feb 1984
Donated & scanned by: Mike Gorman
Feature by Paul Gilby
Help Support The Things You Love
mu:zines is the result of thousands of hours of effort, and will require many thousands more going forward to reach our goals of getting all this content online.
If you value this resource, you can support this project - it really helps!
Donations for April 2026
Issues donated this month: 0
New issues that have been donated or scanned for us this month.
Funds donated this month: £0.00
All donations and support are gratefully appreciated - thank you.
Magazines Needed - Can You Help?
Do you have any of these magazine issues?
If so, and you can donate, lend or scan them to help complete our archive, please get in touch via the Contribute page - thanks!