


Magazine Archive
Home -> Magazines -> Issues -> Articles in this issue -> View
Sound Designer Universal | |
Article from Sound On Sound, October 1988 | |
If you own several samplers or just want to transfer S900 samples into your mate’s FZ1, then this program will make life considerably easier. David Mellor creates some designer sounds with the Atari ST version of Digidesign’s universal sample editor.
David Mellor creates some designer sounds with the Atari ST version of Digidesign's universal sample editor.

Why did you choose your particular sampler? When I bought an Akai S900 back in '86, the choice was obvious. Now, it is less clear cut. For many, the deciding factor will be the editing facilities on offer - and particularly the ease with which these edits are carried out.
I believe it is possible to identify two types of sampler user, or perhaps two modes which any one user may alternate between. There is the 'sample-it-use-it-forget-it' mode, where you hear a nice sound and only use it once, probably because it is too specific to the project in hand to be usable elsewhere. There is also the 'library sample' mode, where you find sounds that are going to be usable again and again.
Working in mode 1 - use once and discard - the requirement is for very fast editing, probably just topping and tailing and perhaps a quick loop. Mode 2 working, where you are going to file and keep the sample, means that it is worthwhile to go into much greater detail and take greater care editing the sample. If you spent a couple of hours on one sample and the result was good, then that would be time well spent.
The first thing I have to say about Sound Designer is that those couple of hours spent on each sample are essential. If you haven't got that amount of time to spend on editing, then you are not going to get much use out of this package. This is not to say that you can't do some things fairly quickly, you can - but proper investigation and experimentation to find all the possibilities a sample contains will take that amount of time, perhaps more.
DESIGN SPEC
So what does it do, and how does it do it? Briefly, Sound Designer will trim samples, loop them (both sustain and release loops, if your sampler supports both), perform cut-and-paste editing, digitally filter samples, mix and merge, and show an FFT (Fast Fourier Transform) graph of a sample's frequency content. Not bad so far.
How it does this is by transferring a sample, over MIDI, from your sampler to the Atari ST. Editing then takes place on the sample in the ST's memory, alterations being stored on a disk in the the ST's drive. When you want to hear the result of any editing, a rough audition can be performed on the ST monitor's internal speaker, if you want to listen with greater sound quality, the sample has to be transferred back to the sampler. This sounds like a long-winded process, but the computer does all the work, a couple of mouse-clicks being all that is required for transfer in either direction. Transfers back and forth will take up a good chunk of the time spent editing a sample, but that is unavoidable.
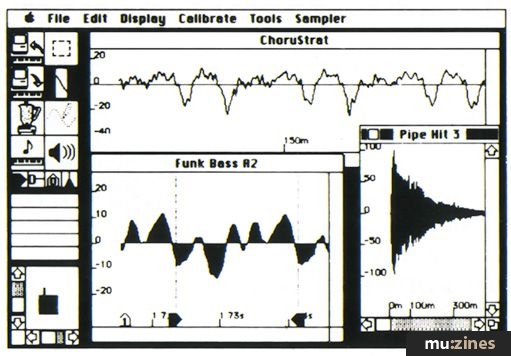
Now for more detail. The best place to start is from the main screen display. There is a control panel which handles the principal functions. Going left-to-right, top-to-bottom we have Sampler-to-ST transfer, Zoom, ST-to-Sampler transfer, Selection/Insertion, Digital Mixer, Waveform Drawing, Preview (which makes a quick transfer to the sampler), and the last one plays a fuzzy version of the sample through the ST's speaker.
As I said earlier, sample transfer is via MIDI. Since MIDI is a slowish serial interface and never intended for data transfer on this scale, it takes a long time to get all the bits across. If a one second sample recorded at a sampling rate of 40kHz takes around one minute and ten seconds to transfer, how long does a ten second sample take? Not quite ten times as long but still a long time, that's why patience is a distinct virtue with an editing system such as this.
Connected to an Akai S900, it works in the following way: clicking on the appropriate spot in the control panel opens a dialogue box. You can select the sample from the S900 by name, and be shown how many sample points it occupies (the information you get depends on how much the sampler in question is prepared to offer. Different types vary - some don't transfer sample names, for example). Another click of the mouse and a box opens inviting you to input a name by which the sample will be known in future. One more click and you are into editing mode.
This is perhaps the best point to introduce the notion that Sound Designer is a disk-based editing system. Most of the things that you do affect the sample on the disk. You don't have to edit, then save to disk. The advantage is claimed to be that the maximum file size is limited only by the available disk space, not by the available RAM. The manual claims that '...a 520 ST owner can edit the same long sound files as a Mega ST owner...'. As far as I can see, that would be true if the 520 owner had upgraded to a 1 megabyte disk drive. I have a 1040 ST and that was able to cope with full-length samples from the S900, so I was OK. Sound Designer is compatible with hard disks, by the way, and I can see definite advantages in speed.
The disadvantage of disk-based editing is that you have to be organised with your backups. Some editing operations can be undone, some can't. And when it's done, it's done on the disk and that's that. If your samples are short and few, then you can have Sound Designer create backup files for you. If the samples are long and many, then there won't be room on the disk for backups. Take care until you get used to the system.
Back to sample transfer... It is possible to have three active samples, each in its own window, so chopping them up and mixing them together is a treat.
Transferring a sample back from the ST to the sampler is almost as easy as the other way around, although there may be the odd option or two depending on your sampler - minor things not worth mentioning here. There is in addition the handy Preview function, which sends an edited file back to your sampler with one click (and one OK button). This is meant for quick (or as quick as possible!) auditioning, but there is a risk of overwriting samples already in the sampler. As long as you are prepared for this, the Preview function is very useful. If you are editing loop points, then these can be sent without sound data to certain samplers (S900 included). This takes a mere second or two.
That is all I am going to say about the mechanics of Sound Designer. Obviously, what it can do editing-wise is more important. But if you are interested in this type of software, it is very important that you know what you are letting yourself in for. Although the editing operations are easy and straightforward, the process takes a lot of time. If you don't have the time to spend, then the package will end up not being used. Simple as that.
EDITING BASICS
The sample window in Sound Designer shows a representation of the waveform of the sample. Sections of this waveform may be marked out for editing. This is a simple matter of using the mouse to position a pair of cursors. Then you can Cut, Copy or Paste this waveform segment. Cut, means that you remove the marked section from the display and from the sample, and place it in a waveform clipboard. If you move the cursor to a new location, it is possible to Copy the contents of the clipboard to this new location. There is a smoothing function to join up the ends neatly, if desired. The alternative is to Copy the segment to the clipboard, so that it stays where it is, but you can insert it at another point in the sample, or take it over to another sample window and use it there. Joining up samples in this way offers a wealth of possibilities. In addition, the marked segment can be Reversed or Zeroed (to convert unwanted noise to silence).
On the main screen, there is a useful scale box below the control panel. This is used to magnify the waveform so that you can really get down to its important little places. Amplitude is scaled by dragging the mouse vertically, on the appropriate bar. Time is scaled by dragging the bar horizontally. Thumbs up here for providing more resolution than you could possibly ever require. At maximum magnification, you get around 350 microseconds horizontally and about +/- 1% of full sample level vertically. If anyone needs to edit samples down to the -50dB level that you can see here, I would be fascinated to know why! But seriously, if it gets to be a trend that we always get more range on controls than the designers and manufacturers expect us to need, then that can only be a good thing.
Another way of homing in on a waveform is by using the Zoom box, which offers quick operation but you can't mark out sections when using it.
It is definitely nice to see proper calibrations on the waveform window, and there is a choice too. The height of a wave can be measured in either 'percentage of full scale' or by sample values. For example, +100% level would be equivalent to a sample value of +32,767. Time can be measured in milliseconds, microseconds, sample number, or hexadecimal sample number (arrgh!). These choices are made using the Scale Marks option from the Calibrate menu.
To determine sample times and levels with a high degree of accuracy, the display shows the numerical values at the position of the cursor. (There are actually different types of cursor for different operations, but that's a small point).
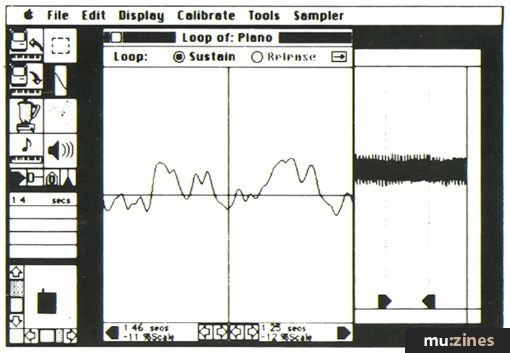
Loops are very quickly created with Sound Designer. There is a stack of loop markers at the bottom of the control panel, showing an 'S' within a little arrow. 'S' indicates a sustain loop (ie. the loop plays for as long as the key is held). Dragging this icon down into the sample window marks the start point of the loop. Then you drag down the 'S' within a left-pointing arrow, that has appeared by magic, to mark the end of the loop. What could be more simple? In the same place in the control panel are the two release loop markers (the loop plays as the sample decays following key release). These only do anything constructive if your sampler supports release loops. If you have a Casio FZ1, then all those extra loops the machine is capable of will have to be edited on the sampler itself.
As a help towards finding a good loop (the Holy Grail of samplists), there is a Loop Window which shows the join-up parts of the loop in magnified detail. Here, you can check that you have the equal-amplitude, equal-slope qualities which are essential for a good loop. You can't actually hear the loop playing as you fiddle around with the loop points, which would be more useful than the loop window feature, but since so few samplers can do that anyway (Roland S550 for one), it's not a thing to quibble about. Figure 2 (taken from the manual) shows the Loop Window.
Another goodie is Waveform Drawing - something you have to do without on a monitor-less sampler. It is good for removing those annoying clicks which seem to work their way into many samples. The only problem is locating the click. You can only see it on a highly magnified version of the waveform, which takes ages to scroll through. But if you really need to get at that click, you can do so.
DIGITAL MIXER
SAMPLERS SUPPORTED
Akai X7000
Akai S900
Casio FZ1/FZ10M
Dynacord Add-1
E-mu Emax
Ensoniq EPS
Ensoniq Mirage
Korg DSM-1
Korg DSS-1
Roland MKS-100
Roland S10
Roland S220
Roland S50
Sequential Prophet 2000
Also supported is the MIDI Manufacturers Association (MMA) Sample Dump Standard. Samplers not listed above may conform to this standard and be usable with Sound Designer. Transfer of sound samples between different samplers is included in the Sound Designer specification.
This is where things start to be fun. Did you notice that the digital mixer icon is shown as a coffee percolator on the control panel? It's probably because you have time to roast the beans while the ST number-crunches its result!
Digital mixing comes in five forms: Mix, Merge, Gain Change, Peak/Shelf EQ and Xfade Looping.
Mix is where you mix together any two of the three possible active samples, in any proportion. That's nothing much in itself, but the benefit is that you can offset the samples in time. So you could mix a bell with a flute so that you get the transient of the bell mixed with the sustain of the flute coming in after a few tens of milliseconds.
Merge splices two samples sequentially with a controllable crossfade time. It works better this way than by butting them together. A new file is created for both Mix and Merge, so you can easily have another go if necessary.
Gain Change is a long-winded version of a mixer fader. It has a simple level change function or it can 'normalise' a sample so that it reaches 100% level. This doesn't improve the signal-to-noise ratio, but it helps make samples consistent. The Peak Value function measures the maximum amplitude of the sample. There is also a Crossfade Loop ('Xfade Loop' they call it), which works in a similar way to the equivalent function provided in the S900.
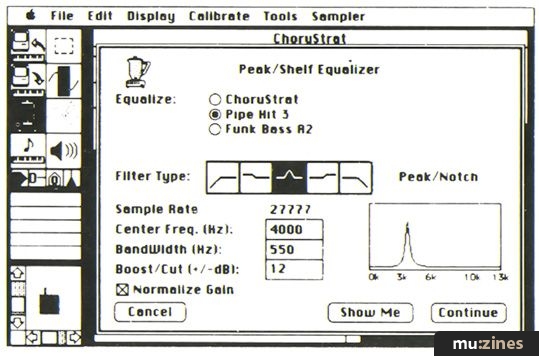
The most interesting part of the digital mixer is the EQ. This is something you normally don't get with a sampler - and all you Roland S550 owners can stop sniggering because this one is much better. You can have peaking/notching, Hi/Lo shelving, and Hi/Lo pass. There is a box which will show you a rough plot of the frequency response you can expect, but since this has a linear frequency scale (as opposed to logarithmic) you don't see much detail in the lower frequencies. Better than nothing though.
With the digital EQ you can obtain some really extreme variations on your original sample. Cut and boost of 60dB is rather spectacular. Most conventional graphic equalisers don't offer much more than 12dB or 18dB.
Best of all, when you go back to the main screen, you can pull down a menu which offers a FFT (Fast Fourier Transform). This produces a '3D' display of the sample's behaviour in frequency, level and time. Problem areas can be singled out for treatment here and sent to the digital EQ for tweaking. Once again, the frequency axis is linear so there is little low frequency detail, but it is definitely a good thing to have. There is an option box so you can set the various FFT parameters to your liking.

The only problem with digital EQ is the time factor. You cannot hear adjustments as you make them. You have to set a change, then let the Atari computer go away and do it. Come back in a few minutes. It might be good for your aural imagination, however.
VERDICT
FEATURES
- Graphic display of up to three waveforms.
- Waveform editing with up to 1/50,000th of a second accuracy.
- Looping window.
- Crossfade looping.
- Complex frequency analysis.
- Digital equalisation.
- Ability to transfer sound files between different samplers.
- Digital mixing of sounds in any proportion.
- Digital merging of sounds with crossfade.
SYSTEM REQUIREMENTS
- Runs on Atari 520, 1040 or Mega ST with a recommended minimum of 720K of disk space (two single-sided or one doublesided 3.5" disk).
- Works with high resolution mono or medium resolution colour monitors.
- Supports hard disk storage.
I have the inclination but I'm not convinced that I have the time for getting 100% out of Sound Designer. Put it another way - it's straightforward to get interesting results out of this software, but there is a definite tendency to spend time on the sample editing procedure that would be better spent on other parts of any musical project. I suspect the best answer would be to apply a degree of self-discipline and have separate sample creation and sample using sessions. If you are heavily into sample manipulation and own several samplers, then Sound Designer Universal could be a valuable tool.
If I were to invest in Sound Designer, then a large proportion of my reasons for doing so would be simply to get involved in this type of sample manipulation. When you have tried out a few of these procedures, and experienced the delights of editing on the big screen, you will begin to appreciate the potential that lies ahead in this field. Get into it now and the techniques learned at this stage of development will be more than useful in the future.
Software version reviewed: Sound Designer Universal 1.3. (Also available for the Apple Macintosh.)
Price £395 inc VAT.
Contact Evenlode Soundworks, (Contact Details).
Featuring related gear

Screen Test - Sound Designer Software
(EMM Dec 85)
Browse category: Software: Sample Editor > Digidesign
Publisher: Sound On Sound - SOS Publications Ltd.
The contents of this magazine are re-published here with the kind permission of SOS Publications Ltd.
The current copyright owner/s of this content may differ from the originally published copyright notice.
More details on copyright ownership...

Sound On Sound - Oct 1988
Review by David Mellor
Previous article in this issue:
Next article in this issue:
Help Support The Things You Love
mu:zines is the result of thousands of hours of effort, and will require many thousands more going forward to reach our goals of getting all this content online.
If you value this resource, you can support this project - it really helps!
Donations for May 2026
Issues donated this month: 0
New issues that have been donated or scanned for us this month.
Funds donated this month: £0.00
All donations and support are gratefully appreciated - thank you.
Magazines Needed - Can You Help?
Do you have any of these magazine issues?
If so, and you can donate, lend or scan them to help complete our archive, please get in touch via the Contribute page - thanks!