


Magazine Archive
Home -> Magazines -> Issues -> Articles in this issue -> View
Cubase In-depth | |
Article from Micro Music, January 1990 | |
Paul Glaister takes us deeper into Steinberg's premiere sequencing package
Paul Glaister analyses whether Steinberg's Cubase package can reclaim the title of supreme sequencing package for the Atari

CUBASE - El Supremo?
If you hear the name Steinberg, your thoughts will probably turn to Pro-24, the package that earned the company the enviable title of 'Industry Standard'. Time, however, has moved on and with packages such as C-Lab Creator around it would now be difficult for Pro-24 to justifiably retain that recognition.
There have been a number of sequencer packages available recently, bearing varying price tags, some of which have been reviewed in earlier issues of this magazine. However until the release of Cubase there hasn't been a real challenger for the industry standard title but I will leave it to you to judge for yourself whether Steinberg's new offering can take the title of El Supremo.
Steinberg got off to a poor start with their new package, not only with a later release date than expected but problems were experienced with the originally proposed name of Cubit. After this minor hiccup Steinberg eventually released the package earlier this year under the name of Cubase.
The review package supplied consisted of an A5 ring binder manual, housed in a substantial file box, the same style of packaging as used for Steinberg's Synthworks. The two floppy disks and security dongle were contained within the manual in a customised sleeve arrangement. This is a great improvement over the way both Pro-24 and Synthworks disks and dongles were packaged, which was inadequate, in my view, for expensive software.
The Cubase programme is contained on one of the two disks supplied, the other contains a 'slide show' overview of the package which is well worth running as it gives you a taste of what's to come. To run Cubase you need an Atari ST with at least one megabyte of RAM and a Monochrome monitor. If you have a colour monitor, it is at this point that your interest in Cubase may start to wane as the package does not support colour.

The Cubase manual is well presented and is a great deal easier to use than the Pro-24 offering. This I always found unmanageable, its A4 size being the first disadvantage (I always had trouble finding space on the desk for it) and secondly the way it was structured. The Cubase manual is easy to handle and its contents are logically presented and the first four chapters ease you gently into the Cubase way of working.
Now lets get down to the serious business of putting this new offering from Steinberg under the microscope. The first action is to make a back-up of the programme disk. As the dongle provides the software security you can make as many back-up copies as you wish. With the dongle securely in place and using a back-up copy of the programme (just in case the gremlins are lurking) its down to work.
Loading the programme takes about forty five seconds, which seems an eternity when you load for the first time and you are eager to get things up and running. Once loading is complete you are presented with the first screen which contains the default Arrange window, 'tape' Transport bar and Menu bar. The latter two remain displayed irrespective of which window or windows are displayed, but more about these later.
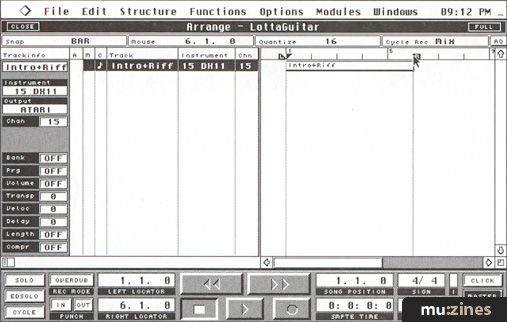
Arrange Window
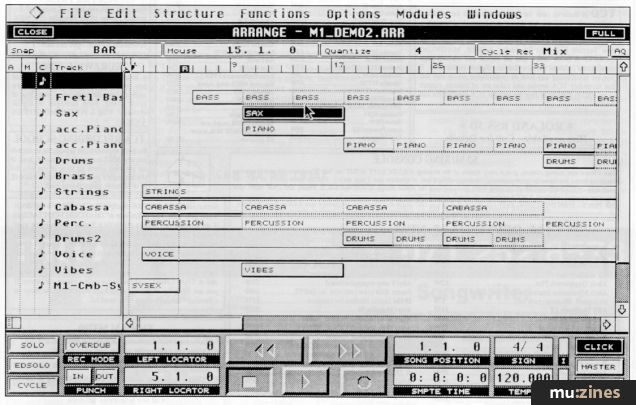
This is the main working window which contains the Track list and Part display and has some very powerful editing facilities. Cubase revolves around the Arrangement window and this is where it differs totally to Pro-24. Arranging on Pro-24 was not one of its strong points, and that's talking from painful experience, but this has been totally addressed within this package.
The Arrange window is split into two parts, the left hand side contains the Track list and the right hand side the Part display. (If you're a Pro-24 user for Pattern, read Part). The Track list contains information on Track mute status, Track name, Instrument, MIDI channel, Output and Map status. The right hand side contains the Part display and is the area where arrangement editing takes place. You can reduce the size of the Track list window by dragging the vertical window separator so as to show only the information you want. This also applies in part to the Drum and Grid edit windows. If you take it to the extreme only the track mute status column remains visible. This does mean that the active part of the window, i.e. the part information, can be displayed across the whole of the screen if so required. I found it quite adequate to display only the track and instrument information.

In the Track list window you can define track names, instrument names and the MIDI channel each track is directed to. Track mute is initiated by clicking in the mute status column adjacent to the desired track. Up to 64 Tracks can be created in the arrange window (there is a limit to the number displayed in the window but all can be viewed by scrolling) and up to seven arrangements can be loaded at any one time. Selecting the Window menu shows the arrangements loaded and allows you to select which one you require to be active. This should meet the needs of even the most adventurous of you.
Parts can be moved within the arrange window by selecting and dragging the part to a new location on the track or to another track. Parts can also be copied by holding down the Alt key, selecting the part and dragging to the required position. There is also a toolbox utility for this window as well as the other edit windows. By depressing the right mouse button a popup box displays a number of icons which in the arrange window are scissors, glue, eraser, pencil, magnifying glass, mute and match. Using these you can cut, join, extend, erase and examine parts. It is also possible to copy parts from one Arrangement window to another by using the copy and paste commands in the Edit menu. The part is copied into a temporary buffer known as the clipboard and then from this can be pasted into whichever Arrangement window is selected. One disadvantage of this feature is that you do not know whether anything is resident in the clipboard and if you have used the cut edit facility there is always the risk of over writing the buffer and losing the original contents for good.
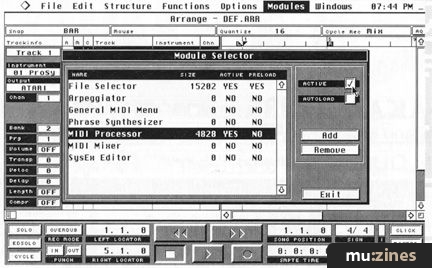
At this juncture it is worth introducing M.ROS the operating system that Cubase is designed around. M.ROS stands for MIDI Realtime Operating System and this operating system, amongst other things, allows multitasking to be undertaken, which means that a number of activities can be undertaken at the same time. This allows you to move around the various windows and menus without stopping the record or playback mode, thus allowing true real time editing to be performed. Also if you've found yourself in that embarrassing position of having produced an item on your sequencer but then, when attempting to save, you're presented with the 'Disk Full' message and no formatted disk to hand, worry no longer. With the multi-tasking facilities available with Cubase you can format a disk and at the same time continue working on your master piece. As you can probably appreciate M.ROS is a very powerful, and more to the point, useful operating system.
Two additional programs are supplied with Cubase that utilise the multitasking capabilities. These are M.ROS Switcher, which allows you to load and switch between up to ten programs (You need megabytes of RAM to run this utility effectively) and Satellite which provides similar facilities as Steinberg's Synthworks however these utilities are outside the scope of this review.
The MENU Bar
The menu bar at the top of the screen contains seven pull-down menu options, these being Desk, File, Edit, Structure, Functions, Options and Windows. The pulldown menus are automatically displayed when the mouse cursor is positioned on the menu name. I sometimes found this more of a hindrance than a help as often when homing in on the 'pop-up' menu boxes that reside just below the Window Title bar, or the options in the Window Title bar itself, a slight overshoot and an unwanted menu appears. I would have preferred the option to click on the menu bar to select the appropriate menu as and when required. With my first little moan out of the way lets continue.

The FILE menu provides all of the disk file, management functions which comprise of New, Open, Save, Close, Delete Files, Format Disk and Quit. All of these are self explanatory but the Open file option warrants further mention as this is the path that enables, among other things, Pro-24 songs to be loaded.
On selecting 'Open' a dialogue box is presented giving seven load options, these are Song, Arrangement, Part, 24 Song, MIDI File, Drum Map and Set Up. A Song file can contain a number of Arrange windows, a Drum Map and a Setup. An Arrange file contains the contents of an arrange window along with tempo setting etc. The Part file can contain one or more parts from an Arrange window and when loaded are positioned at the left locator setting. 24 Song allows Pro-24 Songs to be imported into Cubase as an arrangement. However not all the Pro-24 data can be transferred across such as the quantize values set in the Score edit, Drum Map 2 & 3, Text Input and a few others beside. MIDI file allows midi file formats from other sequencers to be imported provided of course they are written and read by the same type of computer. Drum Map allows you to load customised configurations, this is particularly useful if you have more than one drum machine. Customising of Drum Maps is performed in the Drum Edit window. Lastly we have Set Up which enables you to load your own customised default settings of Arrange windows, Menus and certain aspects of Editor windows. By making a number of copies of the programme disk and saving different configurations of the Set Up file on each you can cater for all the different default setup requirements you may have and of course save your valuable time for the more creative tasks.
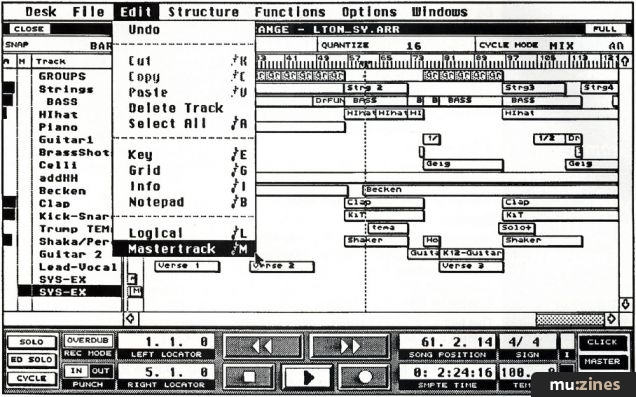
The EDIT menu presents us with the route to the four edit windows available, these being Grid, Drum, Key and Score edit. These will appear familiar to Pro-24 users apart from Key edit which is a new addition. As these edit facilities demand closer investigation I will deal with these a little later on. Also to be found in the edit menu are a Logical edit facility, the Mastertrack (this can be considered as the 65th track which looks after the time signature and tempo changes you may require to implement), Cut, Copy and Paste functions and an Undo delete command (most important for avoiding premature heart failure!).
The STRUCTURE menu enables the creation of Tracks, Parts and Groups along with Mix Down and Remix facilities. In essence this menu allows you to build up the Arrange window.
The FUNCTIONS menu reveals the quantize options available which include Iterative, Over and even a Groove quantize which allows you to produce your own 'maps' for quantising. The basic idea behind Groove is to enable you to produce rhythmic feels to quantising. After all this, I can say that there is plenty of scope for experimentation safe in the knowledge that you can undo any quantize action, except where the Freeze quantise function has been used.

The OPTIONS menu provides access to such things as MIDI Definition (for setting up midi filters, midi thru etc), Synchronisation (setting Tempo and SMPTE synchronising mode), Remote Control (enabling control via the keyboard. The key and function combination can also be customised from this dialogue box) and a number of other goodies such as a MIDI Effects Processor and a Human Synchronisation facility which follows your tempo in the record mode. The facilities available in this menu could keep you occupied for hours, if not days.
The WINDOWS menu, as mentioned earlier, lists all those Arrangements currently loaded and all can be displayed simultaneously by selecting the Tile Windows command that automatically resizes and aligns all open Arrange and Editor windows.
TAPE TRANSPORT Bar
The 'tape' transport bar contains the usual controls, play, record, rewind, fast forward as well as boxes containing the locators, song position indicator, tempo, time signature, SMPTE fields and other facilities such as cycle, solo etc. However gone are the track midi activity bar graphs found on Pro-24 to be replaced with two small boxes, one indicating midi activity out and the other activity in. I must admit that at first I thought this was a retrograde step but in reality what is provided is quite sufficient.
Steinberg have provided an additional feature associated with the fast forward icon. Selecting either the fast forward or rewind icons and operating the left mouse button and you get what you expect but selecting the fast forward icon and operating the right mouse button you have playback at a speed that is dependant on the position of the cursor in the FFWD icon. This feature is ideal for a quick preview of a section or cueing a part and I found it very useful. I did wonder initially why they hadn't provided this nicety on the rewind function but then is there much to be gained from playing the tracks backwards apart from the novelty factor. Remembering that this is a serious piece of software I dismissed the thought.
RECORDING AT LAST!
Although Cubase is a very comprehensive sequencer package and boasts numerous features that would take some time to fully appreciate, you can get to work with the package and get results very quickly. To prove this fact let's get down to some recording.

Information can be input in a number of ways but the easiest at this stage is to record MIDI data straight from the keyboard. First you need to create a Track, this can be achieved by either selecting Create Track from the Structure menu or by double clicking the mouse in the Track column. The Track can be re-named by double clicking on track name box which produces a pop-up box which allows you to enter a name up to ten characters in length. Moving to the MIDI channel column, the MIDI Out channel can be selected, once again using the left or right mouse buttons. If a number of tracks have been created use the mouse to select the track on which you wish to record, then referring to the tape transport bar place the mouse pointer in the Tempo box and adjust the tempo setting, using the left or right mouse buttons as appropriate. Select the metronome click option and provided the piece you want to record is in 4/4 time (the time signature can be altered by accessing Mastertrack) then select record. Cubase provides a two bar count in, then you are away.
While you play, a vertical cursor line travels from left to right across the screen. This is known as the Song Position Indicator which is used extensively throughout the package. When you've finished playing, hit the space bar and low and behold your first part is recorded and displayed as a black horizontal bar adjacent to the track selected.
Now this is where the fun really starts to begin and where the power of the package is fully demonstrated. Additional parts can be recorded and this is best done by selecting cycle record mode and setting the left and right locators at the appropriate bars. There is no need to exit the record mode just select the required track and continue. With the recording completed and using the copy and paste commands previously mentioned and the toolbox menu, you are able to modify your arrangement to your hearts content without having to halt playback, so you are able to appreciate immediately the changes made. If this wasn't enough there is another facility that can be called upon in the shape of the Play Parameter dialogue box which is accessed by double clicking on a Part. This allows programme change, velocity, volume and midi filters to be set among others and the effects can be noted immediately. One point I did notice however, is that you cannot go from record to playback without first selecting stop although this doesn't really cause any grief.
Having produced a number of Parts in the arrange window, four edit windows are available, as mentioned earlier, for more detailed editing or Step input mode. Pro-24 users will recognise the Grid, Score and Drum edit but Key edit is a newcomer, although this presentation has been provided in other sequencer packages for some time.
EDIT WINDOWS
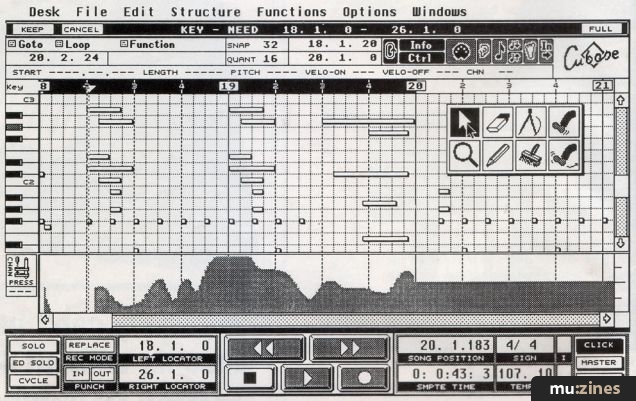
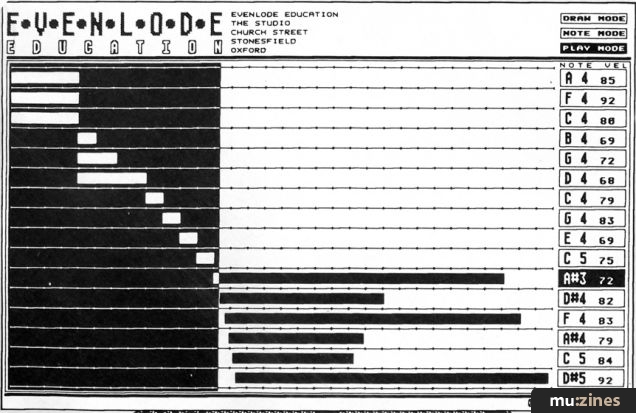
The KEY EDIT window displays the track or part information in a pianola roll presentation running horizontally across the screen. When Follow Song is selected from the Options menu the Song position indicator travels from left to right across the screen (Follow Song is available in all the edit windows). A keyboard is displayed vertically on the left of the screen coincidental with the Key edit grid display. Four octaves of the keyboard can be displayed at any one time but this is reduced when the Control information window is active. The number of bars displayed horizontally and the number of keys displayed vertically can be altered by clicking the right mouse button on the scroll bar arrows. The display can therefore be compressed or expanded to suit personal preference. This function also applies to the Drum Edit and Arrange windows. In the case of the Drum edit it governs the number of instruments displayed and with Arrange the number of Tracks displayed.

Normal scrolling is carried out using the left mouse button. The toolbox displayed in this window contains different icons such as a boot to kick notes left or right, a brush to paint in notes plus a pair of compasses. Yes a pair of compasses! In fact this is used with the Control edit window. This window provides access to control functions such as pitch bend, aftertouch, balance, breath control etc. With the aid of the compasses you can draw in the required pitch bend, volume change or pan requirement for example. This control edit function is also present in Drum edit.
The GRID Edit window is fundamentally the same as found in Pro-24 but some additional information is displayed in Cubase, such as whether the midi data is note or control information. The Status column displays the data type present and the Value columns give the supplementary information. The Toolbox provided in this edit window is the same as for Key edit.
The DRUM edit window is presented in a fashion that would be familiar to owners of drum machines. Customised drum maps can be configured or loaded to suit individual requirements. The display still uses the diamond icon or 'rhomb' as referred to in the manual and are entered by calling up the 'drumstick' from the toolbox. Four preset velocities can be selected by using a combination of the Shift and Ctrl keys. The rhomb changes shade according to the velocity chosen. By selecting the cycle record mode and the minimum number of bars required for the basic rhythm a pattern can be quickly generated and of course you immediately hear the results of any changes made. The length of the rhythm part can be edited in the Arrange window by using the copy and glue commands.
The SCORE Edit window differs from that of Pro-24 in that as much of the score as possible is automatically displayed which means that there could be more than one staff displayed in the window depending on the length of the part or track selected. Full edit facilities are provided but I must admit that I found it difficult to get to grips with these, as well as the Step function mode. Perhaps more time spent familiarising myself with the intricacies of this window would resolve the difficulties but at this point I would say I prefer the Pro-24 score edit.
Conclusion
Cubase, with its multi-tasking facility, really makes light work of arranging and as such is likely to promote more ambitious works, as the hard slog associated with arranging on other sequencers, including Pro-24, is now a thing of the past. The best recommendation about Cubase is that it lets you get on with your creativity, the only limit being your imagination and, of course, the amount of time you are prepared to spend in exploring the multitude of functions and facilities available, many of which have not been touched on in this review. Cubase has taken over from where Pro-24 left off and in my opinion can justifiably take over the title as industry standard. The only problem I now have is returning to Pro-24 but I think the upgrade purchase won't be too far away for me.
Product: Cubase
Format: Atari 1040 ST Mono
Price: £499
Supplier: Steinberg UK, Evenlode Soundworks, (Contact Details)
Also featuring gear in this article

Clash of the Titans
(MIC Oct 89)

Cubase 2.0
(SOS Dec 90)

Cubase MIDI Mixer - Programming Clinic (Part 1)
(SOS Oct 92)

Cubase MIDI Mixer - Programming Clinic (Part 2)
(SOS Nov 92)

Dream Sequences (Part 1)
(MX Dec 94)

Dream sequences (Part 2)
(MX Jan 95)

Dream Sequences (Part 3)
(MX Feb 95)

Dream sequences (Part 4)
(MX Mar 95)

Dream sequences (Part 5)
(MX Apr 95)
Dream sequences (Part 6)
(MX May 95)
Dream sequences (Part 7)
(MX Jun 95)

Hands On: Steinberg Cubase
(SOS Jan 92)


Steinberg Cubase - Version 3.0 Software
(MT Sep 92)
Steinberg Cubase 3.0 (Part 1)
(SOS Apr 92)

Steinberg Cubase 3.0 (Part 2)
(SOS May 92)

Browse category: Software: Sequencer/DAW > Steinberg
Featuring related gear

An Old Pro - Steinberg Pro24 Amiga
(SOS Feb 91)


Macintosh or Atari?
(SOS Jan 88)
School's Out
(MIC Aug 89)


Software Tracking - Steinberg Pro24 Software
(EMM Sep 86)

Steinberg Cubase Audio
(SOS Nov 92)

Steinberg Cubase Lite - For the Atari ST
(MT May 93)

Steinberg Cubeat
(SOS Nov 90)
Steinberg Cubeat - Atari Sequencing Software
(MT May 91)

Steinberg Pro 24 - SoftwareCheck
(IM Oct 86)


Steinberg Pro24 Version III
(SOS Aug 88)

Steinberg Software Page
(SOS May 88)

Steinberg Software Page
(SOS Jun 88)


Yamaha Hello! Music! - computer music system
(MT Nov 93)
Browse category: Software: Sequencer/DAW > Steinberg
Publisher: Micro Music - Argus Specialist Publications
The current copyright owner/s of this content may differ from the originally published copyright notice.
More details on copyright ownership...

Micro Music - Jan 1990
Donated & scanned by: Mike Gorman
Review by Paul Glaister
Ads for Gear in this article:


Help Support The Things You Love
mu:zines is the result of thousands of hours of effort, and will require many thousands more going forward to reach our goals of getting all this content online.
If you value this resource, you can support this project - it really helps!
Donations for May 2026
Issues donated this month: 0
New issues that have been donated or scanned for us this month.
Funds donated this month: £0.00
All donations and support are gratefully appreciated - thank you.
Magazines Needed - Can You Help?
Do you have any of these magazine issues?
If so, and you can donate, lend or scan them to help complete our archive, please get in touch via the Contribute page - thanks!