


Magazine Archive
Home -> Magazines -> Issues -> Articles in this issue -> View
Improving a Copy Guitar (Part 1) | |
Article from International Musician & Recording World, May 1975 | |
We gave guitar maker and repairer Stephen Delft an Antoria Les Paul copy and asked him to improve it as far as possible. This is Part One of his report.

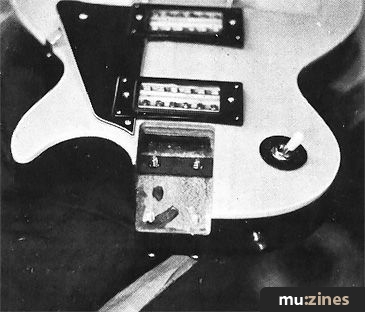
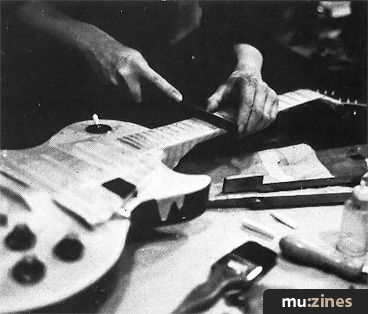
1. Adjusting bridge for correct string intonation.
There was a time when the price difference between the real thing and a good copy was explained by the greater amount of time spent in finishing and adjusting the original.
Today the gap between originals and their copies is narrowing both with respect to price and to finish.
However, the general rule of common sense still applies, 'if you pay less, you generally get less' and what you still generally get less of, is finishing and adjustment time.
As a guitar maker and repairer my most common type of request is from the owner of a middle-priced copy (or, sadly, a budget-priced original, bought from his Mother's Mail Order catalogue) who looks at me as if I am his last hope of salvation and lists a string of minor faults which the guitar has obviously had since the day it was made.
This has been written particularly for the owners of reasonably good copies, but those with recently made American guitars may recognise some of the faults described and wish to do something about them.
As an example of what can be done to improve a copy, I shall be working on a reasonable Les Paul copy. I am going to attempt to cover adjustment of necks, actions, intonation (playing in tune) and fret filing. If I have not covered your problem, please write to the Editor and I will try to include it in a later article, but I regret that individual answers are just not possible at the moment.
Also, don't work on any guitar unless (a) it really needs it and (b) you are sure you understand what to do, or (c) it is almost unplayable at the moment, you are unlikely to make it worse, and you may do some good.
If this sounds hard on you, remember that I cannot put years of experience into one article; only a little advice, and it is very easy to make a poor guitar worse.
Let's start with actions. They can be as low or as high as you like but most people seem to want them lower. I define the action as the distance between the underside of any one string, and the top of (generally) the 12th fret. (It becomes a little complicated if the neck is bent, but we will deal with that later.) This distance may vary to taste, and between one string and another (if the bridge adjustments permit this). Unfortunately, if the nut is mis-adjusted it can confuse things, so at first, tune the guitar to correct pitch, and fit a good 'capo' behind the first fret and make your action measurements over the 13th fret.
2. Shim to alter neck angle.
I have set mine to a clearance of 1.2mm under the highest string and 2.5 mm under the lowest. This is done by turning the screws or wheels at each end of the bridge (clockwise for down).
If your guitar now buzzes at any fret, WHEN PLAYED THROUGH AN AMP, read further on to "Fret Filing".
If the bridge does not have sufficient range of adjustment, and you cannot make the action high enough or low enough for your needs, first check whether the neck is straight, read on to the section on truss rods and correct it. However, if the neck is fine, it is likely that it joins the body at a slightly incorrect angle (There is no 'correct' neck angle — it depends on the model of guitar).
If your guitar has a glued-on neck there is a little you can do about it; (see your last month's Guild review). If on the other hand you have a screw-on neck, angle adjustment is simple, if time consuming.
Screw-on necks are really incorrect on a Les Paul copy, but my copy and many others have them and they are certainly better than a dud action. You will see from the picture, that I removed the neck screws and placed a thin cardboard shim (over the two nearest the bridge) between neck and body. This lowers the action drastically, if too much, use thick paper shims.
To raise the action, shim the other two screws. Now the action you want should fall within the range of adjustment of the bridge.
I was lucky — no buzzes. The next adjustment is on the nut. The idea is that you hold each string down, between frets two and three and then lower the slots in the nut until the string just clears fret one. If you cut too deep the string will buzz when played 'open', if not deep enough, the action feels higher in the first fret and second or third strings may not play in tune.
If the slot is too wide the string may rattle in it; if too narrow, or if wedge shaped or irregular, the string may stick and/or break at the nut, may creak while tuning, and will at some time in the future start buzzing as above. There is no correct tool for cutting nuts, a carpenters saw is certainly not suitable. Some people like a junior hacksaw, with a new blade, and I prefer a small 'Gents' type saw used by silversmiths, which seems only to be available from Coopers (off Hatton Garden).
Hold the saw as shown in the photograph to cut the bottom of the slot at a slight angle back from the fingerboard.
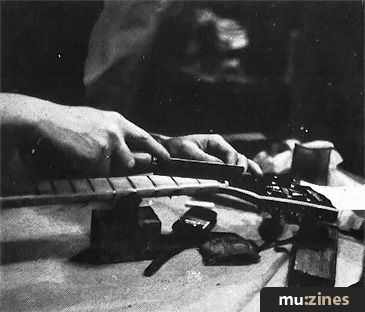
3. Hold saw this way to adjust nut.
Some nuts have a 'Zero' fret very close, on which the strings should rest. If you have one of these you should hold the saw as before and deepen/widen the slots in the NUT ONLY until all strings sit firmly on the adjacent fret. If it still gives trouble, take out nut and fret, deeper the fret slot and remove the bit of fingerboard between them, and fit an ordinary nut, WHERE THE FRET WAS.
Nuts may be made from:— (a) ivory — excellent but very expensive, (b) Whale 'ivory' — nearly as good, (c) Plastic Sheet — not as good and difficult to cut without cracking, (d) Moulded Plastic — cheap to make and buy, but cracks badly when old, (e) Fibreglass Composition — which you couldn't cut even if you could get hold of it.
Generally it is the plastic nuts which need replacing, because they wear faster, and I see no point spending hours on a plastic nut. Go and search for some Ivory (please don't cut up antiques). If you are going to work on guitars, you had better get used to long searches for materials, it is one of the reasons why good repairs are expensive. However I happen to know a supplier of ivory bits and tusks and if he agrees I shall print his address in part two of this article. You may also find that your local music shop can supply rough-cut ivory or whale bone blocks. If you really can't saw straight, you shouldn't be fixing guitars, but you may be able to buy a moulded nut which sort-of fits.
Meanwhile, start practicing on old toothbrush handles or scrap ¼ inch perspex sheet (cream or black looks best). Cut your nut roughly to shape with a large hacksaw with a NEW fine blade, then trim it to fit with the fine side of an Oberg 152 wood file, finishing with a fine file, 400 Wet and Dry paper, and T-Cut or tooth powder.
The easiest way to remove the old nut (and no way is foolproof) is to scribe all round the joint with a Stanley knife (except for fingerboard) and tap it loose from the fingerboard side with a piece of hard wood and a small hammer. If the varnish starts to lift, scribe deeper.
As soon as you have removed the nut, stick back any flakes of varnish with one drop of Cyanolit on the point of a needle. Be careful, this stuff etches varnish and will glue your fingers together in seconds. Have Acetone ready to clean it off skin, but leave drips on the guitar to dry and then polish with T—Cut (from car re-painting shops).
My guitar had a fairly common fault with Japanese copies. Although the fingerboard was the correct width, the ends of the frets were bevelled too much and the playable width of fret was a little narrower than on the original. As a result, the strings had to be closer together at the nut than is comfortable. There was no problem in making a new nut with wider spacing, but then the top string insisted on sliding off the ends of the frets. You may have met this fault too, and it can often be cured by careful 'fret filing'.
FRET FILING
I should like to make it clear that fret filing is only done with a file in special cases, and then with a very special file. Fretwire is fairly soft and if you treat it with anything approaching enthusiasm you will soon have the first fretless Les Paul in captivity. However, another and more common reason for 'filing' frets is because they are not level with each other, and with a low action, something buzzes somewhere.
I have no doubt that the fret file, used with some skill, is needed for getting frets really level, so I will show its use — but this is not a job for amateurs. I shall also show the use of a Carburundum stone on frets, and if you have any doubts, use the coarse side of this, where I show a large file.
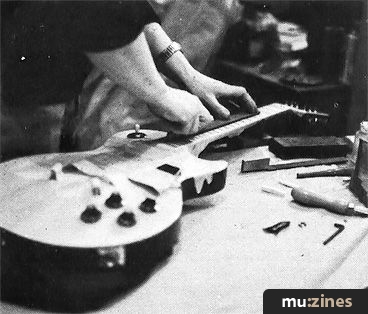
4. Hold flat file this way and watch your fingernails.
For fret filing, you will need certain specialised tools. You must either buy them, borrow them, or stop filing frets.
You will need:—
(1) 400 grade Wet and Dry paper, or preferably 7-0 waterproof Garnet paper (Oakley's).
(2) A 10 inch Mill (for sharpening big circular saws). This should be made by Nicholson or preferably Peter Stubbs, AND MUST BE FLAT on at least one side. Only about one in ten is flat.
(3) A Fret file. This has smooth faces and toothed hollow edges and you can't buy them from tool shops. I can supply a few at £5.20 by post (P.O.'s please — no cheques) (Specify fret width in millimeters.)
(4) A small fine flat needle for cleaning up fret ends.
(5) A small bottle of half and half almond oil and white spirits.
(6) ¾ inch masking tape.
(7) A very sharp knife or scalpel.
(8) A Carburundum stone (not India) No.109.
Now if you can bear with me for just a few minutes more, you must first learn about Truss Rods. Guitar strings exert a tension on the neck which tends to pull it forwards. The truss rod is fitted inside the neck, near the back, and when tightened correctly, can exert a pull in the opposite direction to keep the neck straight. That is, if it has been designed and fitted correctly. If you follow my instructions and the neck does not respond, you should see a repair man, or in the case of a cheap guitar, spend no more time trying to improve it.
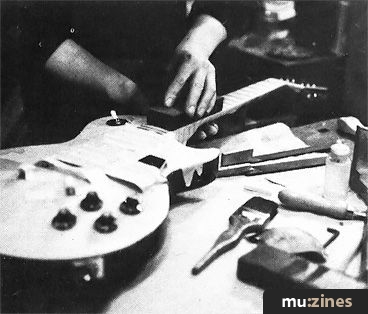
5. Using fine side of stone.
The truss rod is generally attached to an adjustment nut at one end of the neck. To pull the neck back against the tension of the strings turn this nut clockwise; to relax the neck turn it the other way. You must have the correct tool for the job — pliers or small ring spanners WILL NOT DO. Ask your local shop to get one from the importer, or to give you his address. I must admit I don't like giving these to customers because the final effects of adjustment only appear after some weeks and daily fiddling only produces an unstable instrument. You have been warned; getting this just right is a long job — 1/8 turn at a time.
Beware of looking down necks from the adjustment end; truss rods have been known to explode like a cross-bow. When I must do this, I put a heavy ENCLOSED socket spanner over the nut and hold it firmly.
If I haven't yet deterred you from filing frets, take off the strings and adjust the truss rod (if there is one) until the neck is just straight without strings. Lay the guitar body on a clean folded towel and the centre of the neck in a cradle (see photo). Get someone to hold the body. Try to balance the guitar so the neck just lies lightly in the cradle.
Now you need to know which frets are out of line. Cut strips of tape to width and mask the whole fingerboard leaving just the frets showing (see photo of the guitar I am working on). Remove the string nut if possible, otherwise cover it with several layers of tape. Lower all pick-ups and mask them. Tape down any loose fittings (if possible, without altering bridge settings, et cetera).
Rub along the length of each fret with the abrasive paper on a fingertip until they all have LIGHT, even scratch marks. Then smear a little oil mixture on the fine side of the stone and holding it as shown, rub it lightly and evenly along the length of the neck, moving it over between strokes to allow for the curve of the fingerboard. In the case of my guitar, I wanted to reduce the amount of bevel at the first fret ends, and took care not to tip the stone over at the edges of the fingerboard. This is generally a good idea; you can always increase the bevel later if you wish. You will need to clean and re-oil the stone frequently.
Clean off the oil and examine the frets. If any are low, the stone will not have removed the scratches you made before. This is the way the whole process works — each stoning or filing is at right-angles to the previous one and if you shine light from the right direction, you will see any previous work as bright flares (see photo which is of a different guitar but shows the same principle).
If any one fret is obviously too high, it may have sprung loose. The recommended cure is to tap it down with a smooth hammer which I found generally does not work. If it springs up again move the tap to one side, put one drop of Cyanolit under each side of the loose part and tape it down for 1 hour. If there are many loose frets stop wasting time, and have the neck refretted. If none of the frets are much below the others, you may be able to get the higher ones levelled down, using the fine side of the stone as before.
If not, you should use the file (or coarse side) in a similar manner. In either case, check by using the FINE side ALONG the frets; it should polish all of them evenly in 2 or 3 strokes.
Don't ever press down hard on the file or stone, it bends the neck slightly and you will cut down the frets unevenly.
6. Using fret file.
Finish off by fine — side stoning along the fingerboard until all previous scratches are removed and then fine stoning along the frets, again until the previous scratches are removed.
Now your frets are level, but they have nasty sharp edges. The cheap way to deal with this is to rub the frets along the length of the neck with the abrasive paper held as shown, and then use the fine stone along each fret to remove scratches.
Incidentally whichever way you are rubbing, the length of the file or stone should always run the same way as the strings; if you turn it round it is almost guaranteed to make the frets un-level. This cheap way will give you smooth, square topped frets but if you want more rounded frets, you must learn to use a Fret file. I suggest you practice on an old wreck first, as the files are hand made and often unpredictable.
For rounder frets ignore the last paragraphs and carefully file along the length of each fret with the special file, until the previous stoning marks remain on only the middle quarter of the width of each fret. You will need to use the needle file to remove sharp edges from the ends of the frets, but don't overdo it or you will have the top string slipping off the ends again.
Now go back to the abrasive paper and the final rub along each fret with the fine stone. Remove the tape carefully so that it doesn't pull varnish from the guitar, and you should have a fine fret job.
Replace nut and strings, check action and recheck nut adjustment, as the frets are now a little lower.
When the frets are satisfactory (or if you want to leave them as they are) you can move on to adjusting the bridge for correct intonation.
It is most important for this that you use fresh strings, of the type you intend to use, and also the action setting you intend to use. Also, the guitar must be tuned to whatever pitch you intend to keep it at, and it must be re-tuned to this after every adjustment. Having got that all settled, all you do is play the harmonic over the 12th fret and compare it with the note when fretted at the 12th fret. If the fretted note is higher, move the string support (or bridge if one piece) AWAY from the 12th fret, re-tune and then check. Repeat if necessary. If the fretted note is lower, move towards the 12th fret.
If you have not done so already move the pick-ups back to their normal height. Your guitar should now be rather better in some respects than most originals.
So far I have only dealt with mechanical problems, but often little things go wrong with the electronics, and while it helps if you can solder well, for some things even this is not necessary.
Series - "Improving a Copy Guitar"
Read the next part in this series:

Improving a Copy Guitar (Part 2)
(IM Jun 75)
All parts in this series:
Part 1 (Viewing) | Part 2
More with this topic
 Amp Airs - Amp Facts |
 Trigger Converter for the Yamaha SPX-90 |
 Electro-Music Engineer - Tuning Up — A Review of VCO Calibration Methods (Part 1) |
 Sourcing The Bottle - Valves |
 I Think We've Got A Lead, Holmes! - Get Connected: Reliability (Part 1) |
 Care & Repair - Tape Machine Line-Up |
 Balancing Acts - Cable Wiring Tips (Part 1) |
 Short Circuit - Time Machine Revisited |
 Nails And Their Nature |
 XLR Connectors Sounded Out |
 Doctor Mains - Breakdowns... |
 Workbench - Remote Control System |
Browse by Topic:
Maintenance / Repair / Modification
Publisher: International Musician & Recording World - Cover Publications Ltd, Northern & Shell Ltd.
The current copyright owner/s of this content may differ from the originally published copyright notice.
More details on copyright ownership...

International Musician - May 1975
Donated & scanned by: Mike Gorman
Topic:
Maintenance / Repair / Modification
Series:
Improving a Copy Guitar
Part 1 (Viewing) | Part 2
Feature by Stephen Delft
Help Support The Things You Love
mu:zines is the result of thousands of hours of effort, and will require many thousands more going forward to reach our goals of getting all this content online.
If you value this resource, you can support this project - it really helps!
Donations for July 2026
Issues donated this month: 0
New issues that have been donated or scanned for us this month.
Funds donated this month: £0.00
All donations and support are gratefully appreciated - thank you.
Magazines Needed - Can You Help?
Do you have any of these magazine issues?
If so, and you can donate, lend or scan them to help complete our archive, please get in touch via the Contribute page - thanks!