

Magazine Archive
Home -> Magazines -> Issues -> Articles in this issue -> View
Doctor Jurgenbüster's Casebook | |
Article from Sound On Sound, December 1988 | |
Martin Russ dishes up another concoction of MIDI hints and tips.

MARTIN RUSS dishes up another concoction of MIDI hints and tips.
DRUM MACHINE NOISE
Most drum machines these days are velocity sensitive, usually via MIDI. Using a sequencer to drive them has become popular, especially using the same master keyboard as is used for the rest of the instrumentation. The method is simple: you map out the drum sounds on the keyboard and use step time record (or even real time with practice!) to enter the patterns into the sequencer. The drum machine can then be left to one side and used purely as an expander - Akai have taken this to its logical conclusion and produced a drum sound generator (the XE8) whose sounds are triggered via MIDI. But there may be a hidden problem in this keyboard-controlled approach: quantisation noise.
I discovered this when I listened to just the drum part of a sequencer-driven piece of music - there seemed to be a nasty digital buzzing as each drum sound decayed away. Since this is the usual way that quantisation noise manifests itself, I investigated further.
It appears that some drum machines implement velocity in the obvious way: they just shift bits (binary digits) downwards, losing them in the process. Assuming that you start with a 12-bit drum sample, this means that you have a scale ranging from full volume using 12 bits, down to the quietest sound with 1 bit, and the limiting case of silence with no bits at all. Now 1 bit is just a square digital waveform, and it sounds nasty - very much like a fuzz box. Definitely not the high quality you might be expecting from a 12-bit drum machine!
The next stage is not so obvious. When you use a master keyboard to enter drum patterns into a sequencer, you just hit the appropriate keys, don't you? Actually, the answer is no! When you play keyboards normally, your velocity will be somewhere in the middle range, between 50 and 80 (on a scale of 0-127). 64 is the defined middle point for MIDI velocity, but in terms of our drum machine a velocity of 64 is going to produce an output which only uses 6 bits - and the resulting sound is going to be poor.
It transpires that you need to play notes very hard, so that you are somewhere in the 100 range of MIDI velocity values, if you want to use the full 12 bits of the drum machine effectively. Another way around this is to alter the velocity values by editing the drum pattern once you have entered it into the sequencer. You could also press a MIDI processor unit like the Yamaha MEP4 into action, so that it increases all your velocities to a suitable range.
The chart below should give you some ideas about the probable effect of velocity on the number of bits and the resulting signal-to-noise ratio.
| Velocity | No. of Bits | S/N Ratio | Comparison |
|---|---|---|---|
| 127 | 12 | 72dB | Good cassette deck |
| 116 | 11 | 66dB | |
| 105 | 10 | 60dB | Cheap cassette deck |
| 95 | 9 | 54dB | |
| 84 | 8 | 48dB | Telephone call |
| 73 | 7 | 42dB | |
| 62 | 6 | 36dB | Answering machine |
| 51 | 5 | 30dB | |
| 40 | 4 | 24dB | Two cans and string |
| 30 | 3 | 18dB | |
| 20 | 2 | 12dB | Bad radio reception |
| 10 | 1 | 6dB | |
| 00 | 0 | 0dB | Mostly silence |
The next time you programme your drum machine, try listening to what is actually happening - not all drum machines vary volume in this way!
ATARI MIDI SWITCH
I have spent quite some time designing complex combinations of switches and buffers to make the MIDI sockets on the Atari ST computer more usable. After a great deal of research and patient trials I have finally narrowed the choices down to a single unit, which turns out to be cheap and simple but very useful.
All you do is buy a decent quality 5-pin DIN hi-fi lead and chop the DIN plug off one end. Now build yourself a box with three DIN sockets and two switches and connect as shown in Figure 1.
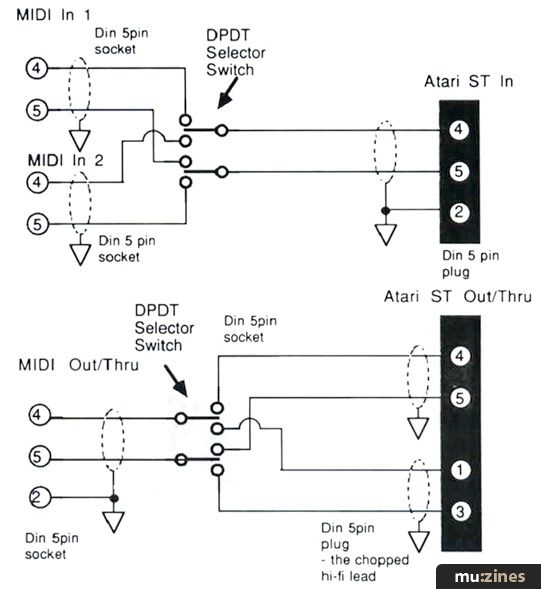
As you can see, we now have a switched input which lets you choose two MIDI sources as the input to the Atari. This can be very useful when you are using a master keyboard as well as other keyboards for controlling sequencers, or even when assembling System Exclusive dumps from several instruments.
The other socket is now an Out/Thru, selected by a switch. The rationale behind this is simple: you use a master keyboard to input MIDI data to the In of the ST, and the Out of the sequencer is used to drive the rest of your network of instruments via a Thru box. No problem, until you quit from the sequencer - and then you need to use the Thru socket instead! With a switched arrangement, you do not need to have the sequencer running all the time in order to use the other MIDI equipment in your network.
CHEETAH MS6 QUICK PERFORMANCES
The Cheetah MS6 analogue synth has a comprehensive Performance mode in bank 8 of its memory. Unfortunately, it can be difficult to keep track of exactly which Performance is stored in each of the 64 available memory slots. Here's a quick way to determine most of what is happening with only a single keypress.
Set the Edit button so that it shows parameter 13 - this is the number of voices assigned to Instrument 1. You can now flick back and forth between looking at parameter 13 and choosing Performance memories by pressing the Edit button repeatedly. Parameter 13 is useful because a lot of information can be inferred from it. For example:
• If it reads '6', then all the available voices are assigned to Instrument 1 - the normal Play mode with 6-voice polyphony.
• If it reads '3', then you probably have two Instruments, both with 3-voice polyphony. Usually these will be stacked to create a detune sound, and a further trick here would be to reassign one Instrument to 4 voices, with the other set to 2 voices - you still get the detuning, but now you have 4-note polyphony! Alternatively, you could have two Instruments playing two separate sounds, but a quick play on the keyboard should tell you if this is so.
• If parameter 13 is set to '1', then you have two choices: either a stacked mono sound (very wasteful of memory locations) or several Instruments assigned to separate sounds in a multitimbral mode. Again, a quick press of a note should show what is happening.
CHORUS FROM REVERB
This is a very old trick, but hearing it used very effectively on the new Yamaha YS200 and YS100 synths made me think about passing it on, since it is well worth the effort.
Some low-cost reverbs and digital delay units do not have a low frequency oscillator to sweep the delay times - the Yamaha R100 is a current example. This means that you really are restricted to reverbs and echoes - chorus and other cyclic effects are not possible. Or are they?
Try adding a little slow vibrato to a synthesized string sound and then feed the signal through a reverb unit. Because reverb is a combination of time delay and multiple repeats of the input signal, you should find that you generate the same sort of beating effects as those you normally associate with chorusing. You may need to experiment to get the best results - often reverb programs with lots of pre-delay can give good results.
More with this topic
 Orchestrating with MIDI (Part 1) |
 Real Time MIDI |
 Virtual or Reality |
 |
Protocol (Part 1) |
 Technically Speaking (Part 1) |
 The MIDI 1.0 Specification |
 MIDI Matters - Song Position Pointers (Part 1) |
 Good Enough For The Pro? - Thoughts on MIDI's Next Decade |
 Signal Processors... Meet MIDI |
 Interface the Music |
Introduction |
Browse by Topic:
MIDI
Publisher: Sound On Sound - SOS Publications Ltd.
The contents of this magazine are re-published here with the kind permission of SOS Publications Ltd.
The current copyright owner/s of this content may differ from the originally published copyright notice.
More details on copyright ownership...

Sound On Sound - Dec 1988
Donated & scanned by: Mike Gorman
Feature by Martin Russ
Help Support The Things You Love
mu:zines is the result of thousands of hours of effort, and will require many thousands more going forward to reach our goals of getting all this content online.
If you value this resource, you can support this project - it really helps!
Donations for June 2026
Issues donated this month: 0
New issues that have been donated or scanned for us this month.
Funds donated this month: £0.00
All donations and support are gratefully appreciated - thank you.
Magazines Needed - Can You Help?
Do you have any of these magazine issues?
If so, and you can donate, lend or scan them to help complete our archive, please get in touch via the Contribute page - thanks!