


Magazine Archive
Home -> Magazines -> Issues -> Articles in this issue -> View
Steinberg Cubase Windows | |
PC Sequencing SoftwareArticle from Sound On Sound, February 1993 | |
Having established itself on the ST, Steinberg's industry-standard Cubase sequencer has recently been making in-roads into the Mac market — and now there's a Windows version to get PC users in on the act. Brian Heywood checks it out.

Just about anyone who has been involved with computer-based sequencing will have come across the name of Steinberg. Indeed, when talking about the Atari ST, Steinberg's Cubase really only has any serious competition from C-Lab's Notator package. The longevity of a product such as Cubase must say something about its quality and usefulness. This is backed up by a band of dedicated users and — in a backhanded sort of way — by the number of pirated copies of the ST version of the program that are floating around.
Cubase was introduced on the Atari in 1988 when it replaced the Pro-24 as Steinberg's top of the range sequencer. Since then it has been converted to run on a number of other computers, including the Apple Mac and latterly on IBM compatible PCs using Windows 3.x. Cubase Windows is actually a cut-down version of the Atari product, lacking some of the additional features such as the score page and the MIDI control surface. As far as I understand it, Cubase Windows is broadly equivalent to version 2 of the Atari offering in terms of the facilities offered, however the facilities that are there are up to the standard of the latest Atari and Apple versions.
Cubase Windows comes on a 3.5" floppy disk and has a comprehensive 380 page manual covering all aspects of the program. The manual has some interesting typographical errors, but in general is well laid out and comprehensive, with a useful reference section at the front. My only criticism of the manual relates to the installation section, which makes the installation process appear to be rather more difficult that it actually is, and so could confuse and dismay someone is new to the PC/Windows environment.
INSTALLATION
Unlike Passport's Pro-4 and Twelve Tone's Cakewalk for Windows, you have to install Cubase from the DOS prompt. This means that you have to create the Program Manager group by hand before you can get the Cubase icons on to the desktop, which could be rather daunting to a first time Windows user. Whilst this is not a major failing, it does indicate to me that Cubase's conversion to the Windows environment is not complete.
Before you run Cubase for the first time, you must run the Setup program which tells the software what MIDI hardware you have installed on your PC. Setup presents you with a list of supported interfaces, along with any hardware configuration details that need to be sorted out. One thing that the manual doesn't make clear is that you only have to use the MROS drivers for the individual interfaces if you are using Windows 3.0. If you are using Windows 3.1 you only need to select the 'Multimedia Windows' options. I'm sure my early problems with Cubase were caused by clashes between the MROS drivers and the Windows drivers. I feel that this whole Setup routine is a needless complication, one which will largely become redundant as most people will upgrade to Windows 3.1.
FIRST IMPRESSIONS
My first impressions of Cubase were not good, mainly because of the number of times it crashed whilst in use. These weren't trivial events either, but the sort that made Windows curl up its toes and die. My main music PC is a Dell 20MHz 386SX with 4MB of memory. Whilst this is not exactly 'state-of-the-art', it should be powerful enough for sequencing applications. However this PC is, it seems, only just powerful enough to run Cubase, and then only in Windows 'standard' mode. Cubase also seems to do something very strange to Windows, since I was usually unable to get any other Windows applications to run whilst Cubase was loaded, despite there being plenty of free memory and resources.
This is a shame as these problems detracted from what is essentially a very good sequencer — when it works!
LAYOUT
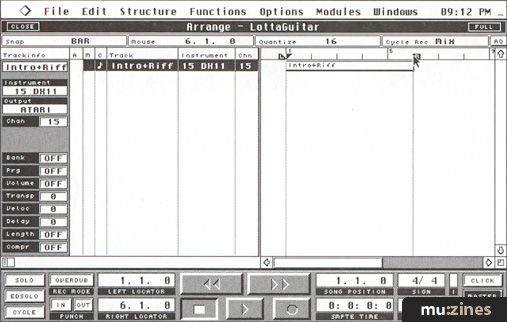
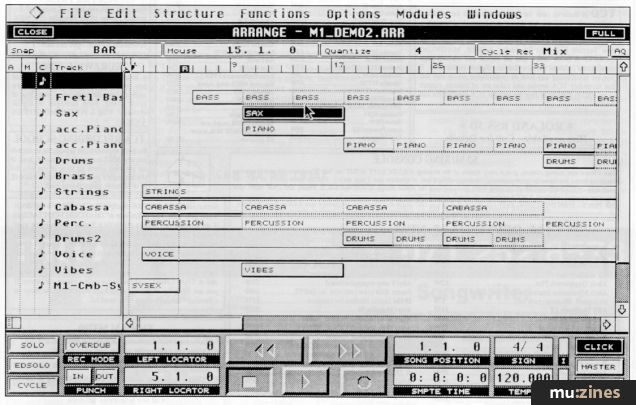
The program follows a fairly standard graphic sequencer model with most of the action being controlled from the Arrange window. This window presents you with what is essentially a track list, each track usually being dedicated to a single MIDI channel/port. The left side of the window shows a vertical list of track and instrument names, along with the default port and channel assignments. Each track also has a number of 'switches' that allow you to mute, lock in time (which I'll explain in a moment), and define the type of data contained in the track. The lock feature means that you can tie the events that make up the track to elapsed time rather than to the bar/beat time, so that even if you change the tempo — they will still occur at the same absolute time. The time-lock feature would be used if you were locking MIDI events to real-time events, say on a video soundtrack.
The right hand side of the arrange window shows a graphic display of the contents of each track, known as 'parts' in Cubase parlance. The dividing line between the two areas can be dragged to hide all or some of the track information. You can also change the order of the columns of text which gives you a lot of control over what information is displayed. The parts appear as horizontal bars with either labels or a graphic representation of the events contained in them. A 'ruler' along the top of the part display shows the current bar position pointer and the left and right locators. One slight annoyance was the limitation on the length of track, instrument and part names to eight or nine letters, which is a bit short for descriptive titles.
You can have up to 16 active arrange windows, which allows you to work on parts of your sequence in isolation and then combine them into one or more 'master' arrangements when you have finished all the bits. Alternatively you could dedicate each arrange window to a single song and then combine them into a set of backing tracks. Since you can save the contents of an individual arrange windows to disk, you have a very flexible tool for managing a repertoire of songs.
The relationship between parts and the tracks is not as fixed as on many other sequencers of this type. The track settings are used when you create or record a new track, but it is possible for a track to contain a part which doesn't reflect the track settings. For instance, it is possible to associate a program change with a part, so that you can have a number of parts on a single track which use different voices.
A part is a chunk of MIDI data that is treated as an entity within Cubase. Usually it will represent some element of the song you are working on, such as a melody, solo or drum part. When you record a performance, the MIDI data ends up as a part. You can manipulate parts from the arrange window by chopping them up or 'sticking' them together, or you can edit their contents using one of Cubase's event editors. The part also has attributes that control its playback, such as MIDI channel, bank and program number, plus various modifiers such as transposition and delay. These attributes travel around with the part when you move or copy it, so that you don't have to worry about setting them up in the new location.
AN INSPECTOR CALLS
Since the parts can have attributes that are not obvious at a glance, Cubase supplies an 'inspector' panel that can display the innermost secrets of an individual part. The panel allows you to set the play-back parameters, such as MIDI channel, program number and so on, for each part. It is important to realise that these settings are 'soft' and don't actually permanently effect the MIDI data in a part unless you use the 'Freeze Play Parameter' menu option. This principle applies to most of Cubase's operations (like quantisation) — unless you specifically 'fix' a command, it will only be applied at playback, which of course means that you can always undo it if you change your mind.
SET THE CONTROLS TO THE HEART OF THE SUN
The overall control of the sequencer can be achieved in a number of ways. The most obvious is the 'Transport Bar' which usually lives somewhere near the bottom of the screen. This has the familiar tape machine transport controls such as play, record, stop, rewind etc., plus a number of buttons and display areas that allow you the status of such things as the tempo, time signature and record modes. This is a 'floating' window, which means that it is always on top of any other windows, so it won't become obscured, although you can switch this window off if you want use the entire screen for editing.

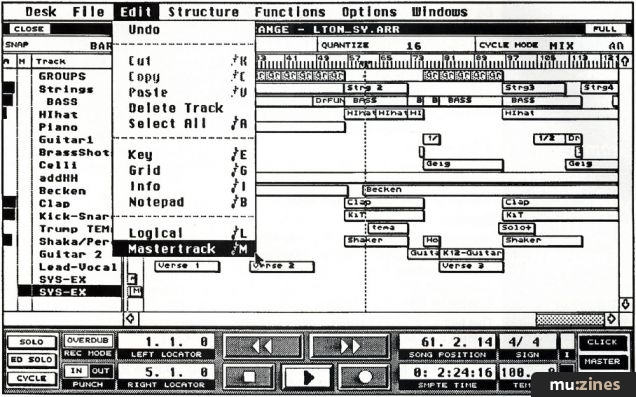
The Logical Editor Window
The sequencer can also be controlled from the numeric keypad on the computer's keyboard, with each key being associated with a transport function — the keypad [Enter] key mimics the play button, the [0] key emulates stop, [*] record, rewind and fast forward are [PgDn] and [PgUp] and so on. Steinberg even provide stickers to go on the key tops to remind you what the various key functions are, thus giving you an extremely fast way of controlling playback. However, you do need to have an 'enhanced' keyboard (ie. with separate numeric and cursor control keypads) to take full advantage of this feature.
The third way of controlling the sequencer is to use your master MIDI keyboard, which could be useful in a live situation or if your synthesizer is remote from your computer. This works by dedicating a key or MIDI controller to each of the transport functions. This stops you from using these keys to record notes into the sequencer unless you designate a master 'remote' key which acts like a shift key, so the other remote control keys are only recognised as Cubase transport keys when this is pressed. So, you might make the top note on your MIDI keyboard the 'remote key' and use the rest of the keys in the top octave to control the operation of the sequencer.
RECORDING
To record a track in Cubase, simply hit the record button. The MIDI data will always end up on the currently selected track, and the part that is created will take on the default attributes of the track and recording will start at the current bar marker. The data will either replace or be added to a part already on the track, depending on whether Cubase is in 'replace' or 'overdub' mode. If the track is empty then a new part will be created.
'Punching' in or out of recording mode is very simple, and is controlled by the left and right hand markers. Two buttons on the transport bar control the activation of each function, and these can be changed without stopping the sequencer. The punch points act as triggers that change the state of the record mode; they don't stop you from going in or out of record or play mode. You can also set the punch points independently, so you could (for instance) just use the punch out to protect a section of the track that you don't want to alter.
Another useful recording facility is the 'cycle' mode. This causes Cubase to loop over the bars between the left and right 'markers' whilst recording. You can use this to build up a part over a number of cycles, which is especially effective for drum parts as you can add one instrument (bass drum, snare etc.) on each cycle. You can discard the notes you recorded in the last cycle, or dump the lot and start again using a single keystroke.
You can record up to four parts simultaneously using the 'Multirecord' option, or you can record multiple MIDI channels in to a single part and then split these into separate parts using the 'Remix' menu option. You can also combine parts into a single multi-channel part using the 'Mix Down' option.
TRACK TYPES
There are actually four types of track in Cubase: MIDI, Drum, Group, and Tape. MIDI and Drum tracks contain the music that you record and play back, while the other two control the internal structure of the song and external devices respectively. The Drum track feature looks extremely useful, as it makes the percussion tracks independent of any particular drum machine, even allowing you to spread the drums across several sound modules — the only limitation is that they must all be connected to the same MIDI port. The Drum track note mapping can be easily changed by loading in a new 'drummap' file, so you could shift the sequence between different MIDI set-ups without having to rejig the drum and/or percussion tracks.
Group tracks are an aid to organising your work, as they allow you to group a number of Parts into a logical unit and then use these to arrange your song, For instance you might create a number of Group Parts containing the verse, chorus and middle eight of a song. You can then arrange these on a Group track to give you the overall structure of a song, allowing you to play around with the arrangement. When this feature is used in conjunction with the multiple arrange windows you have a powerful tool for organising your work.
Another useful feature is the ability to control a multitrack tape machine from Cubase. This feature allows you to record, play and generally control the tape machine from the program. As far as I know only the Fostex R8 is supported and, since I don't have one of these, I couldn't test this feature.

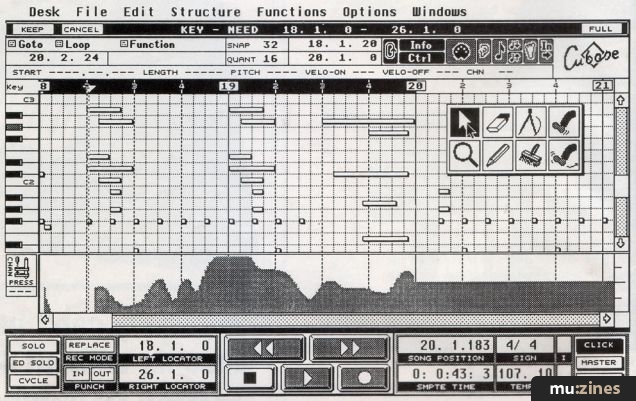
The Key Edit Window
EVENT EDITORS
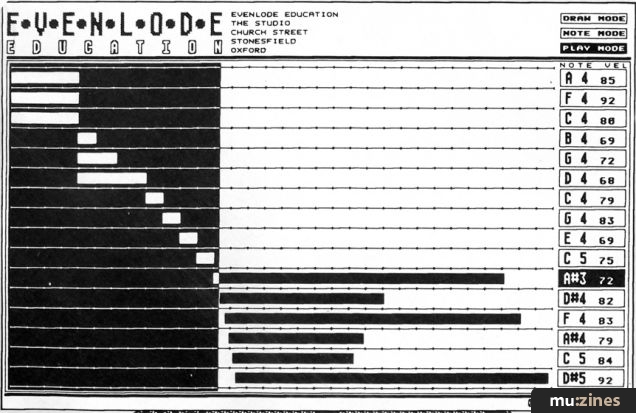
Once you've recorded a part you'll undoubtedly want to edit the MIDI data using the event editors. Cubase has four event editors, three of which give you direct 'point and click' control over the MIDI data, and the fourth allows you to apply a logical criteria that applies to the whole part. Taking the last first, the Logical Edit page lets you edit the part according to some characteristic such as pitch, length or velocity. You could, for instance, use it to remove all notes shorter than a certain length, or move notes from one pitch to a new one.
Where the Logical Edit page lets you change the constituents of a part wholesale, the graphic editors give you fine control over individual MIDI events. The three editors give you different views of the MIDI data, either in piano roll notation (Key Edit), a drum grid (Drum Edit) or as a list of MIDI events (List Edit). The editors are almost identical in terms of their features and controls, with only the display of the MIDI data being different. The piano roll editor in particular is one of the clearest I've seen on any sequencing package, especially if you use the colour option. Normally, simply double clicking on a part will bring up an editor appropriate to the track, but you can use any of the editors by selecting a part and then using the menu options.
The editors have too many features to go into any kind of detail here, but note that they do allow the graphic display of controllers, they let you use MIDI to alter the events, and that there's a step edit mode. One nice feature, that also applies to the Arrange Page, is the ability to 'scrub' the mouse pointer across the notes to hear them via MIDI. I also found that the method of selecting the editing tools using the right mouse button to be extremely fast and effective, despite being unusual in terms of Windows software.
QUANTISATION OPTIONS
Cubase is particularly well endowed with quantisation options, including 'match', 'groove' and 'analytic' quantisation. The first two of these let you superimpose a feel (or groove) onto the part that you are quantising whilst the latter appears to quantise intelligently, leaving triplets and glissandos untouched. The quantisation of a part is not usually fixed, but is applied to the track when you play it back. However, if you want to apply two types of quantisation to a a part, you must 'freeze' one type of quantisation before applying the second. So you might apply a standard type of quantisation to correct a sloppy performance, and then 'groove' quantise the resulting track to inject some 'human feel' back into the part.
Another interesting feature is the 'legato' setting which allows you to define the overlap between adjacent notes in a lead line. If you use a negative value you can ensure that none of the notes overlap, which means that the line can be played on a monophonic instrument without having to worry about the effect of note priority on note timing. This is really quite an obscure feature unless you happen to use an old analogue synthesiser, but Cubase is first sequencer that I've come across that can do this.
AND THE REST...
A review of this length can only scratch the surface of a program of this level of complexity, and I'd probably need to use the software for at least six months to explore all the angles. What I can say, though, is that Cubase is a very intuitive program to use, with none of the awkwardness that you might expect from a piece of software that has been converted from another computer and operating system. And although it has problems, these don't appear to relate to the underlying software; rather they are due to the fact it is running on a different computer platform.
CONCLUSION
Cubase is a bit like an ancient and venerable stately home — it has lots of nooks and crannies containing useful items that have stood the test of time and has a multitude of different ways of getting from A to B. Also, like a lot of stately homes, it needs a bit of work doing to it before it can be made habitable. The reliability of software in the studio environment is paramount, regardless of whether you're in a £100 an hour commercial facility or making music in your back bedroom. The last thing you want to see is your last four hours worth of work evaporate in a puff of electronic smoke with the dreaded Windows 'General Protection Fault'.
By its very nature, this kind of reliability problem will tend to go away as Steinberg supply bug fixes and release new versions of the software. Even as I write this, there is an update winging its way towards me (I will keep you up to date with improvements in my PC Notes column). When the guys at Steinberg get this one right, Cubase Windows is going to be one of the best sequencers on the market. Until then, you may find that you can use it; just don't forget to save your work early and often.
Further information
Cubase for Windows £335 inc VAT.
Harman Audio, (Contact Details).
DIFFERENCES BETWEEN CUBASE WINDOWS AND CUBASE V3 FOR THE ATARI
This is a list of features not included in the PC version (source: Cubase help line).
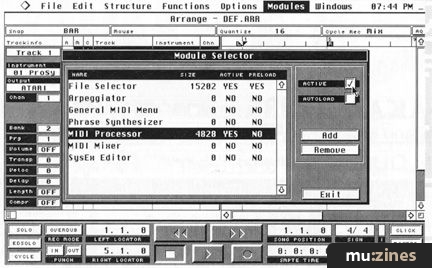
• Module Editor (so you can't add and remove modules to maximise free memory),
• Score Module (no printing or editing of events in stave notation),
• MIDI Processor,
• MIDI Mixer
• Input Transformer,
• Intelligent Phrase Synthesiser (IPS),
• Cross Hairs,
• Human Sync,
• Preferences,
• Format floppy disk.
Also featuring gear in this article

Clash of the Titans
(MIC Oct 89)

Cubase 2.0
(SOS Dec 90)

Cubase In-depth
(MIC Jan 90)

Cubase MIDI Mixer - Programming Clinic (Part 1)
(SOS Oct 92)

Cubase MIDI Mixer - Programming Clinic (Part 2)
(SOS Nov 92)

Dream Sequences (Part 1)
(MX Dec 94)

Dream sequences (Part 2)
(MX Jan 95)

Dream Sequences (Part 3)
(MX Feb 95)

Dream sequences (Part 4)
(MX Mar 95)

Dream sequences (Part 5)
(MX Apr 95)
Dream sequences (Part 6)
(MX May 95)
Dream sequences (Part 7)
(MX Jun 95)

Hands On: Steinberg Cubase
(SOS Jan 92)


Steinberg Cubase - Version 3.0 Software
(MT Sep 92)
Steinberg Cubase 3.0 (Part 1)
(SOS Apr 92)

Steinberg Cubase 3.0 (Part 2)
(SOS May 92)
Browse category: Software: Sequencer/DAW > Steinberg
Featuring related gear

An Old Pro - Steinberg Pro24 Amiga
(SOS Feb 91)


Macintosh or Atari?
(SOS Jan 88)
School's Out
(MIC Aug 89)


Software Tracking - Steinberg Pro24 Software
(EMM Sep 86)

Steinberg Cubase Audio
(SOS Nov 92)

Steinberg Cubase Lite - For the Atari ST
(MT May 93)

Steinberg Cubeat
(SOS Nov 90)
Steinberg Cubeat - Atari Sequencing Software
(MT May 91)

Steinberg Pro 24 - SoftwareCheck
(IM Oct 86)


Steinberg Pro24 Version III
(SOS Aug 88)

Steinberg Software Page
(SOS May 88)

Steinberg Software Page
(SOS Jun 88)


Yamaha Hello! Music! - computer music system
(MT Nov 93)
Browse category: Software: Sequencer/DAW > Steinberg
Publisher: Sound On Sound - SOS Publications Ltd.
The contents of this magazine are re-published here with the kind permission of SOS Publications Ltd.
The current copyright owner/s of this content may differ from the originally published copyright notice.
More details on copyright ownership...

Sound On Sound - Feb 1993
Review by Brian Heywood
Ads for Gear in this article:


Previous article in this issue:
Next article in this issue:
Help Support The Things You Love
mu:zines is the result of thousands of hours of effort, and will require many thousands more going forward to reach our goals of getting all this content online.
If you value this resource, you can support this project - it really helps!
Donations for June 2026
Issues donated this month: 0
New issues that have been donated or scanned for us this month.
Funds donated this month: £0.00
All donations and support are gratefully appreciated - thank you.
Magazines Needed - Can You Help?
Do you have any of these magazine issues?
If so, and you can donate, lend or scan them to help complete our archive, please get in touch via the Contribute page - thanks!