Magazine Archive
Home -> Magazines -> Issues -> Articles in this issue -> View
Hands On: Roland S750 | |
Article from Sound On Sound, September 1992 | |
David Mellor throws away the Roland S750 manual and gets down to some practical advice for novice users.

When sampling technology first became available at an affordable price, about six or seven years ago, all the major instrument manufacturers had a go at producing such a device. But, while building a rack mounting box that enables a musician to play real sounds from a keyboard proved to be a relatively easy task, many of these early machines were troublesome and frustrating to use and, in my opinion, only one manufacturer steered a steady course from their first fully practical model through to the present day. That manufacturer is Akai, and their S900, S950, S1000 and S1100 (the latter three are all still current models) have formed a coherent and progressive range, which has become justly very popular in studios and with musicians, because they all do very well the job they set out to do, and they're easy to use.
There are, however, other samplers around today which can match the abilities of the S1000 and S1100 at competitive prices. I would single out the Emu Emax II, which has already featured in the Hands On series, and the subject of this month's instalment, the Roland S750. Neither of these instruments has achieved the word of mouth reputation of the Akai products and it certainly isn't because they are lacking in any way (although facilities vary between the three, I'd say they all stack up pretty evenly). The only problem Emu and Roland had was that their earlier products didn't quite hit the nail as squarely on the head as Akai's, and their reputation hasn't quite caught up yet. Hopefully, this article will go a little way towards redressing the balance, at least on Roland's side. I have to admit that I am an S1100 owner, but I'll try not to let any personal biases creep into this article. The purpose of the Hands On series is to give you some help on how to use the equipment, so I'm not going to advise you on whether to buy it or not; I'm just giving information on what to do when you find yourself confronted with the beast, whether at a commercial studio, round at a friend's place, or as hired equipment.
My first piece of advice is:, 'don't bother with the manual'. It's chock full of useful information, but you'll spend all day getting started. Just read this...
THE SET UP
The Roland S750 isn't as self-contained as most pieces of studio equipment. You can use it as it stands, but it's better with the accessories — a monitor and a mouse, and enough space to deploy them effectively. I doubt if there are many S750s in serious use without monitor and mouse, so I am going to assume their presence.
Another important 'accessory' is a disk containing the operating system. Unlike Akai's machines — but like Emu's — the Roland S750 is as useful as an ashtray on a motorbike without the system disk. If the S750 you are operating is connected to a hard disk then the system will probably be on that and it will load up automatically. The current system version for the S750 is 2.11, so everything in this article refers to this.
ORGANISATION
I think it's fair to say that the S750 does not organise its multitude of functions particularly well. Actually that's not completely true, because sometimes if an instrument's facilities are badly organised it is difficult to use even if you know if well; the S750 is difficult to get into, but once you get the hang of things you should be speeding around very fluently.

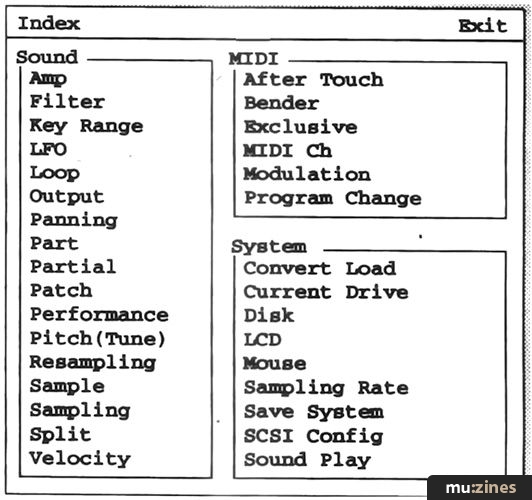
Figure 2. The S750's Index page.
On the bottom rung of the S750's ladder stands the Sample, which is raw audio data newly recorded into the unit. A number of samples, up to four, can be made into a Partial. Partials are allocated to notes on the keyboard in a Patch. Several Patches can be put together to make a Performance. A Performance may also have a number of Parts, a Part being in effect a modification of a single Patch. Your sonic creations in the S750, on any hierarchical level, may be saved onto disk as a Volume. To guide you through the system there is a complex series of menus which, for your first steps I am going to advise you mostly to ignore. The manual will tell you all about these, and you can learn them at your leisure. But fortunately Roland also provide a simpler system of navigation which, as far as I can see, is just as good. Look up at the top of the screen and click the left mouse button on Index. You will see a list of functions, as in Figure 2, and clicking on any topic will take you to the appropriate page. With this list, which is always quickly available, almost anything can be achieved reasonably intuitively. To get out of any menu or screen, click on 'Exit' in its top right corner; but since we want to get started, click on 'Sampling'.
SAMPLING
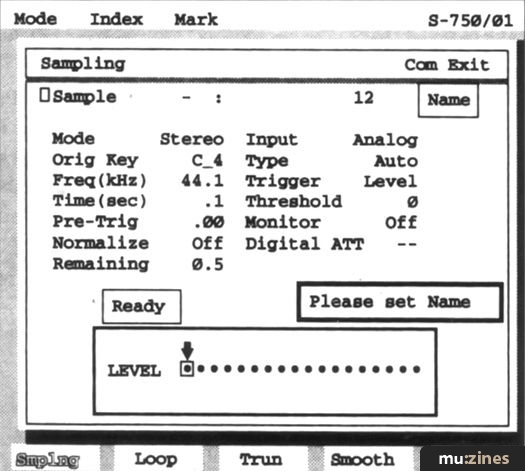
OK, now you have clicked on Sampling and seen the sampling screen, click directly on Index (which is in red on the monitor, showing that it is available without having to click Exit on the current screen). To go directly to the Sampling screen is paradoxically the long route; a short cut is available by clicking on Partial, then on Partial Common in the sub menu. If you have started from scratch then the screen will look like Figure 1, except that all four sample locations will show 'Off'. The reason for taking this route towards sampling is that you're going to get Partials created for you automatically, saving time in a multiple sampling session. Now click on 'Com' in the top right and on 'Sampling' in the sub menu. Now we are back to the sampling page, or actually its 'Sampling from Partial' variant.

Figure 1. The Sampling page.
I'll assume that you have a stereo sound source, let's say a CD player, connected to the front panel inputs and the stereo outputs connected so you can hear what you are doing. Set the parameters as follows:
Mode: stereo
Orig key: C4
Freq (kHz): 44.1 or 48kHz
Time: 4.5 seconds
Pre-trig: 0
Normalize: Off
Input: Analog
Type: Auto
Trigger: level
Threshold: 10
Monitor: On
You enter data (and select Samples, Partials, Patches, etc) by highlighting the field you want to change, either with the mouse or cursor keys, and then turning the Value dial.
Click the Name box to give the sample a title, and a QWERTY keyboard display will appear. When you're done click 'CR' (which I assume stands for Carriage Return — how quaint). Now you can start your source and set the level. Stop the source and click on 'Ready'. On the upcoming screen click 'Start', and restart the source. Everything you expect will happen before your eyes, and when it's done click 'Next' so you can take another sample in exactly the same way. Take another sample just for luck. Now, when you click 'End' you will be transported back to the Edit Partial screen, and lo and behold, you will have three Partials already created for you. You could edit these Partials but, for now, just notice that the Partials, which can hold up to four samples each, have been given the same names as the samples you recorded and let's press on to the next level upwards, which is Patch.
PATCH
Go back to the Index and click on Patch, then Patch Common. There are a number of parameters you could edit on the opening screen but pass them by for the moment and take the mouse down to where it says 'Split' at the bottom of the screen. Click there and you'll see a nice clear keyboard display (rather better than Akai's equivalent, even on the S750's LCD). There are a number of ways to set note ranges for each Partial but I don't want to confuse you. It seems to me that the most logical way to assign keys is by pressing notes on the MIDI keyboard itself. To do this, hold down the right mouse button outside of the blue rectangle enclosing the keyboard graphic and press the notes you want the Partial to appear on. If that isn't easy I don't know what is. If you want to change your mind about any notes, hold down the right mouse button below the keyboard display, position the mouse to highlight the offending note, and click the left button. You can also sweep away a whole expanse of notes in this manner. Once you have split your Partials (ouch!) and named the Patch using the same screen, go back to the Index and select Performance, then Performance Common, then click 'Page 1' at the bottom of the screen. We're almost there.
This is the easy bit. On this screen, and the other three pages you will find a numbered list of Parts (these are the numbers down the left side), each of which you can fill with a Patch. Notice how you can select the MIDI channel for each Patch, so multi-timbral operation from a sequencer should be straightforward. When this operation is complete (and the Performance named) it's back to the Index, click Performance then 'Play Page 1'. Now you are ready to play.
During our little excursion around the S750 you are bound to have noticed that there are a zillion, if not a squillion, other functions that are worthy of exploration. It's unfortunate that because of these the S750 seems complex, but if you stick to the basics — and 90% of users of musical equipment do just that — then you will find that you can quickly transfer samples from your source onto the keyboard and get up and running with them.
ADVANCED FEATURES
TVF/TVA
TVF and TVA stand for Time Variant Amplifier and Time Variant Filter respectively, and both act on the Partials. There is nothing like adding synthesis capabilities to a sampler to bring out the best in the raw sampled material. Although Akai's S1000 and S1100 have roughly equivalent facilities to the S7S0, I have to say that the results, though effective, are not nearly as impressive. Roland's TVF has parameters for Filter Mode (low pass, band pass or high pass); Cutoff Frequency with Key Follow; Resonance; Velocity Curve and Curve Sensitivity; Key Follow Point; Envelope Depth, Velocity Sensitivity and Pitch Depth; Time Velocity Sensitivity and Key Follow, and the TVA is effective too. A really nice touch is that on the graphic envelope display of the TVF, which you can edit with the mouse, the envelope of the TVA is shown too, and vice versa. Since getting the sound you want often depends on the interaction of these two envelopes, this is a real help.RESAMPLING
Resampling is where two mono samples can be digitally mixed into another mono sample. If this doesn't sound too exciting then how about including the tuning and relative delay of the samples along with the TVF and TVA envelopes and sustain/release loops? This is getting more interesting now, and you can combine far more than just two samples — you can resample multiple samples, up to the S750's 24-note limit of polyphony.
DISK OPERATIONS
At any point in the sampling proceedings outlined in the main article you can save your work to disk. To get to the disk operations pages, go to the Index, select 'Disk', then 'Save'. You can save Samples, Partials, Patches or Performances, but I would be inclined to go the whole hog and save complete Volumes, a Volume being the complete contents of the S750's memory. This is particularly sensible on floppy disk because a floppy can only hold one file anyway (a large file may be split across several disks). You have to give the Volume a name in the Performance Common page first, and then back in disk mode select the Volume as the 'Target' to save. If you have the luxury of more than one disk drive, then you can choose which disk you save to by clicking on 'Current Drive'. To start the saving procedure click on the name of the item you want to save. Loading works in a similar way, and just because you have saved a whole Volume to floppy doesn't mean you have to load the whole Volume back in. You can select whichever components you need.
S770
LOOPING
The waveform display on the smoothing page shows the sample and also the sections which are going to be massaged to create a good loop. I found it was best to adjust the Loop Smoothing Length so that I was operating on the largest possible similar features of the two sections of the waveform. This is obviously a case of trial and error, but fortunately almost anything that can be done on the S750 can be undone too, and this is the case with smoothing (are you listening Akai?). After a few trials you will hopefully get the perfect loop.
More with this topic
Total recall - Akai the old |
 Photographing Sound - The Art of Sampling (Part 1) |
 Tuning Your Breakbeats |
 Sampling Through The Ages |
Sample Shop |
A Vocal Chord (Part 1) |
Dumping Grounds (Part 1) |
Making The Most Of Your Mirage (Part 1) |
Retro-Sampling - Sampling Classic Electro Sounds |
Drum Fun |
Digital Mixing Magic - With Sampling Keyboards |
Sampling Confidential: Anything To Declare? (Part 1) |
Browse by Topic:
Sampling
Also featuring gear in this article
Featuring related gear
Roland S770 (Part 1)
(MT Jun 90)
Roland S770 (Part 2)
(MT Jul 90)
Roland S770 Sampler
(SOS Jul 90)
Browse category: Sampler > Roland
Publisher: Sound On Sound - SOS Publications Ltd.
The contents of this magazine are re-published here with the kind permission of SOS Publications Ltd.
The current copyright owner/s of this content may differ from the originally published copyright notice.
More details on copyright ownership...
Feature by David Mellor
Help Support The Things You Love
mu:zines is the result of thousands of hours of effort, and will require many thousands more going forward to reach our goals of getting all this content online.
If you value this resource, you can support this project - it really helps!
Donations for April 2024
Issues donated this month: 0
New issues that have been donated or scanned for us this month.
Funds donated this month: £7.00
All donations and support are gratefully appreciated - thank you.
Magazines Needed - Can You Help?
Do you have any of these magazine issues?
If so, and you can donate, lend or scan them to help complete our archive, please get in touch via the Contribute page - thanks!


