


Magazine Archive
Home -> Magazines -> Issues -> Articles in this issue -> View
How to set up a Home Studio (Part 8) | |
Questions & AnswersArticle from Sound On Sound, July 1989 | |
PART 8: David Mellor expands on some of the points that have arisen so far in the series and looks at some alternative patchbays from Connectronics.
David Mellor expands on some of the points that have arisen so far in the series.
If you have been following this 'How to set up a Home Studio' series right from the beginning, then by now you must have formed some ideas on how to go about actually doing it. As I have said from time to time along the way, it's not my intention to present a complete blueprint for a home studio but more to supply a collection of ideas, all of which are relevant and, when added together, will supply a large proportion of the necessary information.
As I have begun to realise over the years, audio is a very 'bitty' subject. There is no straight-line path from ignorance to complete mastery. Gradually, you pick up more and more information, then suddenly it all gels together and you really do understand what's going on.
At this stage in the series - the penultimate chapter - it's time to reflect on the process of assembling a studio system. To go back and examine the key facts so that knowledge gained will, hopefully, be knowledge retained. Here are some of the questions I have been asked, both during the series and at other times. I hope the answers shed more light on the subject.
Anyone can make a good recording - if they have lots of expensive equipment. Right?
Not necessarily. Professional equipment is designed so that it is as easy as possible to get good results - but at a price. Equipment suitable for home studios often has as many facilities, but the overall performance may be compromised. Yes, you will be more likely to get good recordings with the really expensive gear, but in your home studio you have time to experiment and, with care and a bit of ingenuity, impressive results are possible.
What musical instruments do I need in my home studio?
As far as keyboards go, you need at least one sampler and one synth. The sampler can access a tremendous range of sounds, the synth is capable of subtle variations in the tones it can produce. The two complement each other.
Can I get everything I need from my local music shop?
You can probably get most of the equipment, but bear in mind that music shops often know a lot about instruments, not so much about recording. There are several suppliers who concentrate on recording equipment and the bits and bobs you need to make it all fit together properly.
How many tape tracks do I need?
At least eight. Four-track recording used to be OK, but if you want to produce recordings of master quality nowadays, four tracks are too restricting. Even with eight tracks, you have to plan your recordings carefully. With 16 or more tracks, you have room to be more spontaneous and creative.
I have a lot of MIDI gear. I don't think I would benefit from having a multitrack tape recorder as well.
You would, because as long as you have a tape/MIDI synchroniser you can use any combination of your MIDI equipment on any track of the tape. This vastly increases the range of sounds and effects you can obtain. Tape is also a safer storage medium. Whatever you put on tape today will be there tomorrow. With synth and MIDI data on floppy disk, it's easy to make a mistake and lose something important.
How many channels should the mixer have?
You can probably work it out yourself, but a good rule of thumb to start with is at least one and a half times as many channels as tape tracks. If you are interested in synchronising MIDI equipment to the multitrack, then obviously you will need more.
What type of recorder should I have for mastering?
A reel-to-reel or DAT cassette. The quality of ordinary cassettes, even Chrome or Metal types, is just not good enough for music mastering. A reel-to-reel recorder should be half-track stereo (definitely not quarter-track) and must run at a speed of at least 15 inches per second. It is an advantage if it takes large 10½" NAB spools.
Should I use any special type of tape?
Yes. Use the brand for which your recorder was lined up. If in doubt, ask whoever you bought the machine from, they should know. Ampex 456 is the most common brand. Some other brands (such as Agfa 469 and Scotch 226) are compatible with 456 and you may use them without re-aligning your machine.
Do I need dynamic or capacitor microphones?
The minimum requirement is for a dynamic mic with a good high frequency response, such as a Beyer Dynamic M201. Some types, like the Shure SM58, are good mics, but they lack top-end response making them sound dull on metallic percussion instruments. A capacitor mic like the AKG C451 sounds very clear, but can lack 'body'. Aim to collect a variety of different types of microphone as your studio grows.
What about signal processing?
A good reverb is essential. Also useful are a digital delay, compressor and noise gate. Multieffects units are good value for money, but not as versatile as a number of dedicated effects units.
Do I need big monitoring speakers?
Yes! But you can manage with a small pair as long as you bear in mind that the bass response of a small speaker will be poor. If you add bass to your recordings to compensate, they will sound 'boomy' when played on larger speakers.
Are good cables important?
Yes. Buy your cables from a studio supplier rather than from a hifi shop. The cables in hifi shops are usually either absolute rubbish, or they are so exotic that you will spend a disproportionate amount of your budget on them. With semi-pro gear keep the cable lengths as short as possible.
What causes hum?
Either poor earth connections on equipment or too many earth connections. An unbalanced audio system (ie. typical semi-pro gear) should be earthed at only one point, otherwise the dreaded 'earth loop' will occur and you will get a loud hum.
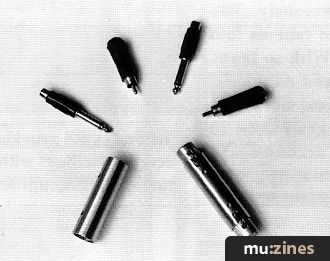
Should I buy ready-made cables or make them up myself?
If you are good at soldering (and anyone can be with practice), it is better and cheaper to make cables yourself. If not, buy them from a studio supplier. Try and avoid using adaptor plugs - eg. phono to jack. They do not usually make very good connections.
Do I need a patchbay?
Definitely. You can get by using point-to-point wiring for so long, but your studio will be more efficient if all your equipment is wired to a central patchbay.
Is it possible to mount equipment in a 19" rack even if it has no rack-mount ears?
Very often it is possible to mount equipment on a blank 19" rack panel, with just a little metalwork. Alternatively, some of the studio suppliers sell rack-mount accessories - shelves, brackets, etc. It's much more tidy to have your equipment in a rack. Bear in mind that if you modify the equipment itself, you will invalidate the guarantee.
I can't afford the latest gear, only secondhand stuff. Does that mean my recordings are going to be rubbish?
Not necessarily, but make sure that you give the equipment a thorough test before you buy. Secondhand tape recorders can be a particular source of trouble. Test every track, and check the amount of head wear. The wider the flat patch on the tape head, the sooner it will be time for an expensive replacement. Tape handling must be smooth. If you are buying a secondhand mixer, test every channel - check knobs and faders for 'scratchiness' (noise). If you are buying a synth, test every note on the keyboard and every knob, control and switch.
I'm going to have my home studio in my bedroom, is that a good place for it?
No! If you think about how much you have paid for all the gear, then it obviously deserves a dedicated home all of its own. Four places that spring to mind are the basement, loft, garage or spare room (not the cupboard under the stairs - although I have seen some outside broadcast vans that had smaller sound control rooms!). If the room you choose is subject to damp, as basements often are, then you will need to takes steps to ensure that the equipment doesn't suffer.
I'm trying to economise on the acoustic treatment. After all, it's the equipment that is most important, right?
Yes, the basic equipment is most important, but after that it is what you hear that will affect the quality of your recordings most, and that is governed by the acoustics of your studio. If you were thinking of buying an extra synth for a few hundred pounds, it might be better to think of spending that money on some basic acoustic treatment.
I want to soundproof my studio. Do I need a lot of foam and curtains?
Soft materials will help reduce the sound levels inside the studio. They will absorb a large proportion of reverberant sound that is mostly unwanted anyway. Apart from that, they won't stop much sound leaking out. If a piece of foam absorbs 75% of the sound that hits it, that is only the same as a 12dB level reduction. Sound insulation, rather than absorption, is governed by the mass of a partition and whether it is well sealed or has any gaps around the edges. If you need to soundproof a room, get a book out of the library on the subject and have a good read first. It's not that easy.
Does modern equipment require a lot of maintenance?
Tape recorders need regular cleaning of the heads, guides and rollers. Other equipment seems remarkably maintenance-free. But if things do go wrong, don't take your precious recording equipment to your local Mr Fixit - he may be reasonably au fait with common or garden TVs and videos, but a dodgy digital effects unit might be outside his experience. If in doubt, contact the manufacturer or distributor. They should have their own service department, or they will be able to recommend someone competent.
That's enough questions for the moment. But are you still asking yourself 'Should I go ahead and do it?'. Well, of course you should! It's a great way to have fun.
But a home studio is not simply a collection of fancy equipment. It is the fashioning of that equipment into a tool for creating music. And it is a tool that will work best when you design it according to your needs. You are bound to come up against problems along the way. Possibly even problems that have not been covered in this series. But your solutions will go towards making your studio unique and totally unlike anyone else's. From that uniqueness, hopefully, you will find your own individual style of recording.
There is one more installment to go of this series: a pictorial A to Z of all the little things that help you, and the professionals, set up and maintain an efficient studio. See you next month.
ALTERNATIVE PATCHBAYS
The GPO-type patchbays (or their miniature equivalent, the bantam jack), as used by pro studios, are efficient and reliable. Unfortunately, they are also expensive and difficult to wire up. But there is a cheaper way, very suitable for the home studio owner.
Type A jack connectors are almost as good as the more expensive Type B GPO-style connector. In fact, practically the only reason why they are less well respected is that there are so many rogue manufacturers making poor quality versions. Well designed Type A jacks can give a very reliable connection.
Connectronics is one of many companies offering a range of patchbay systems based on the Type A jack, which they call their 'SoundWires' systems. They are not only much cheaper than GPO patchbays, they are much easier to install. I asked them to send me some of their units for review - so let's run through them.

SoundWires 44-way (jack) patchbay from Connectronics.
SOUNDWIRES JB44
The SoundWires JB44 is a 44-way patch-bay unit with a variety of options. The system is based on a printed circuit board to which each vertical pair of jacks is mounted. The printed circuit board offers a variety of normalling options. You can configure the board as half-normal, full-normal or unnormalled.
Soldering expertise is not required in any great abundance because to select any of the options all you have to do is to bridge two pads on the printed circuit with a blob of solder. As long as you avoid the dreaded 'dry joint', all will be neat and perfect.
Connection of equipment to the patchbay is easy too, with options. Unlike the normalling options, which are configured by the user, the connection option must be specified at the time of ordering.
Perhaps the most simple way to connect your equipment to the patchbay is via rear-mounted ¼" jacks. This is option JB44MJ. You could possibly avoid soldering altogether! Or you can have phonos - option JB44MP - or no connector at all: option JB44MH. Of course, with no rear connector, you just solder cables straight onto the PCB. All the PCBs are demountable, so you shouldn't have any trouble.
There are also versions for balanced operation - JB44SJ and JB44SH. I would advise getting hold of a brochure to explain all this in more detail, but I am convinced that this is a very good way of setting up a patchbay. I obviously could not test the reliability of the system on a short loan, but they ought to be good for some reasonably strenuous use. Connectronics supply patchcords in various lengths and colours, too.

SoundWires 16-way dedicated insert bay from Connectronics.
SOUNDWIRES JB8000
The JB8000 series by the same company is also interesting. You are probably aware that on many budget mixing consoles the channel insert point is wired so that the send and return are on the tip and ring of a stereo jack plug. This is a horrible system that manufacturers would do well to dispense with. It forces you to make up special cables: one to deal with the normal send and return procedure, another so that you can use the send as a parallel output without disturbing the signal flow through to the channel by breaking the plug's internal switch contacts.
The JB8000 series patchbay deals with this by providing a panel with one stereo jack on the rear, which you connect via a stereo jack cable to your mixer's insert point. On the front there are two separate mono jacks working as a normalled send and return pair, which you can use with standard patchcords. It is a clever solution to a silly problem.
The JB8008 is an 8-way version. The JB8016 is 16-way, with suitable wiring looms available.

SoundWires XB32 blank accessory mounting panel from Connectronics.
SOUNDWIRES XB32
Finally, the XB32 series may be of interest to professional users. A range of panels are available with various connector types mounted - male or female XLRs, phono, DIN, bantam jack. And also video connectors - BNC and UHF - for those studios with the odd video line that they need to patch. Thanks to accessory mounting plates, different combinations of connectors may be mounted on the same panel. Very useful.
All the Connectronics units described above have wiring bars for neat and secure wiring and seem generally well made. I would recommend inspection of these, and of similar products from other manufacturers who advertise in Sound On Sound.
FURTHER INFORMATION
Example SoundWires prices (excluding delivery and VAT):
JB44MJ - £59.00: JB8016 - £58.95; XB16 - £52.99 (8 male and 8 female XLR connectors).
Connectronics, (Contact Details).
Series - "Setting Up A Home Studio"
Read the next part in this series:
How to Set Up a Home Studio (Part 9)
(SOS Aug 89)
All parts in this series:
Part 1 | Part 2 | Part 3 | Part 4 | Part 5 | Part 6 | Part 7 | Part 8 (Viewing) | Part 9
More with this topic
 Home Taping - Steve Waye |
 Studio DIY |
 Home Taping - Kite Studios |
 Home Taping |
 Home Taping |
 Home Taping: Tom Robinson |
 Outboard |
 Hometaping - Patrick Wilson |
 State Of Independence - Dave Stewart On Going It Alone In The Music Biz |
 Getting Your Priorities Right |
 Home Electro-Musician - Gerry Taylor |
 Readers' Systems - From SOS to 8-track |
Browse by Topic:
Home Studio
Publisher: Sound On Sound - SOS Publications Ltd.
The contents of this magazine are re-published here with the kind permission of SOS Publications Ltd.
The current copyright owner/s of this content may differ from the originally published copyright notice.
More details on copyright ownership...

Sound On Sound - Jul 1989
Donated & scanned by: Mike Gorman
Topic:
Home Studio
Series:
Setting Up A Home Studio
Part 1 | Part 2 | Part 3 | Part 4 | Part 5 | Part 6 | Part 7 | Part 8 (Viewing) | Part 9
Feature by David Mellor
Help Support The Things You Love
mu:zines is the result of thousands of hours of effort, and will require many thousands more going forward to reach our goals of getting all this content online.
If you value this resource, you can support this project - it really helps!
Donations for June 2026
Issues donated this month: 0
New issues that have been donated or scanned for us this month.
Funds donated this month: £0.00
All donations and support are gratefully appreciated - thank you.
Magazines Needed - Can You Help?
Do you have any of these magazine issues?
If so, and you can donate, lend or scan them to help complete our archive, please get in touch via the Contribute page - thanks!