


Magazine Archive
Home -> Magazines -> Issues -> Articles in this issue -> View
Steinberg Cubase (Part 1) | |
Atari ST SoftwareArticle from Music Technology, August 1989 | |
They gave us the first industry-standard sequencing software for the Atari ST in Pro24, now Steinberg are making a second bid for Atari domination with Cubase. Nigel Lord says "part two next month...
Snapping mice, scissors and glue, kickers, paint brushes and magnifying glasses, welcome to the wacky world of music technology 1989 - and to the first of a two-part exploration of Steinberg's latest sequencer.

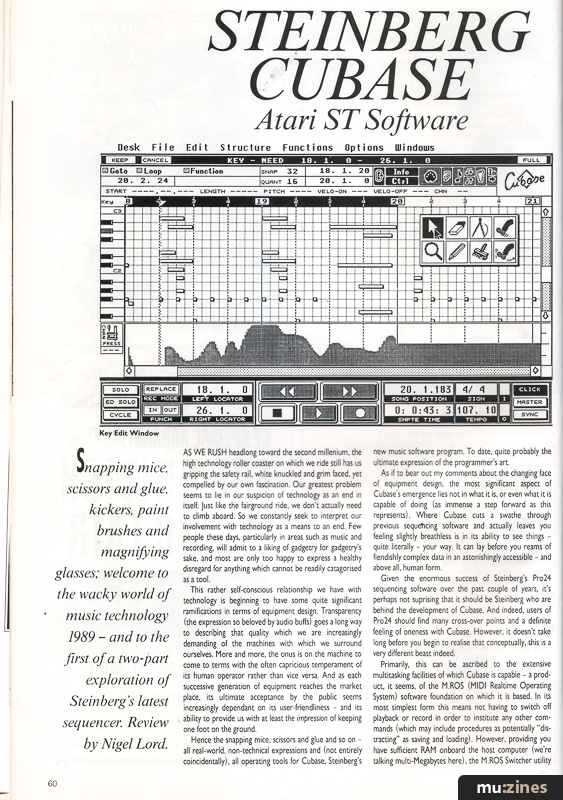
Key Edit Window
AS WE RUSH headlong toward the second millenium, the high technology roller coaster on which we ride still has us gripping the safety rail, white knuckled and grim laced, yet compelled by our own fascination. Our greatest problem seems to lie in our suspicion of technology as an end in itself. Just like the fairground ride, we don't actually need to climb aboard. So we constantly seek to interpret our involvement with technology as a means to an end. Few people these days, particularly in areas such as music and recording, will admit to a liking of gadgetry for gadgetry's sake, and most are only too happy to express a healthy disregard for anything which cannot be readily catagorised as a tool.
This rather self-conscious relationship we have with technology is beginning to have some quite significant ramifications in terms of equipment design. Transparency (the expression so beloved by audio buffs) goes a long way to describing that quality which we are increasingly demanding of the machines with which we surround ourselves. More and more, the onus is on the machine to come to terms with the often capricious temperament of its human operator rather than vice versa. And as each successive generation of equipment reaches the market place, its ultimate acceptance by the public seems increasingly dependant on its user-friendliness - and its ability to provide us with at least the impression of keeping one foot on the ground.
Hence the snapping mice, scissors and glue and so on all real-world, non-technical expressions and (not entirely coincidentally), all operating tools for Cubase, Steinberg's new music software program. To date, quite probably the ultimate expression of the programmer's art.
As if to bear out my comments about the changing face of equipment design, the most significant aspect of Cubase's emergence lies not in what it is, or even what it is capable of doing (as immense a step forward as this represents). Where Cubase cuts a swathe through previous sequencing software and actually leaves you feeling slightly breathless is in its ability to see things quite literally - your way. It can lay before you reams of fiendishly complex data in an astonishingly accessible - and above all, human form.
Given the enormous success of Steinberg's Pro24 sequencing software over the past couple of years, it's perhaps not suprising that it should be Steinberg who are behind the development of Cubase. And indeed, users of Pro24 should find many cross-over points and a definite feeling of oneness with Cubase. However, it doesn't take long before you begin to realise that conceptually, .this is a very different beast indeed.
Primarily, this can be ascribed to the extensive multitasking facilities of which Cubase is capable - a product, it seems, of the M.ROS (MIDI Realtime Operating System) software foundation on which it is based. In its most simplest form this means not having to switch off playback or record in order to institute any other commands (which may include procedures as potentially "distracting" as saving and loading). However, providing you have sufficient RAM onboard the host computer (we're talking multi-Megabytes here), the M.ROS Switcher utility supplied on the main disk allows you to run up to ten programs simultaneously - and this includes synth editors, mixer automation programs et al. Serious multitasking.
Of course, owners of the humble (humble?) 1040 ST aren't exactly left out in the cold by the limitations imposed on them by memory deficiency. Even on its own, Cubase is immense in scope and could never be accused of short-changing anyone - as expensive as it might first appear. Having said that, as an owner of an ST with a medium resolution colour monitor, I cannot help feeling disappointed that Cubase doesn't support it. Of course, the sheer quantity of screen information has necessitated some pretty finely-detailed graphics, and these simply wouldn't be legible in medium-res (a problem which Steinberg have confronted on previous software). But I have to say, shelling out another hundred quid for a monochrome set on top of the price of Cubase itself isn't going to sit too squarely with owners of colour monitors. Perhaps a colour version will materialise in the coming months.
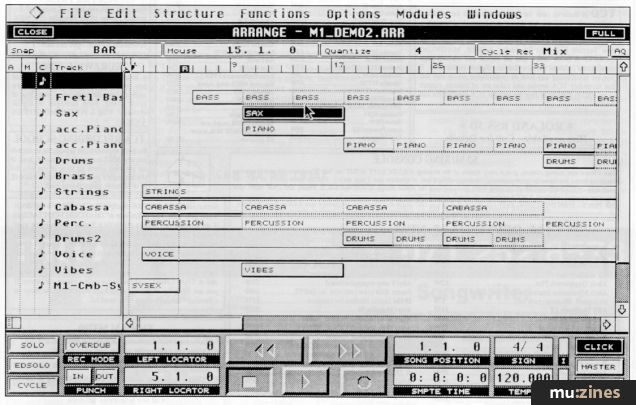
The Arrangement
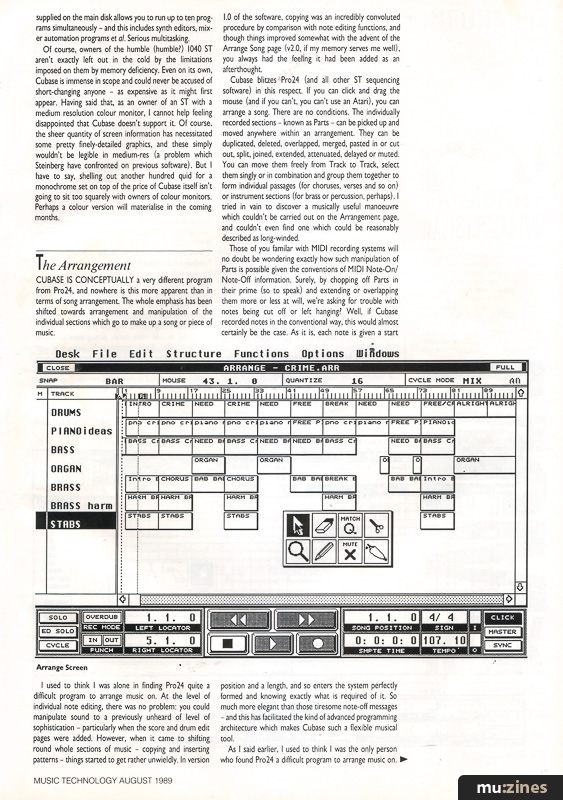
CUBASE IS CONCEPTUALLY a very different program from Pro24, and nowhere is this more apparent than in terms of song arrangement. The whole emphasis has been shifted towards arrangement and manipulation of the individual sections which go to make up a song or piece of music.
I used to think I was alone in finding Pro24 quite a difficult program to arrange music on. At the level of individual note editing, there was no problem: you could manipulate sound to a previously unheard of level of sophistication - particularly when the score and drum edit pages were added. However, when it came to shifting round whole sections of music - copying and inserting patterns - things started to get rather unwieldly. In version 1.0 of the software, copying was an incredibly convoluted procedure by comparison with note editing functions, and though things improved somewhat with the advent of the Arrange Song page (v2.0, if my memory serves me well), you always had the feeling it had been added as an afterthought.
Cubase blitzes Pro24 (and all other ST sequencing software) in this respect. If you can click and drag the mouse (and if you can't, you can't use an Atari), you can arrange a song. There are no conditions. The individually recorded sections - known as Parts - can be picked up and moved anywhere within an arrangement. They can be duplicated, deleted, overlapped, merged, pasted in or cut out, split, joined, extended, attenuated, delayed or muted. You can move them freely from Track to Track, select them singly or in combination and group them together to form individual passages (for choruses, verses and so on) or instrument sections (for brass or percussion, perhaps). I tried in vain to discover a musically useful manoeuvre which couldn't be carried out on the Arrangement page, and couldn't even find one which could be reasonably described as long-winded.
Those of you familiar with MIDI recording systems will no doubt be wondering exactly how such manipulation of Parts is possible given the conventions of MIDI Note-On/Note-Off information. Surely, by chopping off Parts in their prime (so to speak) and extending or overlapping them more or less at will, we're asking for trouble with notes being cut off or left hanging? Well, if Cubase recorded notes in the conventional way, this would almost certainly be the case. As it is, each note is given a start position and a length, and so enters the system perfectly formed and knowing exactly what is required of it. So much more elegant than those tiresome note-off messages - and this has facilitated the kind of advanced programming architecture which makes Cubase such a flexible musical tool.
As I said earlier, I used to think I was the only person who found Pro24 a difficult program to arrange music on. The advent of Cubase convinces me that Steinberg themselves were aware of the limitations and decided a complete rethink was called for. If this was the case, it has worked... beautifully.

Arrange Screen
Little Boxes
LIKE MOST MUSIC software programs these days, Cubase is structured around a series of pages or windows, access to which is gained via the Edit pull-down menu. Unlike most other programs, however, Cubase can support up to seven windows at a time and permit work on several different sections of a song - or even several different songs - simultaneously. Just how much information it would be possible to discern, with windows for seven different songs spread across the screen of an Atari monitor, I'll have to leave to your imagination - but the capability is there.
As we've seen, the main work environment is the Arrange window and within this lie the Part display and the Track list (where up to 64 tracks can be accommodated). Within the Track listing can be found mute buttons for each Track, an instrument title column, the MIDI send channel selector and a MIDI output port selector which can be used to direct MIDI Out information to specific MIDI ports on equipment connected to the Atari. So, with Steinberg's SMP24 for example, you can select exactly which of the four MIDI out sockets sends the data from a particular Track. And with 16 channels of MIDI available for each socket, you have up to 64 MIDI paths down which to send information.
Immediately below the window is the Transport Bar, which is actually common to all the main editing windows, and features - in addition to the Play, Record, Fast Forward, Fast Rewind and Stop controls - the Left/Right Locators used for determining Part lengths when recording (amongst other things), the Cycle on/off button (for use during recording or playback), the Solo buttons (which work in a similar way to those on a conventional mixing desk), the Record Mode buttons (for replacing a previously recorded Part or overdubbing a Part), the Song position and SMPTE position counters, the Tempo and Time Signature indicators, MIDI In/Out data indicators and the selector buttons for the Metronome, Internal/ External Sync and Master Track (about which more later).
Combined with the Fast Forward control is a cueing facility, which like its counterpart on a cassette player, allows you to hear the music whilst in fast forward mode. Curiously, the system necessitates first stopping playback and then selecting Fast Forward - unlike most cassette cueing systems where Fast Forward is pressed during playback. Also somewhat difficult to explain is the absence of a cueing facility linked to the Fast Rewind control; I would have thought this an operation every bit as useful as in the forward direction, but anyway... To make up for this, perhaps, is a rather neat feature which allows you to increase or decrease the cueing speed by moving the mouse to the left or right of the Fast Forward icon - so making it quicker and easier to pinpoint a particular section of a song.
Immediately above the Part display and Track list is the Function Field, wherein may be found the Snap To value box (used for determining the nearest beat or fraction of a beat to which Parts are pulled or "snapped" when released by the mouse), the Mouse position indicator, the Quantise value selector box, and the Cycle recording selector box. This later function is used to select either Mix, Punch or Normal recording modes. Mix, as you might imagine, allows you to add more notes during each successive recording cycle; Punch automatically drops you into Record mode the moment you play anything during a cycle (and continues until the end of that cycle); Normal record mode (when selected during cycled recording), preserves the notes from a previous cycle unless you start to play on the current cycle, in which case the earlier cycle is erased.
The Parts used in arrangements form the basic building bricks within Cubase. Each one has a start and an end point, and in addition to note information, also carries any MIDI messages entered during (or after) recording as well as a whole series of playback parameters which may be called up for editing by double clicking the mouse over the relevant Part box. These include Transpose, Velocity, Delay, Note Length, Compression (of Velocity), Program Change and Volume. In addition, there are extensive MIDI data filter options, and a Drum Map selector switch which directs Part information to the Drum Map in the Drum Edit Window (more on this later too).
Of course, the most important thing about the playback parameters is that they are individually set for each Part, and given the flexibility of Part arrangement outlined earlier, you should get some indication of just how much power this puts in your hands.
The Tracks, which comprise the list down the left-hand side of the Arrange window, are also pretty manoeuverable and can be re-arranged simply by dragging them to a new position in the list (a process which results in the Parts associated with them also being shifted to the new position). Once defined, the Track columns containing the Track titles, instrument names, MIDI channel numbers etc, can be overlaid by extending the Part display to the left, thus giving you a greater area to work in.
The grouping facility mentioned earlier is achieved, simply enough, by clicking the mouse in a blank area near the Part display, and drawing out a square (DTP style) which covers the Parts you wish to include. These then turn from white to black to indicate they are 'active", and can be arranged within a special Group Track created from the Structure menu.
Songs, the largest entities within Cubase's architecture comprise a set of Arrange Windows (along with any Groups that may have been defined), a Drum Map and a Set-up. The Drum Map we'll be looking at in the context of the Drum Edit window later on. The Set-up, on the other hand, is a file containing a whole series of parameters - such as the instrument list, tempo, MIDI processor settings and so on - which are applicable to a particular Song and which are saved/loaded along with it.
Some Songs may be composed entirely within the Part display (there's certainly enough room here to create all but the most complex arrangement), and this gives you the option of using Cubase's conventional Song structure to install several different Songs or perhaps several different arrangements of the same Song.
Recording
RECORDING MAKES EXTENSIVE use of the Left and Right Locators which determine the start and end points of a recorded section. Convenient Locator pairs - such as bars 1-4, 4-8, 8-16 - may be memorised and stored under the Atari's Function keys (F1-F10) and used to instantly reset the Locator positions prior to recording or playback. A further aid to recording is the provision of a Preroll facility which, when laying down additional tracks to a piece of music allows you to roll through a number of bars of an existing Track before recording starts.
The precise number of bars is linked to a conventional Precount facility which counts you in using the metronome. I say conventional, but like most things on Cubase, there is an interesting feature lurking behind it which can potentially make life much easier. In this case, it's the ability to record notes during the Precount, making it much easier to catch those which occur on the upbeat of a bar. And as most musicians will know, a considerable number of musical phrases actually begin on the last beat of the preceding bar - a fact that can make life with a sequencer extremely difficult. Not so with Cubase. This is not a facility which can be used before position 1.1.0 in the Song, but given the ease with which you can insert another Part with the relevent note(s) into the beginning of an arrangement, even this does not pose a problem.
You can punch in and out of recording either manually or automatically on Cubase - the Left/Right Locators, once again, being instrumental in this function. There is also the choice of replacing the existing recording or overdubbing where each successive recording is added to the existing ones. Thanks, once again, to the system by which notes are given start point and predetermined length (as opposed to simple note on/off information), there is no danger of notes sounding at the punch-in point being cut off. So clean, glitch-free recordings present no problem at all.
Needless to say, Cubase records all relevant MIDI information (with the exception of System Common and System Real Time messages), but equally important is its ability to filter out certain types of MIDI data. In the playback mode this is achieved by calling up the Play Parameter box as detailed earlier; in record mode however, this is achieved using the MIDI definition box. within the Options Menu.
The Old & The New
IN THE TIME-HONOURED way of ST software, most of Cubase's functions are selected using the six pull-down menus (seven if you include the Desk). The first of these, the File menu, comprises all the loading and saving operations, the disk formatting and file deletion functions and the Close window, New window and program Quit commands. Loading is instigated using the Open command and reveals a dialogue box giving you the option of Song or Arrange files, Drum Map, MIDI or Set-Up files - or Pro24 files.
This last facility is likely to be the one which Pro24 users have been waiting with bated breath to see included (sorry to prolong the agony). Yes, Cubase does support Pro24 song files, but there are a few conditions. Songs stored in Sequence mode on Pro24 are transferred to a Group Track on Cubase, and all Tracks played in Sequence mode are muted. In addition, the following parameters cannot be transferred: Fixed Velocity and Quantise values set in the Track Info box, Quantise values set in Score Edit, MIDI Mode/Note Off settings, Multi Out SMP24 assignments, MIDI Definition settings, Cue Points for SMP24/ TlmeLock, the preprogrammed Mute settings, Drum Maps 2 & 3 and the Text Input. Also, Cubase will not play in sync with Pro24 songs recorded using TimeLock or SMP24. There may be a chance of salvaging the Track using Cubase's Human Sync function (which we'll get around to), but it looks like being a tricky business.

Grid Edit Window
For conventional files, however, there should be no trouble (I certainly experienced very few problems). What changes do occur during transfer can soon be put right on Cubase - and of course you can then get cracking on a complete rearrangement of the song and wonder how you ever put up with the more laborious aspects of Pro24's programming system. Incidentally, the MIDI file loading option applies only to Standard MIDI files created on Atari ST sequencer software. In other words, you can transfer files from another ST sequencer program, but not from those written on another computer (or, I presume, a dedicated sequencer). Great idea this MIDI "standard", isn't it?
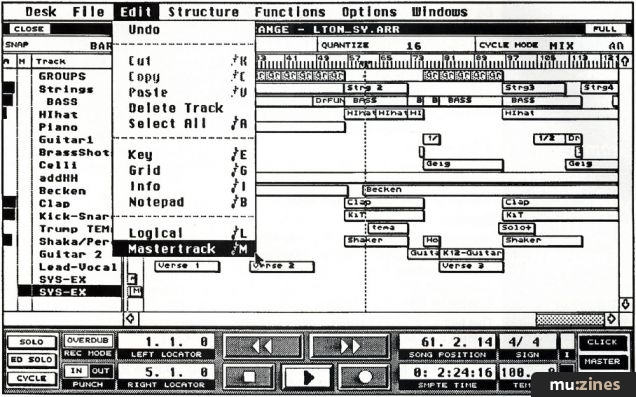
Next along is the Edit menu, and in many ways this is perhaps the most important as it is from here the other four editing windows are accessed, Key, Score, Grid and Drum, as well as the Logical Edit function. Like the manual, however, I will refrain from describing these here as they clearly warrant individual attention, and indeed, will be given such later on.
One of the most important aspects of good sequencer design lies not only in how easy it is to do things within a recording or an arrangement, but how easy it is to undo them, and as you might imagine, Cubase is well equipped in this respect. Not only is it nearly always possible to delete your last action, but the Undo facility in the Edit menu actually tells you what it is that will be undone if you take this option. In addition, the program lets you undo an Undo and therefore effectively allows you to toggle between the two actions. And in any of the Edit windows you have the option of undoing everything you've done since entering the window by simply clicking on the Cancel box in the Window Title bar.
The Master Track concept is another feature inherited from Pro24 and takes the form of an extra track (the 65th) which is programmed with timing information. The idea is that the song or arrangement runs parallel with the Master Track and uses it as a guide track for tempo and time signature changes. In its simplest form, this can be used to speed up a song slightly as it nears its end (in much the same way as live musicians would), but it can also be extended to include changes in time signature for more complex arrangements.
The Cut command allows you to take Notes, Parts or MIDI events from a window and put them in an imaginary clipboard within the memory. It's a way of storing something you don't want to lose, but don't need at a particular time. The Copy command has a similar function, but puts copies into the clipboard rather than the Notes or the Parts themselves. Conversely, Paste is used to take an item from the clipboard and put it back into the Arrange or one of the Edit windows -the only proviso being that it must be returned to the same kind of window it was cut or copied from.
Deleting will, in all probability, be most often performed using the Delete key on the computer, but if you prefer to do it by mouse, you can use the Delete command included here. You also have the option of accessing the Play Parameters (for a selected part) from the Edit menu using the Info command - whilst Select All simply allows you to activate all the Parts or Events in a particular window.
Finally, the Note Pad utility gives you a facility for inputting text to accompany a specific Arrangement, and this is saved along with the rest of the data when a file is dumped to disk. So there should be no more headscratching when going back to an arrangement after 12 months, wondering just which reverb preset you used and how you got the cat to make that peculiar whining noise on one of the percussion samples.
Structural Survey
IN THE STRUCTURE menu, as its name suggests, you'll find the commands principally used in assembling a song. Create Track and Create Part are used to establish new Tracks or Parts. Global Cut and Insert removes or inserts sections of music or blank space across all Tracks, and Copy Range copies a section of music from all selected Tracks to another position in the Song. Remix Track allows you to split up into new Parts (each with its own MIDI channel) pieces of music with events recorded across several different MIDI channels. So, for example, a Track recorded on another sequencer and comprised of notes spread across a number of MIDI channels, can, by recording it into Cubase, be "sorted" into its component parts.
Mixdown allows you to merge all the Parts on selected Tracks into one composite Part, whereas Repeat copies a selected Part and repeats it a specified number of times after the original. The Grouping facility mentioned earlier also has its commands in the Structure menu, and from here you can set up Groups, insert and delete parts in them, create the special Group Track in which the Groups are arranged, and disassemble a Group back into its component parts.
Quantise Fits All
IT IS, PERHAPS, an indication of the level of sophistication of most sequencing software (and hardware) these days that what was originally included as a means of correcting timing errors when inputting music, has become a creative process in its own right. I refer to quantisation, and as if to reflect its state of the art status, Cubase goes to town in this department. Most of the commands connected with quantising notes (for it is only notes that are quantised) are contained within the Functions menu. The actual quantise value is selected from a pop-up menu accessed from the Function Field immediately above the Arrange window.
In addition to Automatic Quantise, which allows you to quantise notes as they are recorded, there are no less than five different manual quantising methods available on Cubase, each with its own characteristics. Note On Quantise provides the sort of auto correct function most people are familiar with - it moves notes to the nearest beat (or division thereof) whilst preserving their original length. Over Quantise is perhaps the most useful musically: though moving notes to the nearest quantised position, it has the ability to detect notes being played consistently ahead or behind the beat and takes this into consideration in deference to your playing style.
Iterative Quantise allows you to move notes toward the quantise position, repeatedly, by a defined amount, until you achieve the kind of feel you require. And it has the option of excluding certain notes, so you have precise control over the whole process. Match Quantise enables you to match the feel of one part with that of another. So you could take a specific drum groove, for instance, and match a bass line to it in order to tighten up a rhythm section. Clearly, the possibilities opened up by this kind of timing manipulation go well beyond the strict corrective function of quantisation as it was originally conceived.
Groove Quantise takes us even further down this road. In simple terms, it allows you to take a Part and impose a feel upon it - either selected from a menu under Edit Quantise, or from a Groove Map created yourself. It's a complex arrangement to describe, and clearly rather subjective in nature, but it's certainly the type of feature which extends Cubase's role from that of a straightforward MIDI tape recorder to a creative instrument in its own right.
Before going any further, it's worth pointing out that as far as Cubase and quantisation are concerned, nothing is irreversible; everything that is done can be undone unless you select the Freeze Quantise command. It's that simple.
Two other quantise-related functions which are probably worth mentioning are Length Size, where the length of all notes is adjusted to the nearest quantise value, and Fixed Length, where all notes are adjusted to the same length, and this is determined by the Quantise value.
Details
AS A MEASURE of the innovation contained within Cubase, you need look no further than the Options Menu; here you get a real impression of the sort of care and understanding Steinberg have invested in the program. For example, if a song begins with a Program Change command to a synth and is followed by a second command for a different voice later in the song, what happens if you start playback somewhere between the two? On any other sequencer, the answer is simple: having had no command to re-select the first program, the sequencer would start playing back the first part of the song with the voice from the second part. On Cubase, however, you select Chase Events, and the program looks back to see what commands had been recorded before the point at which you start, and automatically sets the synth to the correct program.
And how about a metronome which allows you to individually set the pitch of the downbeat and that of the other beats? With Cubase, the problem of metronome "bleeps" being masked out by the music you play becomes a thing of the past.
Throughout the Options menu (and the program generally), this is the kind of utility that crops up time and again and makes life much easier for the harried musician or studio dweller. And the more time you put into learning to use Cubase, the less time you need spend trying to coax the best results from your equipment - and your imagination. But I digress...

MIDI Effect Processor
Follow Song initiates the automatic scrolling facility in the Arrange and Edit windows. Reset On Stop automatically zeroes MIDI Pitchbend, Modulation and Channel Pressure values so that nothing is left hanging; it also sends out All Notes Off and Reset All Controllers messages where these might be needed. A secondary Tempo Recording function (in addition to the Master Track facility) is provided in the Options menu, and so too is a neat little utility which allows you to choose what type of information appears in the Part boxes within the Arrange window. You can display simply the Part name, or visually reveal the density of information which occurs in each Part - this being represented by parallel vertical lines similar to Hybrid Arts' MIDITrack approach. The greater the density, the closer the spacing between the lines.
The Multi Recording facility which first made an appearance on v3.0 of Pro24 has been included in Cubase in an expanded, and more accessible form. Basically, it allows you to record on up to four tracks at once; so, if you play two separate keyboards simultaneously (or have a multitimbral synth transmitting on two or more channels), or if you are recording a band with two or more musicians playing together, this is going to make life a lot easier. Studios should benefit from it; a lot of musicians experience the utmost difficulty playing alone what the, have previously only played together. And the chances of getting a good take are improved enormously if all the musicians can be recorded at every run through.
MIDI, Sync & Processing
THE MIDI DEFINITION command is used to access the main MIDI data control functions, and these appear in the form of a menu with Record, Thru, Control and Channel filter boxes, a Controller number remapping area, MIDI Thru and Running Status selection boxes (the latter being a special function for compression of MIDI data), and a Thru Off Channel box which I'm quite happy to let the instruction manual explain to you.
Synchronisation facilities are comprehensive to say the least. The Sync dialogue box contains all the options, and these fall into two main catagories - SMPTE based and Tempo based. SMPTE sync includes the internal M.ROS time code, SMP24 time code, Steinberg TimeLock time code, MIDI time code and Tape Controller time code. Tempo sync, on the other hand, includes the internal tempo (as determined by the value set on the Transport Bar or on the Master Track), MIDI clock tempo (with Start/Stop, Continue and Song Pointer messages) and Human Sync.
MT readers are likely to be familiar with the concept of human synchronisation; units such as the Kahler Human Clock have been around for some time now. However, it's probably worth checking up on the price of such a unit if the cost of Cubase still seems prohibitive. And then consider this is but one feature in Cubase's arsenal.
For those not familiar with the concept, let's say it's a system whereby a sequencer synchronises itself to the timing of a musician -so reversing the convention of you having to stay in time with the machine. It can also be used to synchronise with old recordings that are not striped with time code (or indeed any piece of music), by generating MIDI information in some way (tapping a key on a synth for example). The options open to the Cubase user in this respect are quite extensive, and with the system correctly set up - and a little practice - the results are extremely impressive.
Finally we come to the MIDI Processor, further proof, if it were needed, that Cubase is no simple MIDI recording system. It takes the concept of MIDI echo into the realms of full signal processing, giving you the ability to produce echo, chorus and pitch-shifting effects - all from the manipulation of MIDI data. Yes, I was a little astonished too. Sadly, the limitations of time prevented me from getting to grips with facilities on offer here in anything but the most casual way. However, the results I did manage to produce messing around with echo loops were quite compelling, particularly on rhythm tracks.
It has to be said that there's an inherent difference in the sound quality to the audio signal processors we're all used to - but it's a fascinating concept for all that, and could easily mean an external processor is freed for other duties. That £500 asking price keeps looking smaller and smaller...
And so to the last of the pull-down menus - the Windows menu. A simple little utility, it allows you to size and align all the open Arrange and Edit windows as well as listing automatically all open Arrange windows and those closed using the Keep option. Right, that's it. Can I move onto the Edit windows now? Perhaps next month...
Price £500 including VAT
(Contact Details)
Series - "Steinberg Cubase"
Read the next part in this series:

Steinberg Cubase (Part 2)
(MT Sep 89)
All parts in this series:
Part 1 (Viewing) | Part 2
Also featuring gear in this article

Clash of the Titans
(MIC Oct 89)

Cubase 2.0
(SOS Dec 90)

Cubase In-depth
(MIC Jan 90)

Cubase MIDI Mixer - Programming Clinic (Part 1)
(SOS Oct 92)

Cubase MIDI Mixer - Programming Clinic (Part 2)
(SOS Nov 92)

Dream Sequences (Part 1)
(MX Dec 94)

Dream sequences (Part 2)
(MX Jan 95)

Dream Sequences (Part 3)
(MX Feb 95)

Dream sequences (Part 4)
(MX Mar 95)

Dream sequences (Part 5)
(MX Apr 95)
Dream sequences (Part 6)
(MX May 95)
Dream sequences (Part 7)
(MX Jun 95)

Hands On: Steinberg Cubase
(SOS Jan 92)


Steinberg Cubase - Version 3.0 Software
(MT Sep 92)
Steinberg Cubase 3.0 (Part 1)
(SOS Apr 92)

Steinberg Cubase 3.0 (Part 2)
(SOS May 92)


Browse category: Software: Sequencer/DAW > Steinberg
Featuring related gear

An Old Pro - Steinberg Pro24 Amiga
(SOS Feb 91)


Macintosh or Atari?
(SOS Jan 88)
School's Out
(MIC Aug 89)


Software Tracking - Steinberg Pro24 Software
(EMM Sep 86)

Steinberg Cubase Audio
(SOS Nov 92)

Steinberg Cubase Lite - For the Atari ST
(MT May 93)

Steinberg Cubeat
(SOS Nov 90)
Steinberg Cubeat - Atari Sequencing Software
(MT May 91)

Steinberg Pro 24 - SoftwareCheck
(IM Oct 86)


Steinberg Pro24 Version III
(SOS Aug 88)

Steinberg Software Page
(SOS May 88)

Steinberg Software Page
(SOS Jun 88)


Yamaha Hello! Music! - computer music system
(MT Nov 93)
Browse category: Software: Sequencer/DAW > Steinberg
Publisher: Music Technology - Music Maker Publications (UK), Future Publishing.
The current copyright owner/s of this content may differ from the originally published copyright notice.
More details on copyright ownership...

Music Technology - Aug 1989
Series:
Steinberg Cubase
Part 1 (Viewing) | Part 2
Gear in this article:
Software: Sequencer/DAW > Steinberg > Cubase
Gear Tags:
Review by Nigel Lord
Ads for Gear in this article:


Help Support The Things You Love
mu:zines is the result of thousands of hours of effort, and will require many thousands more going forward to reach our goals of getting all this content online.
If you value this resource, you can support this project - it really helps!
Donations for June 2026
Issues donated this month: 0
New issues that have been donated or scanned for us this month.
Funds donated this month: £0.00
All donations and support are gratefully appreciated - thank you.
Magazines Needed - Can You Help?
Do you have any of these magazine issues?
If so, and you can donate, lend or scan them to help complete our archive, please get in touch via the Contribute page - thanks!